Setting the plate stage vertical positions
About this topic
The Microplate Labeler accommodates a wide range of microplates, including deep-well microplates, full-skirt PCR microplates, and tube racks. For details on supported labware, see Labware considerations.
The Microplate Labeler plate stage enables labeling at two vertical positions: top and bottom. You can adjust automatically to the top or bottom position to accommodate labware with special requirements, such as tall microplate skirts. The top and bottom positions are set at the factory for the most commonly used microplate sizes. This topic explains how to change the top and bottom positions if necessary.
When to change the vertical plate stage position
To accommodate different microplates sizes and skirt heights, you can adjust the top and bottom plate stage positions. Different types of microplates can have different skirt heights. A label positioned at the optimal height on one microplate will be either too high or too low on a microplate that has a significantly different skirt height.
Figure Examples of label positions of different sizes of labware
 |
For shallow microplates, you might set the plate stage in the top position. For microplates with tall skirts, you might have to drop the plate stage to the bottom position. If you are using both types of microplates, you can use a different position for each.
You set the plate stage top and bottom positions mechanically. In the software, you specify whether the top or bottom position is used to label a specific microplate. Before labeling a microplate, the plate stage moves to the vertical position specified by the labware definition (VWorks software) or the schema (ActiveX).
Plate spacer
The Microplate Labeler is shipped with a plate spacer installed. If you are using a microplate that cannot be labeled properly through adjustment of the plate stage height, you can remove the plate spacer. When the plate spacer is removed, labels can be placed 0.635-cm (0.25-in) higher on the microplate, but the adjustment also affects how close to the bottom of the microplate a label can be placed. For more information, contact Agilent Automation Solutions Technical Support.
Plate stage positions for microplates of the same height
If all of the microplates that use have the same skirt height, you can set the top and bottom positions to the same height. This enables you to determine if one of the stage height positions has drifted. If any vertical movement occurs in the plate stage when you use the drop stage command in Microplate Labeler Diagnostics, drift has occurred.
Before you start
• Locate a 2.5-mm hex wrench.
Procedures
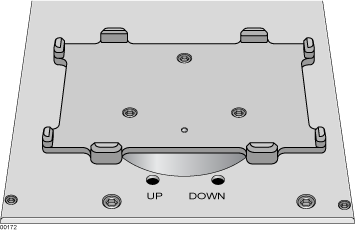
The top and bottom heights of the plate stage are determined by mechanical stops that you position by turning the following set screws located near the plate stage:
• UP sets the top position.
• DOWN sets the bottom position.
Figure Plate stage adjustment set screws (UP and DOWN)
 |
The procedures for setting the top and bottom positions are given separately.
Setting the top position
To set the top position of the plate stage:
1 Place the microplate that you want to use at the top position on the plate stage.
2 In Microplate Labeler Diagnostics, click the Stage Setup tab.
3 Under Teachpoints, locate Apply angle (east side), and click Move here to move the plate stage to the apply angle teachpoint.
4 Click the I/O Functions tab, and click Raise stage, if necessary, to move the plate stage to the top position.
5 To check the top position:
a In the I/O Functions tab, click Rotate to stage, and then click Extend head to extend the applicator head.
b Examine the alignment between the application head vacuum pads and the side of the microplate.
Your goal is to position the vacuum pads at the desired height of the label on the microplate.
c Click Retract head, and then click Rotate to printer to move the applicator head out of the path of the plate stage.
If the height appears to be correct, go to step 8 to home the stage and run a print-and-apply test. If the position requires adjustment, go to step 6.
6 Select the Disable stage auto-repositioning check box, and then manually rotate the plate stage to gain access to the UP and DOWN set screws.
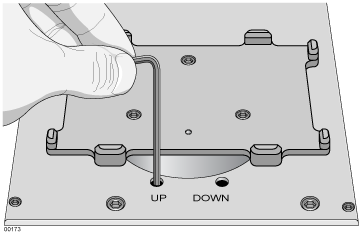
7 Insert the 2.5-mm hex wrench into the UP set screw. Turn counterclockwise to raise the plate stage, or turn clockwise to lower the plate stage.
Raise or lower the plate stage based on how much you want the label to move from where it has been placed.
 |
8 In the Stage Setup tab, click Home stage.
9 To check the position:
a In Microplate Labeler Diagnostics, click the Testing tab.
b Select Print and apply, and then click Run test.
10 Examine the vertical alignment of the label on the microplate.
If necessary, repeat step 5 to step 8 until the adjustment is correct. After adjusting the top position, use the following procedure to check the bottom position.
Setting the bottom position
To set the bottom position of the plate stage:
1 Place the microplate that you want to use at the lower position on the plate stage.
2 In the Stage Setup tab, locate Apply angle (east side), and click Move here to move the plate stage to the apply angle teachpoint.
3 Click the I/O Functions tab, and click Drop stage, if necessary, to move the plate stage to the bottom position.
4 To check the bottom height position:
a Click Rotate to stage, and then click Extend head to extend the applicator head.
b Examine the alignment between the application head vacuum pads and the side of the microplate.
Your goal is to position the vacuum pads at the desired height of the label.
c Click Retract head, and then click Rotate to printer to move the applicator head out of the path of the plate stage.
If the position appears to be correct, go to step 7 to run a print-and-apply test. If the position requires adjustment, proceed to step 5.
5 Ensure the Disable stage auto-repositioning check box is selected. Manually rotate the plate stage to gain access to the UP and DOWN set screws.
6 Insert the 2.5-mm hex wrench into the DOWN set screw. Turn clockwise to raise the plate stage, and turn counter-clockwise to lower the plate stage.
7 In the Stage Setup tab, click Home stage.
8 To check the position:
a In Microplate Labeler Diagnostics, click the Testing tab.
b Select Print and apply, and then click Run test.
9 Examine the vertical alignment of the label on the microplate.
10 Ensure that the Disable stage auto-repositioning check box is clear (not selected).
About automatically adjusting the stage height during a run
The procedure for setting the plate stage height parameter varies depending on which software you use to control the Microplate Labeler:
Automation control software | See… |
|---|---|
VWorks software. In the labware definition of a microplate that uses the plate stage bottom position, select the option to lower the plate at the Microplate Labeler. This parameter is in the Labware Editor—Plate Properties tab. | VWorks Automation Control Setup Guide |
ActiveX. When setting up a print schema, set the dropStage parameter to TRUE (bottom position) or FALSE (top position). | Microplate Labeler ActiveX User Guide |
Related topics
For information about... | See... |
|---|---|
Starting Microplate Labeler Diagnostics | |
Setup workflow | |
Moving the plate stage | |
How to resolve problems |