Changing the field size and other attributes
About this topic
When designing a label format, you can change the size of the fields to make the label more readable or to fit more information on the label. This topic describes how to alter the size of a printed text or barcode field.
Before you start
If you have not already done so, already:
• Load the label format that you want to modify. See Loading a label format in the Label Editor.
• Make sure you understand how the fields are positioned on the label. See Positioning the fields on the label.
• Consider the label size when planning the format: 0.0635 by 5.08 cm (0.25 by 2.0 in).
Changing the size attributes of a text field
To change the size attributes of a text field:
1 In the Label Field Data table, click the entry in the Attributes column for the field that you want to edit. The row is highlighted.
2 Click the attribute entry once more. The Edit Values dialog box opens.
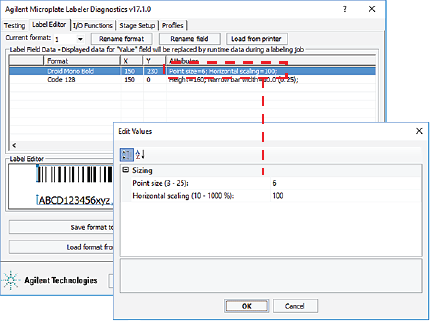 |
3 In the Edit Values dialog box, type the values for the relevant parameters in the Sizing area, and then click OK.
The available parameters change depending on the format selection.
Font type | Parameter and description |
|---|---|
Bitmap fonts: 12x12, 16x16, 16x32, OCR‑A, OCR‑B | • Horizontal magnification. Specifies the x-axis magnification of the text block. • Vertical magnification. Specifies the y-axis magnification of the text block. Range: 1–10 The magnification factors are multipliers, for example, a value of 2 is twice as big as 1. The different bitmap fonts are different sizes at a magnification of 1. Therefore, the reasonable range of magnification values varies for each of the bitmap fonts. |
Vector fonts: Droid Mono, Droid Mono Bold, Swiss721, Swiss721Bold, Monospaced | • Point size. Specifies the height of the font in 0.01 in (0.0254 mm). For example, a 6-point font will be 0.06-in (0.15 cm) tall. The width is scaled to match. • Horizontal scaling (%). Allows you to make the font narrower or wider without changing the font height. |
Note: The Label Editor preview box does not reflect the size change. To see the effect, print a test label.
4 To check your changes, see Checking the attribute changes.
Changing the attributes of a barcode field
To change the attributes of a barcode field:
1 In the Label Field Data table, click the entry in the Attributes column for the field that you want to edit. The row is highlighted.
2 Click the attribute entry once more. The Edit Values dialog box opens.
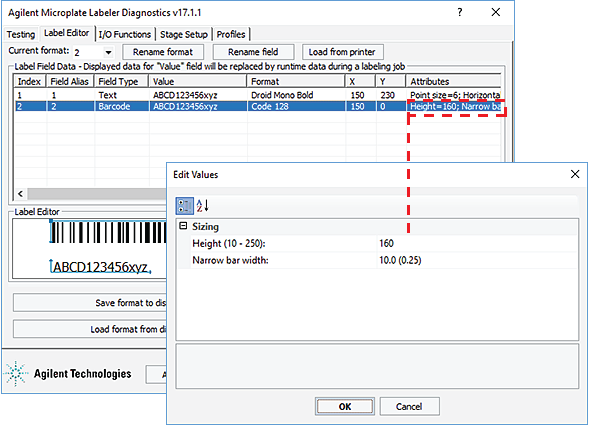 |
3 In the Edit Values dialog box, type or select the values for the relevant parameters, and then click OK.
Parameter | Description |
|---|---|
Sizing | Use the sizing parameters to change the barcode size. |
• Height | Specifies the height of each bar in 0.001 in (0.0254 mm). The overall barcode width is scaled relative to this value. For example, if Height = 150, the barcode is 0.150-in (0.38-cm) tall. |
• Narrow bar width | Defines the width of the narrowest bar in the barcode in 0.001 in (0.0254 mm). The overall barcode width is scaled relative to this value. |
• Bar width ratio | Defines the ratio between the narrow and wide bars in the barcode. For example, a ratio of 3 means that the wide bar is three times the width of the narrow bar. |
• Row height | Defines the height of a single row in a 2D symbology. |
• Symbol aspect ratio | Defines the ratio between the height and width of the barcode. |
• Dot size | Data Matrix only. Defines the size of the dot in the 2D code. The overall height and width of the barcode are scaled to this value. |
• Columns | Micro PDF417 only. Defines how many columns are used (1-4) to display the data. The column number combined with the narrow bar width sets the width of the symbol. The printer adds more rows of data (height to the symbol) as more characters are added. |
Error level | PDF417 only. Defines an error level. |
4 Click Upload format to printer, and then check your changes using the following procedure.
Checking the attribute changes
To check the attribute changes:
1 In the Label Editor tab, click Print test label, or press the green button on the device.
If after increasing the size of the field, the field does not print, check where the field is positioned on the label. The field may now be positioned off the edge of the label.
Saving the changes
You must upload the changed format to the printer before the revised or new label format is available for printing.
To upload the format changes to the printer:
1 In the Label Editor tab, click Upload format to printer.
To save the format changes to an XML file:
1 In the Label Editor tab, click Save format to disk.
2 In the Save As dialog box, specify the file name and the file storage location, and click Save.
Related topics
For information about... | See... |
|---|---|
Designing label formats | |
Performing a test print and apply operation | |
Performing a test barcode read | Documentation for your barcode reader |
Setting the parameters for the label content | VWorks Automation Control User Guide |