Label Editor tab
About this topic
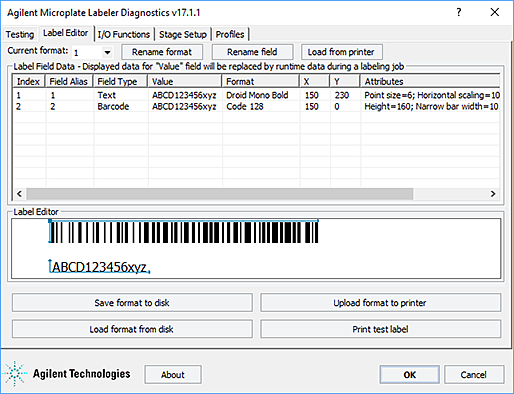
This topic provides a quick reference to the controls and indicators in the Microplate Labeler Diagnostics—Label Editor tab. You use the controls and indicators in the Label Editor tab to design label formats and save them.
The Microplate Labeler includes templates for the label formats that are ready to use or customize. For an overview of the templates, see Templates for barcode formats.
Figure Label Editor tab
 |
Label Editor tab procedures
The Label Editor tab enables you to:
Procedure | See... |
|---|---|
Create or edit label formats | |
Print a test label of a format that has been uploaded to the printer | |
Upload label formats to the printer | |
Save label formats to XML files |
Label Editor contents
The Label Editor tab contains the following:
• Format selection list and format buttons
• Label Field Data table
• Label Editor preview box
Format selection list and format buttons
Controls and indicators | Description |
|---|---|
Current format | Specifies the format that you are loading into memory for editing, or that you are saving to disk or uploading to the printer. Label format templates are included with the Microplate Labeler. You can load the formats from the printer or from the computer. Only label formats that have been uploaded to the printer can be printed or printed and applied. |
Rename format | Opens a dialog box where you can enter a new name for the label format. |
Rename field | Opens a dialog box where you can enter an alias for the selected field (Index 1 to Index 6). |
Load from printer | Temporarily loads a label format selected in the Current format list from the printer into the Label Editor tab for editing or saving to disk. |
Save format to disk | Opens the Save As dialog box where you can save the displayed label format to an XML file. Each label format is saved as a separate XML file. By default, the label formats are in the following folder: C:\VWorks Workspace\Microplate Labeler Label Formats Label formats can be accidentally overwritten in the printer, so you should save backup copies of the label formats in XML files. |
Load format from disk | Displays the Open dialog box, where you can select a label format that was saved as an XML file, and load the label format into the Label Editor tab temporarily for editing or uploading to the printer. By default, label format templates are installed in the following folder: C:\VWorks Workspace\Microplate Labeler Label Formats Note: Only the label formats created for the cab A2+ printer are supported on the Microplate Labeler. |
Upload format to printer | Uploads the displayed label format to the printer. Only the label formats stored in the printer are available for labeling protocols (VWorks software), or print-and-apply tests (Microplate Labeler Diagnostics). |
Print test label | Performs a test print of a format stored in the printer that you have selected in the Current format list. Only the label formats stored in the printer are available for printing. |
Label Field Data table
The Label Field Data table displays the data for the label format that is currently loaded in the Label Editor tab.
 |
Each row in the table represents a field in the currently selected label format. The Label Field Data table columns include the following:
Column | Description |
|---|---|
Index | Indicates the number of the field. Each field defined in the label format is given an index number from 1 through 6. Only field 2 can be a barcode field. All other fields can be human-readable text. |
Field Alias | Specifies a name for the field. The default alias is the index number. To change the alias to something more descriptive, select the field row in the table, click the Rename field button, and then type the new name in the dialog box that appears. |
Field Type | Specifies whether the field is human-readable text or barcode. • Field 1 must be human-readable text. • Field 2 can be a barcode or human-readable text. • Fields 3–6 can be human-readable text. |
Value | Test purposes only. Specifies the contents of the field for a test print using the Print test label button in the Label Editor tab. Click the Value box for the given field, click the box again, and then type the new value: • Text/numeric field. The value is the actual text that will be printed during a test print. • Barcode field. The value is the actual data that is encoded into the barcode for a test print. The barcode text should follow the rules of the specified symbology, for example, limited to numbers only or uppercase letters and numbers. These values are not used for production print jobs. When you run a labeling protocol or a print job, the value of each field comes from the data that you select in the VWorks software. If you do print tests from the Testing tab, the values from the Label Editor tab are not used. |
Format | Specifies the printing format to be used when printing the field. Assigns the text font or barcode symbology, depending on whether the field is a text field or a barcode field. Ensure that the characters you enter for a barcode field are supported by the selected format (symbology). For an overview of the supported barcode symbologies, see Barcodes and supported symbologies. |
X, Y | Specifies the printer coordinates on the label for the position of each field, where • Text field. The X,Y values specify the bottom, left corner of the field. • Barcode field. The X,Y values specify the top, left corner of the field. The Label Editor preview box displays the x, y coordinates as the intersection of a pair of thin blue lines, either at the top left of a barcode field, or the bottom left of a text field. 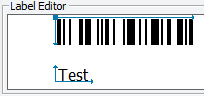 To change the field position, you can type new values in the X and Y columns. The coordinates are measured in 0.001‑in (0.0254‑mm) increments. Given a label size of 0.25 by 2.0 in (0.0635 by 5.08 cm), the range of possible values is as follows: Y: 0 to 250 X: 0 to 2000 Note: Alternatively, you can drag the field to a new position in the Label Editor preview box. However, this is not as precise a method for positioning the field. When the format is uploaded to the printer, the software transfers the x, y coordinates to the printer label coordinates. |
Attributes | Indicates the field size and other attributes. For details on changing the attributes, see Changing the field size and other attributes. |
Label Editor preview box
The Label Editor preview box allows you to add and delete fields, drag fields to reposition them on the label, and view an approximation of how the printed label will appear. The preview is not precise, and you must test print the label to see the actual field positions, and then adjust as necessary. To specify the exact coordinates, you can type the values for the coordinates in the Label Field Data table X and Y columns.
If you load an undefined format, the Label Editor preview box is empty. To add new fields to format, right-click the preview box to display a shortcut menu.
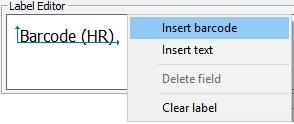 |
The shortcut menu contains the following commands:
Command | Description |
|---|---|
Insert barcode | Available for field 2 only. Inserts a barcode field in the Label Editor preview box and adds a barcode field to the Label Field Data table. A pair of thin blue lines with arrows appear on the top and left sides of the barcode field in the preview box. The intersection of the blue lines represents the printer x, y coordinates for the field position on the label. Only one barcode field is allowed per label format. |
Insert text | Inserts a text (human readable) field in the Label Editor preview box and adds a text field to the Label Field Data table. A pair of thin blue lines with arrows appear on the bottom and left sides of the text field in the preview box. The intersection of the blue lines represents the printer x, y coordinates for the field position on the label. |
Delete field | Deletes the field that is highlighted in the Label Field Data table. |
Clear label | Clears all fields from the Label Editor preview box and the Label Field Data area. |
Related information
For information about... | See... |
|---|---|
Label templates | |
Testing tab |