Creating new protocol tasks using the JavaScript Wrapper
About the JavaScript Wrapper task
The JavaScript (JS) Wrapper task enables you to create new protocol tasks that have custom task icons and task parameters.
The JS Wrapper task uses the following 3 file types:
• JavaScript task file (.js). The file name must be the same as the JavaScript function and must have the .js file extension. For example, a function named myjavascriptfunction would have the file name, myjavascriptfunction.js.
This file should contain two parts:
– The XML command information, which describes the task function, task parameters, and graphical user interface (GUI).
– The JavaScript function which VWorks will execute.
• Icon file (.bmp or .jpg). The task icon image should be 32x32 pixels. The icon file should have the same file name as the JavaScript function. For example, a function named myjavascriptfunction might have the file name, myjavascriptfunction.bmp.
If the icon file is missing or not present in OLSS storage, the software uses a default JavaScript icon file.
Note: The VWorks software already includes some JS Wrapper tasks that use the default JavaScript icon file, such as the JS importCsvTo Inventory task ( ).
).
). • Global script file (jsaddin_global_vars.js). This global script file, which is provided with the software, enables you to declare functions and variables that are accessible to a JS Wrapper task or any protocol that includes a JS Wrapper task.
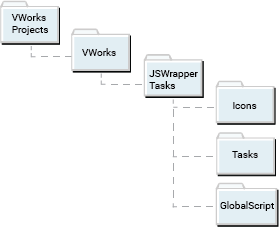
File location requirements
The JavaScript task file and icon file must be placed in specific locations relative to the VWorks Projects folder. The following figure shows the file path for the required files relative to the VWorks Projects folder:
/VWorks Projects/VWorks/JSWrapperTasks/Icons
/VWorks Projects/VWorks/JSWrapperTasks/Tasks
/VWorks Projects/VWorks/JSWrapperTasks/GlobalScript
 |
Ensure that the JavaScript task (.js) file name and the task icon (.bmp or .jpg) are the same as the JavaScript function to be wrapped. For example, for a function named myjavascriptfunction, you would have the following task and icon files:
/VWorks Projects/VWorks/JSWrapperTasks/Tasks/myjavascriptfunction.js
/VWorks Projects/VWorks/JSWrapperTasks/Icons/myjavascriptfunction.bmp
Follow the instructions in Importing and exporting miscellaneous files to import the JavaScript task file and icon file into Shared Services storage.
VWorks Plus. The files for the JS Wrapper tasks are records of interest. The software logs audit trails for the JavaScript files that you import into the Secure Storage Repository and for the global script file.
The VWorks software uses these files to create the JS Wrapper tasks during startup. Therefore, any changes to the XML command block within the JavaScript file must take place before the VWorks software is started.
JavaScript file
The JavaScript file should have the file extension .js. The file must contain two parts:
1 The XML command information, which describes the task function, task parameters, and graphical user interface (GUI).
2 The JavaScript function which will execute.
JavaScript task file example
Example JavaScript task file to set labware barcode |
|---|
///<?xml version='1.0' encoding='ASCII' ?> ///<Velocity11 file='MetaData' md5sum='00000000000000000000000000000000' version='1.0' > /// <Command Compiler='0' Editor='2' Name='JS Set Barcode' Description='JS Set plate barcode' > /// <Parameters > /// <Parameter Name='Side' Description='Side on which barcode is present' Scriptable='0' Type='2' > /// <Ranges > /// <Range Value='NORTH' /> /// <Range Value='SOUTH' /> /// <Range Value='EAST' /> /// <Range Value='WEST' /> /// </Ranges> /// </Parameter> /// <Parameter Name='Barcode' Description='Value of barcode to be set' Scriptable='1' Type='1' /> /// </Parameters> /// </Command> ///</Velocity11> function jsAddin_setBarcode(jsAddin_setBarcode_parameter1, jsAddin_setBarcode_parameter2) { // convert jsAddin_setBarcode_parameter1 text to variable name jsAddin_setBarcode_side = eval(jsAddin_setBarcode_parameter1) // set barcode plate.setBarcode(jsAddin_setBarcode_side, jsAddin_setBarcode_parameter2) } |
The preceding code produces a task shown in the following figure.  |
In this example, the function jsAddin_setBarcode()requires two arguments (jsAddin_setBarcode_parameter1, jsAddin_setBarcode_parameter2).
The XML block in the file describes the task to be created and how arguments are entered. The following example code shows the basic structure.
Example XML block structure |
|---|
///<?xml version='1.0' encoding='ASCII' ?> XML declaration ///<Velocity11> Velocity 11 root element /// <Command> Command element describing the task /// <Parameters > Parameters element describing how arguments are displayed and entered /// <Parameter /> Escaped Parameter element describing how 1st argument is entered in task parameters GUI /// <Parameter /> Escaped Parameter element describing how 2nd argument is entered in task parameters GUI /// </Parameters> Close Parameters element /// </Command> Close Command element ///</Velocity11> Close Velocity11 element |
The XML block uses /// at the start of each line to distinguish it from the JavaScript.
You can find a detailed description of the XML elements in the VWorks Plugin Developers Guide in the section on common elements and attributes. The following table provides a summary.
Table Summary of VWorks common XML elements and attributes
Element | Attribute | Value | Description |
|---|---|---|---|
Velocity11 | File | MetaData | Specifies XML structure (in this case, use MetaData) |
md5sum | 32-digit hex number | 128- bit hash value that can be used to verify the integrity of an XML block. Use 32 zeros until md5sum calculated. | |
version | 1.0 | Currently always 1.0. | |
Command | Name | String | Name of task (as seen in VWorks Available Tasks list). |
Description | String | Description of task (as seen under the task in a protocol). | |
Compiler | Bitmask | Compiler options. 0 indicates no compiler action. | |
Editor | Bitmask | Protocol editor options: 0 = disregard (default) 1 = hide if not available 2 = Main protocol editor 4 = Sub-process editor 8 = Startup/cleanup process editor 16 = All editors | |
Parameters | Contains one or more Parameter elements. | ||
Parameter | Name | String | Name of field (parameter). |
Description | String | Description of field (shown in task parameters when field is selected). | |
Category | String | A name used to group two or more Parameter elements. | |
Hide_if | Logical test | When the value of the conditional expression in the Hide_if attribute is true, the parameter field is hidden or made read-only. Example: Hide_if='Variable(Type)!=Const(Table)' The parameter will be hidden if the variable Type (the name of a parameter in the same category) is not equal to the constant (in this case the word Table). | |
Scriptable | Integer (boolean) | Indicates if the parameter field can accept JavaScript in the editing dialog. 0 = not scriptable | |
Style | Integer | How parameter fields are displayed in the task window. 0 = displayed as read/write (default) 1 = displayed as read only 2 = displayed as read only and hidden when hide disabled tasks selected in VWorks options. | |
Parameter | Type | Integer | Describes the type of field displayed 0 = Provides a Boolean check box. 1 = Allows the user to specify a character string. 2 = Provides a drop- down list box. 3 = Provides a drop- down combo box. 4 = Allows the user to specify a device location. 5 = Allows the user to specify a labware or a fixed location. 6 = Allows the user to specify both a location and the labware to use. 7 = Opens the Well Selection dialog box. 8 = Allows the user to specify an integer. 9 = Allows the user to specify a file path. 10 = Provides a labware drop- down list box. 11 = Provides a liquid- class drop- down list box. 12 = Allows the user to specify a decimal fraction. 13 = Allows the user to specify a file path, where the value can be empty. 14 = Allows the user to enter a password and displays a series of asterisks to hide the password string. 15 = Allows the user to specify an IP address. 16 = Allows the user to select a directory. 17 = Allows the user to enter a time in the format hh:mm:ss. 18 = Refers to an object in the JavaScript scripting context. 19 = Allows the user to enter a date. The format depends on the region and language settings. 20 = Allows the user to enter character strings that can wrap onto multiple lines. 21 = Opens the Pipette Technique Editor. 22 = Opens the Head Mode Selector dialog box. 23 = Describes the tip positions of a tip box. 24 = Opens the Field Composer dialog box. 25 = Displays the available hit pick format files. For example, when the user clicks the down arrow in the Format file field of the Hit pick replicate task, the list that is displayed is of this type. |
Parameter | Type | Integer | 26 = Deprecated. Used to show the available analog input names in the device file where the plugin resides. 27 = Deprecated. Used to show the available digital input names in the device file where the plugin resides. 28 = Deprecated. Used to show the available digital output names in the device file where the plugin resides. 29 = Converts a parameter of this type to, and accesses it as, a JavaScript array object. 30 = Allows the user to specify a duration in the format n Days hh:mm:ss. 31 = Displays a multi- line text box. 32 = Opens the color palette that enables the user to change the colors of various dialog box components. |
Ranges | Contains one or more Range elements. | ||
Range | Value | String | When the Parameter Type attribute is 2 or 3 then each Range element and Value attribute describe a menu item that can be selected. When the Parameter Type attribute is 8 or 12 then two Range elements with Value attributes containing integers describe the maximum and minimum possible values. |
Designing the task parameters GUI
Using different field types
Below are examples of the three most common types of fields for user input.
• Check box. When ParameterType ='0', the check box is displayed. When the check box is selected it has a value of 1, and when not selected it has a value of 0.
For example, the following XML parameter element produces the fields displayed in the following figure.
/// <Parameter Name='Enable' Description='Enable this option' Type='0' Value='1'/>
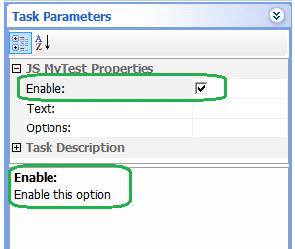 |
Value attribute specifies the default starting condition. In the example, it is checked.
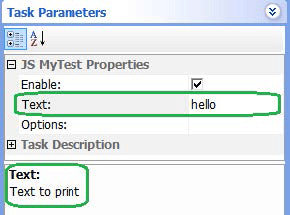
• Edit field. The edit field is displayed for a parameter when Type ='1'. It passes a character string to the functions argument.
For example, the following XML parameter element displays the fields shown in the following figure.
/// <Parameter Name='Text' Description='Text to print' Type='1' />
 |
• Drop list. The drop list field is displayed for a parameter when Type ='2'. It passes a character string of the selected item to the functions argument. The items in the drop list are defined by the Ranges and Range elements.
For example, the following XML parameter element produces the display shown in the following figure.
/// <Parameter Name='Options' Description=Select the option' Type='2' >
/// <Ranges>
/// <Range Value='Option A' />
/// <Range Value='Option B' />
/// <Range Value='Option C' />
/// </Ranges>
/// </Parameter>
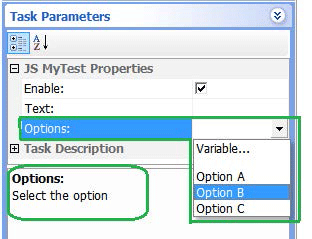 |
This figure shows the options available.
Grouping fields in the task parameter GUI
You can use the Category attribute to group fields in the task parameters GUI under different headings. The Category attribute places the fields in the order the Categories are first defined and the order each parameter is defined. If no Category is defined for a parameter it is placed in a Category with the name of the task.
For example, the following code produces the display shown in the following figure.
/// <Parameter Name='Enable' Description='Enable this option' Type='0' Value='0' Category='First Category' />
/// <Parameter Name='Text' Description='Text to print' Type='1' Category='Second Category' />
/// <Parameter Name='Options' Description='Select the option' Type='2' Category='First Category' >
/// <Ranges>
/// <Range Value='Option A' />
/// <Range Value='Option B' />
/// <Range Value='Option C' />
/// </Ranges>
/// </Parameter>
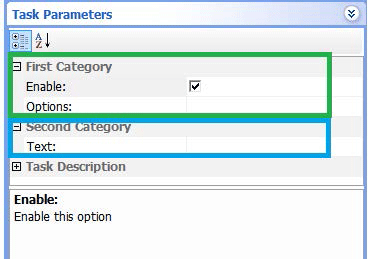 |
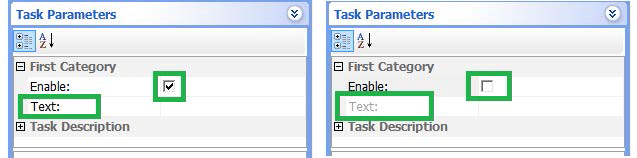
Enabling and disabling GUI fields based on user selections
The Hide_if attribute allows you to enable or disable a field based on the value of another field. The syntax is as follows:
Hide_if='[Item1] [logical test] [Item2]',
where the field is disabled if the outcome of the logical test is true.
In the following example, the field is disabled if the parameter named Input (this is a variable) is not equal (!=) to the character string "Option A " (this is a constant). The logical tests are similar to JavaScript (==,!=,>,<…).
Hide_if='Variable(Input)!=Const(Option A)'
The Hide_if attribute only allows variables to be used from within the same Category. If the Enable check box is not selected the Text field is disabled. See the following example.
/// <Parameter Name='Enable' Description='Enable this option' Type='0' Value='0' Category='First Category' />
/// <Parameter Name='Text' Description='Text to print' Type='1' Category='First Category' Hide_if='Variable(Enable)==Const(0)'/>
 |
Passing JavaScript variables and arrays to and from the function
You can pass data from JavaScript variables/arrays within the protocol to the JavaScript function of a JS Wrapper task. You can also return data from the JS Wrapper task.
Fields are scriptable
By default fields are scriptable. The field accepts either the ' = javascript variable' or displays the option 'Variable’.
/// <Parameter Name='Input' Type='1' />
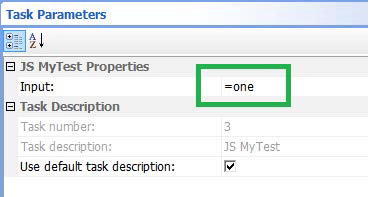 |
In the this example, the contents of the protocol variable one is passed to the JS Wrapper parameter.
Using the global context
Protocol variables are accessible from within the JS Wrapper function, which allows you to act on them directly. To make JS Wrapper tasks generic (where the names of the protocol variables are not known when writing the JS Wrapper task), you can pass the protocol variable or array names to the JS Wrapper in an edit field during protocol writing, as the following example shows.
Example XML block structure | |
|---|---|
///<?xml version='1.0' encoding='ASCII' ?> ///<Velocity11 file='MetaData' md5sum='00000000000000000000000000000000' version='1.0' > /// <Command Compiler='0' Name='JS My Array' Description='JS My Array' Editor='-1' NextTaskToExecute='1' RequiresRefresh='0' TaskRequiresLocation='0' VisibleAvailability='1' > /// <Parameters> /// <Parameter Name='Input' Description='Name of array to send to function' Type='1' /> /// <Parameter Name='Output' Description='Name of array returned from function' Type='1' /> /// </Parameters> /// </Command> ///</Velocity11> function myarray(jsAddin_myarray_input,jsAddin_myarray_output) | |
{ // Assign input data to temp eval("jsAddin_myarray_temp = "+jsAddin_myarray_input) // Transfer temp to output eval(jsAddin_myarray_output+" = jsAddin_myarray_temp") } | 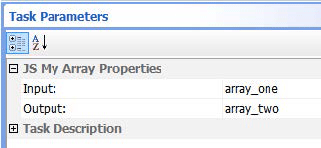 Note: array_one and array_two are the names of the variables you want to interact with. |
The character string entered for the variable or array name is converted into an actual variable or array name in JavaScript using the function eval().
The function eval() processes a string as JavaScript.
This mechanism allows data to be passed to and from the JS Wrapper task without reserving specific variable or array names.
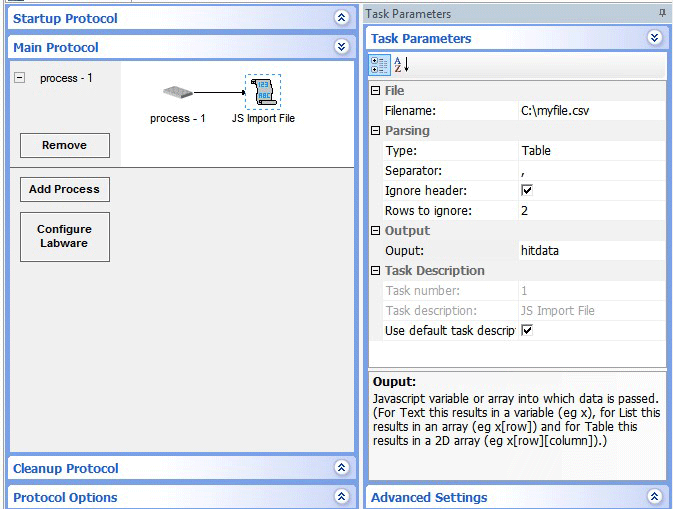
Example: File import and parsing task
The following example creates a file import and parsing task that has the following key features.
• The import file can be selected.
• The file type can be specified (text, list, or table).
• For the file type table the column separator can be specified (,/;/:/TAB).
• For the file types list and table the header lines can be ignored.
• The output can be specified (name of variable or array).
With an appropriate icon file, the task parameters appears as follows in the user interface.
 |
The following example shows the JS Wrapper file to generate this task.
Example file to generate JS Wrapper task |
|---|
///<?xml version='1.0' encoding='ASCII' ?> ///<Velocity11 file='MetaData' md5sum='00000000000000000000000000000000' version='1.0' > /// <Command Compiler='0' Description='JS Import File' Editor='-1' Name='JS Import File' NextTaskToExecute='1' RequiresRefresh='0' TaskRequiresLocation='0' VisibleAvailability='1' > /// <Parameters > /// <Parameter Name='Filename' Description='Filename' Category='File' Scriptable='1' Type='9' /> /// <Parameter Name='Type' Description='Type of file and parsing that will be applied. (Text for a single piece of data, List for data in rows and Table for data in a Grid format (eg CSV).)' Category='Parsing' Type='2' Scriptable='0' Value='Text'> /// <Ranges> /// <Range Value='Text' /> /// <Range Value='List' /> /// <Range Value='Table' /> /// </Ranges> /// </Parameter> /// <Parameter Name='Separator' Description='Separator for Grid file type ' Category='Parsing' Type='2' Scriptable='0' Value=',' Hide_if='Variable(Type)!=Const(Table)' > /// <Ranges> /// <Range Value=',' /> /// <Range Value='TAB' /> /// <Range Value=';' /> /// <Range Value=':' /> /// </Ranges> /// </Parameter> /// <Parameter Name='Ignore header' Description='Ignore header rows in list and grid files.' Category='Parsing' Type='0' Scriptable='1' Hide_if='Variable(Type)==Const(Text)' /> /// <Parameter Name='Rows to ignore' Description='Number of rows to ignore in list and grid files.' Category='Parsing' Type='1' Scriptable='1' Hide_if='Variable(Type)==Const(Text)' /> /// <Parameter Name='Ouput' Description='Javascript variable or array into which data is passed. (For Text this results in a variable (eg x), for List this results in an array (eg x[row]) and for Table this results in a 2D array (eg x[row][column]).)' Category='Output' Type='1' /> /// </Parameters> /// </Command> ///</Velocity11> |
Function jsAddin_ImportFile(jsAddin_ImportFile_filename,jsAddin_ImportFile_filetype,jsAddin_ImportFile_separator, jsAddin_ImportFile_ignoreheaders,jsAddin_ImportFile_rowstoignore,jsAddin_ImportFile_output) { // create file object jsAddin_ImportFile_fo = new File() // open file jsAddin_ImportFile_fo.Open(jsAddin_ImportFile_filename) // read file into variable contents jsAddin_ImportFile_contents = jsAddin_ImportFile_fo.Read() // close file jsAddin_ImportFile_fo.Close() // Parse contents depending file type/parsing method switch(jsAddin_ImportFile_filetype) { // Text - assumes one value and passes directly to variable jsAddin_ImportFile_temp case "Text": jsAddin_ImportFile_temp = jsAddin_ImportFile_contents break; // List - assumes a list with a single piece of data on each row case "List": jsAddin_ImportFile_temp = jsAddin_ImportFile_contents.split("\n") break; // Table - assumes a tabular data structure in row and columns case "Table": jsAddin_ImportFile_temp = new Array() jsAddin_ImportFile_lines = jsAddin_ImportFile_contents.split("\n") if(jsAddin_ImportFile_ignoreheaders=="1") { jsAddin_ImportFile_start = jsAddin_ImportFile_rowstoignore } else { jsAddin_ImportFile_start = 0 } jsAddin_ImportFile_ii = 0 for(jsAddin_ImportFile_i=jsAddin_ImportFile_start;jsAddin_ImportFile_i<jsAddin_ImportFile_lines.length;jsAddin_ImportFile_i++) { jsAddin_ImportFile_temp[jsAddin_ImportFile_ii]=jsAddin_ImportFile_lines[jsAddin_ImportFile_i].split(jsAddin_ImportFile_separator) jsAddin_ImportFile_ii++ } break; } // assign jsAddin_ImportFile_temp to output variable eval(jsAddin_ImportFile_output +" = jsAddin_ImportFile_temp") } |
Global script file
The global script file (jsaddin_global_vars.js) allows you to declare functions and variables that will be accessible to a JS Wrapper task or any protocol that has a JS Wrapper task.
Note: The software stores the global script file in the following folder:
/VWorks Projects/VWorks/JSWrapperTasks/GlobalScript
/VWorks Projects/VWorks/JSWrapperTasks/GlobalScript
Before launching the VWorks software, you can add functions and variables to the global script file, including the open() command to process other JavaScript files.The functions and variables defined in the global script file are available to any protocol that contains a JS Wrapper task. Unlike the functions and variables described in a JS Wrapper task, the ones that are defined in the global script file are available before the JS Wrapper task is executed.
Example of using global script file | |
|---|---|
In this example, both the JavaScript tasks contain the same code, as shown in the Task Parameters area. 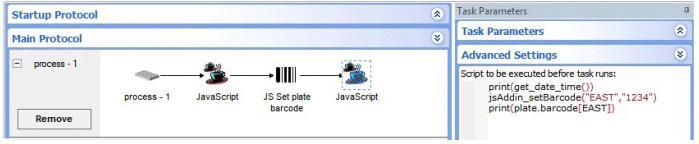 | |
Global script file 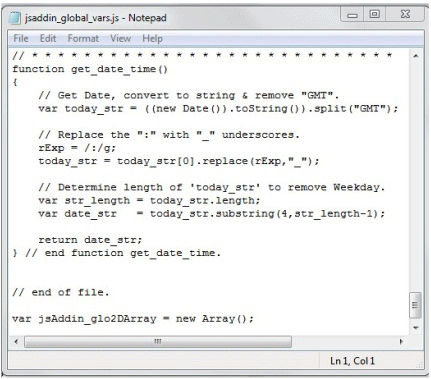 | The function get_date_time(), which is part of the global script file is available both before and after the execution of the JS Wrapper task (JS Set plate barcode). The function jsAddin_setBarcode(), which is part of the JS Wrapper task (JS Set plate barcode), is only available after the JS Wrapper task is executed. |
Sequence of events displayed in Main log  | |
Enabling global scripts
The Global script file is only processed when the protocol contains a JavaScript Wrapper task.
If you want to use the Global script file and not a specific JavaScript Wrapper task, you can prepare a JavaScript Wrapper task whose sole function is to enable the Global script file. Create a JavaScript wrapper file called jsAddin_enableGlobalScripts.js containing the following.
Example of JS Wrapper file to enable Global script file |
|---|
///<?xml version='1.0' encoding='ASCII' ?> ///<Velocity11 file='MetaData' md5sum='00000000000000000000000000000000' version='1.0' > /// <Command Compiler='0' Editor='16' Name='JS Enable Global Scripts' Description='JS Enable Global Scripts File (jsaddin_global_vars.js)' > /// <Parameters /> /// </Command> ///</Velocity11> function jsAddin_enableGlobalScripts() { print("Global Script File Enabled") } |
Related information
For information about... | See... |
|---|---|
Using JavaScript in the VWorks software | |
Using script variables directly in task parameters | |
JavaScript task description |