Preparing the solutions

The In-Solution Digestion: Multi-Plate protocol accommodates a wide range of digestion chemistries so that previously optimized conditions can be easily transferred to this automated platform. Therefore, the reagents described here are categories of reagents used in the assay rather than specific recommendations.
Solutions required for the protocol
Table Required solutions
Solutions | Number of plates required | Description |
|---|---|---|
Syringe Wash Buffer | 4 | This is an optional solution used to solubilize and wash away protein that may have adsorbed onto the probes and syringes. The use of 50 mM NaOH has been found to be a suitable stringent syringe wash solution for several proteins. However, other protein-solubilizing solutions may be used depending on the specific protein sample inputs. Use the Single Liquid Addition utility (Single Liquid Addition v2.0 User Guide) to transfer 300 µL per well of the wash solution to the four Greiner 96-Well Round Bottom, White Plates that will be stacked on deck location 2 by the Plate Stacking protocol before running the In-Solution Digestion protocol. During the protocol run, these plates serve two purposes. The plates are moved on top of the sample plates and serve as lids to protect the samples from light during the alkylation step of the protocol. The plates are also used as reservoirs for the syringe wash solution which is used to wash the syringes to prevent carry-over between sample loading steps. |
Master Reagents | 1 | The three master mix reagents (Denaturation mixture, alkylant, and protease) are placed in the reagent setup plate which serves as the source plate for distributing these reagents into the plates used during the In‑Solution Digestion: Multi-Plate protocol. Use the Reagent Plate Setup protocol to dispense these three reagents to dedicated reagent plates. Fill an ABgene 1.2 mL Deep-Well Plate with the Master Reagent. See Setting up the Reagent Plate Setup protocol. |
Diluent Mixture | 1 | This solution is used to dilute the sample following denaturation, reduction, alkylation and before enzyme addition. The solution typically contains deionized water, 1.0 M Tris at pH 8.1, and 0.5 M TCEP. This reagent is placed in an ABgene 1.2-ml deep-well plate which is placed at deck location 3 during the In-Solution Digestion protocol run. The volume per well required for the Diluent Mixture and the composition of the solution is determined using the Reagent Volume Calculator. |
Note: You can find the Labware Reference Guide in the Literature Library page of the Protein Sample Prep Workbench.
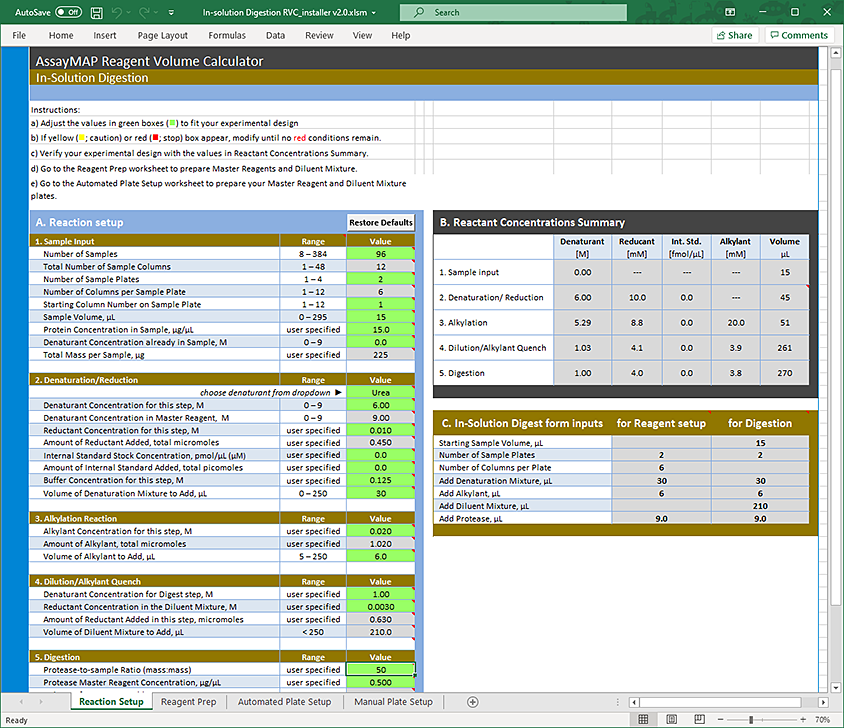
Using the Reagent Volume Calculator for In-Solution Digestion: Multi-Plate
The Reagent Volume Calculator is a Microsoft Excel file that contains the following:
• Reaction Setup worksheet. You to enter information about the samples, denaturant and reductant, alkylant, dilution, and digestion. The calculator determines the concentrations and volumes required based on your input, taking into consideration pipetting overage and evaporation concerns.
Note: The pipetting overage suggested is generally conservative. The minimal overage may be greater or less depending on the volatility of the solution, the length of the run, and when the step occurs during the run. The overage volume can be optimized to minimize loss of precious reagents.
• Reagent Prep worksheet. This sheet displays the volumes and composition of the reagents required for the in-solution assay based on the input provided in the Reaction Setup worksheet.
The Reaction Prep worksheet consists of four tables: Denaturation Mixture, Alkylant, Protease, and Diluent Mixture
If you are using more denaturant than what is required, you can enter the larger mass in the Denaturation Mixer table.
The Master Reagent requires iodoacetamide powder. If you are using more than what is required, you can enter the larger mass in the Alkylant table.
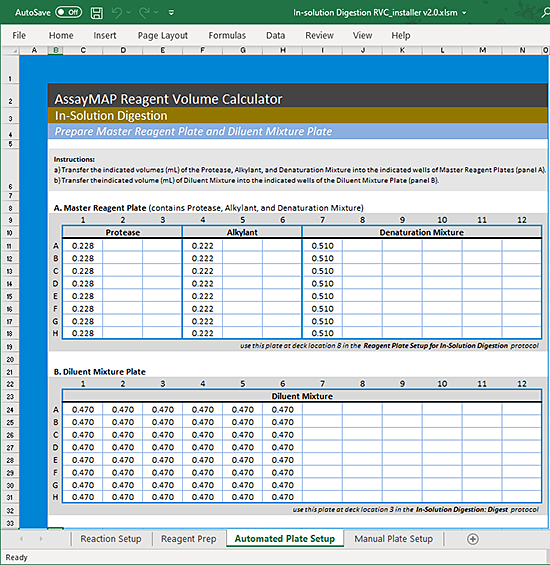
• Automated Plate Setup worksheet. This sheet displays the layout of the Master Reagent plate and the Diluent Mixture plate, including the volumes of the reagents that must be transferred into the designated wells when running the Reagent Plate Setup protocol.
• Manual Plate Setup worksheet. This sheet displays the layout of the Denaturation Mixture plate, Alkylant plate, Protease plate, and Diluent Mixture plate, including the volumes of the reagents required for the plates used in the In-Solution Digestion protocol in case you prefer to manually pipette these reagents into the plates rather than use the Reagent Plate Setup protocol.
To use the Reagent Volume Calculator:
1 Open the App Library.
2 Locate the application, and then click the corresponding Calculator button. Microsoft Excel starts and displays the calculator.
3 Ensure that you enable content in Microsoft Excel.
4 Click Restore Defaults.
5 Modify the values in the green boxes as required to match your specific method. As you change the values in the green boxes, the calculated values change.
Note: The green box should remain green after you enter a value. If you enter a value that is outside the normal working range, the box becomes yellow. If you enter a value that is outside of the acceptable range, the box becomes red.
To display the corresponding tooltip for a setting, mouse over a box that has a red triangle in the upper right corner.
 |
Reagent Volume Calculator Reaction Setup fields
The following tables describe the fields in the Reaction Setup worksheet.
Reaction Setup: Sample Input area
Field | Description |
|---|---|
Number of Samples | The number of samples you want to process. The number of samples should be a multiple of 8. Note: If the number of samples is not a multiple of 8, excess reagent consumption will occur. See Total Number of Sample Columns. Range: 8–384 Default: 96 |
Total Number of Sample Columns | Read only. The calculator converts the Number of Samples to the Total Number of Sample Columns by rounding up to the nearest multiple of 8. Range: 1–48 Default: 12 |
Number of Sample Plates | The number of labware containing the samples you want to process. To minimize the volume of reagent consumed, specify a greater number of sample plates where fewer wells are used in each plate. This requires fewer syringes during the liquid transfer, which minimizes reagent consumption. To minimize the number of labware used, specify fewer number of sample plates. For example, place eight columns of samples on one plate. Because more syringes are used during the liquid transfer, more reagents are consumed. To assess which scenario works best, use the Reagent Prep worksheet. Range: 1–4 Default: 2 |
Number of Columns per Sample Plate | Read only. The number of columns that occupy each sample plate. The value is calculated using the Total Number of Sample Columns and the Number of Sample Plates. Range: 1–12 Default: 6 |
Starting Column Number on Sample Plate | The column at which the samples begin in the sample plate. Note: The samples can begin in any column in the sample plate. Make sure the columns in the plates are contiguous. You cannot skip a column. If you have multiple sample plates, make sure the samples begins at the same column across all the plates. Range: 1–12 Default: 1 |
Sample Volume, µL | The volume of the samples in each well. Range: 0–270 Default: 15 |
Protein Concentration in Sample, µg/µL | The concentration of the protein in the sample. The In-Solution Digestion protocol can accommodate a wide range of concentrations, which is largely dependent on downstream needs. Range: Varies Default: 15 |
Concentration of Denaturant in Sample, Molar | The concentration of urea or guanidine already present in the sample. Note: The acceptable range differs for each denaturant. In addition, the value you specify influences calculations for the Denaturation Mixture. Range: 0–8 for guanidine; 0–9 for urea Default: 0.0 |
Total Mass per Sample, µg | Read only. The mass of the sample. The value is calculated using the Sample Volume and Protein Concentration. Range: Varies Default: 225 |
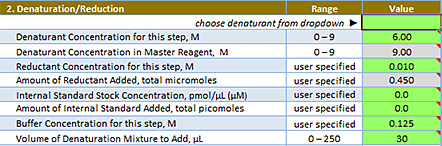
Reaction Setup: Denaturant/Reduction area
 |
Field | Description |
|---|---|
Choose denaturant from dropdown | The denaturant you want to use. Select either Guanidine or Urea. |
Denaturant Concentration for this step, Molar | The concentration of guanidine or urea that you want to use in the denaturation step. To skip denaturation, enter 0. Range: 0–8 for guanidine; 0–9 for urea Default: 6.00 |
Denaturant Concentration in Master Reagent, Molar | Read only. The concentration of guanidine or urea in the Master Reagent. To adjust the calculated value, increase or decrease the Volume of Denaturation Mixture to Add. For example, increase the Volume of Denaturation Mixture to Add to decrease the Denaturant Concentration in Master Reagent. Range: 0–8 for guanidine; 0–9 for urea Default: 9.00 |
Reductant Concentration for this step, Molar | The concentration of the reductant for the Denaturation step. To skip reduction, enter 0. Range: 0–0.100 Default: 0.010 |
Amount of Reductant, total micromoles | Read only. The micromoles of reductant. The value is calculated using the Reductant Concentration and the Denaturation Mixture volume. Range: Varies Default: 0.450 |
Internal Standard Stock Concentration, pmol/µL | Optional. The concentration of the internal standard stock solution you want to add to the Denaturation Mixture. Range: Varies Default: 0.0 |
Amount of Internal Standard in reaction, total picomoles | The total number of picomoles of the internal standard you want to include in the reaction. The value is converted to a final concentration at the indicated reaction steps (displayed in B. Reactant Concentrations Summary). Range: Varies Default: 0.0 |
Buffer Concentration for this step, Molar | The concentration of the pH buffer present during the denaturation step. Note: Values below 0.1 M have not been tested. Values above 0.35 M are out of range for the solutions used to prepare Master Reagents. Range: 0.100–0.350 Default: 0.125 |
Volume of Denaturation Mixture to add, µL | The volume of Denaturation Mixture that will be added into the sample. This mixture may include denaturant, reductant, internal standard, and pH buffer as defined by the experiment. Range: 0–270 Default: 30 |
Table Reaction Setup: Alkylation Reaction area
 |
Field | Description |
|---|---|
Alkylant Concentration for this step, Molar | The concentration of alkylant desired at this step. Range: Varies Default: 0.020 |
Amount of Alkylant, total micromoles | Read only. The number of micromoles of the alkylant. The value is calculated from the concentration and volume added to the reaction, and the final concentration at the indicated steps is displayed in the B. Reactant Concentrations Summary table. Range: Varies Default: 1.020 |
Volume of Alkylant to add, µL | The volume of alkylant to add. Using the default or minimum volume (5 uL) minimizes unnecessary dilution of the reaction and provides greatest flexibility in the volumes of other reactants. Range: 5–250 Default: 6.0 |
Reaction Setup: Dilution/Alkylant Quench area
 |
Field | Description |
|---|---|
Denaturant Concentration for Digest step, Molar | The concentration of guanidine or urea in the digestion step. This value determines the volume of Diluent Mixture. If the sample does not contain any denaturant, enter 0. If the Denaturant Concentration is 0, the software will allow you to manually enter a volume in the Volume of Diluent Mixture if NO Denaturant field (the last row in the 4. Dilution/Alkylation Quench area) to control the buffering capacity in the digestion reaction. Range: Varies Default: 1.00 |
Reductant Concentration in the Diluent Mixture, Molar | The concentration of reductant necessary for quenching the alkylant. The final concentrations of reductant and alkylant at the indicated reaction steps are summarized in the B. Reactant Concentrations Summary table. Range: Varies Default: 0.0030 |
Amount of Reductant added in this step, micromoles | Read only. The number of micromoles of reductant that is added during this step. The value is calculated using the Reductant Concentration and Volume of Diluent Mixture. Range: Varies Default: 0.630 |
Volume of Diluent Mixture to add, µL | Read only. The volume of the Diluent Mixture you want to add. The value is calculated using many of the values you supplied in the table. Range: < 250 Default: 210.0 |
Volume of Diluent Mixture if NO denaturant, µL | The volume of Diluent Mixture to add if Denaturant Concentration for Digest Step is 0. The Diluent Mixture contains additional reductant, if added, and pH buffer. This field appears only if you entered 0 for Denaturant Concentration for Digest Step (the first field in the 4. Dilution/Alkylation Quench area). |
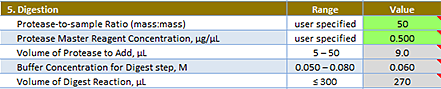
Reaction Setup: Digestion area
 |
Field | Description |
|---|---|
Protease-to-Sample Ratio (mass:mass) | The protease-to-substrate protein (sample) ratio. The default value of 50 means the final digest reaction will contain 1 µg of protease for every 50 µg of protein in the sample. Typically, this ratio varies from 1:25 to 1:100. Refer to the recommendations of the protease supplier. Range: Varies Default: 50 |
Protease Master Reagent Concentration, µg/µL | The concentration of the Protease Master Reagent. This value and the Protease-to-Sample Ratio determine the Volume of Protease to Add. The Protease Master Reagent should be prepared from your protease stock solution. Range: 0.05–1.50 Default: 0.500 |
Volume of Protease to Add, µL | Read only. The volume of Protease to add. The value is calculated using the Protease-to-Sample Ratio and the Protease Master Reagent Concentration. You can compare this value with the Volume of Digest Reaction value, below. Its lower bound is the lowest recommended volume (5 uL), and the upper bound should be no more than 10% of the Volume of Digest Reaction, for best control of reaction pH. Range: 5–50 Default: 9.0 |
Buffer Concentration for Digest step, Molar | Read only. The final concentration of the buffer. The value is calculated using the starting concentration and volumes added from the fields above. Make sure the value remains within the range for optimal for pH control and protease activity. Range: 0.050–0.080 Default: 0.060 |
Volume of Digest Reaction, µL | Read only. The digest reaction volume. The value is calculated using the volumes shown above this field. Make sure the labware you are using can accommodate this volume. The labware should also accommodate any reagents you might want to add to this volume following the overnight digestion. Range: <= 300 Default: 270 |
Dispensing the solutions
\
Use one of the following methods to set up the reagent plates:
• Automated Reagent Plate Setup
• Manual Reagent Plate Setup
To use Automated Reagent Plate Setup:
The Master Reagent plate should be prepared at this stage.
1 In the Reagent Volume Calculator, display the Automated Plate Setup worksheet. See the following figure.
2 Add the designated volumes of Protease, Alkylant, and Denaturation Mixture into the assigned columns of the Master Reagent plate as shown in the A. Master Reagent Plate area of the worksheet.
3 Add the volumes of the Diluent Mixture into the assigned columns of the Diluent Mixture plate as shown in the B. Diluent Mixture Plate area of the worksheet.
Note: The Diluent Mixture plate is prepared manually because of the large volumes required.
4 To complete the setup, run the Reagent Plate Setup protocol. See Running the Reagent Plate Setup protocol.
Figure Example of Automated Plate Setup worksheet
 |
To use Manual Reagent Plate Setup:
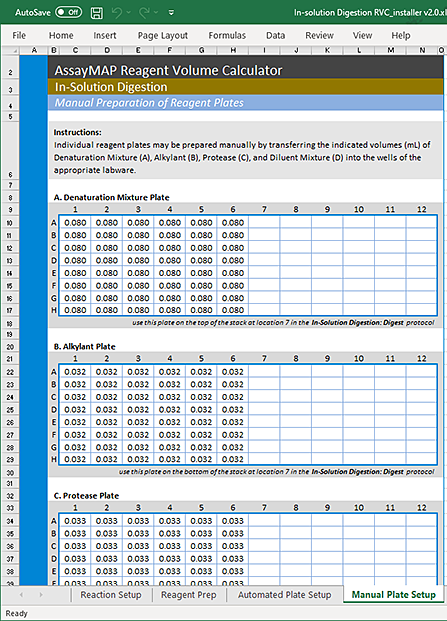
1 In the Reagent Volume Calculator, display the Manual Plate Setup worksheet. See the following figure.
2 Use manual pipettes to prepare reagent plates for the Protease, Alkylant, Denaturation, and Diluent reagents based on their respective plate layouts.
Figure Example of Manual Plate Setup worksheet
 |
Preparing plates for stacking
The In-Solution Digestion: Multi-Plate protocol requires a stack of five 96-well Greiner 650207 U‑Bottom plates at deck location 2, regardless of the number of sample plates being used.
To prepare the plates for stacking:
1 Label one plate to be used as a lid for the Protease plate, and label four plates to be used as lids for the sample plates. The four plates that will be used for sample plate lids also function as Syringe Wash Buffer plates.
2 Fill each Syringe Wash Buffer plate with 300 µL per well of buffer, such that the filled columns match the columns of samples in the sample plates.
You may use manual pipettes for this task, or you may use the Reagent Transfer utility, Reagent Aliquot utility, or the Single Liquid Addition utility.
Before using a utility, the system must be prepared using the System Startup Utility. For details, see the System Startup/Shutdown v3.0 User Guide.