Single Liquid Addition v2.0 User Guide

The Single Liquid Addition Utility is specifically designed to adjust the pH of samples after the samples have been digested using the In-Solution Digestion: Multi-Plate application. This utility enables you to rapidly adjust buffer composition or add a component to up to four sample plates by transferring liquid from a common reagent plate, to up to four independent sample plates. An optional stringent syringe wash step is included to prevent carry over.
Before you start
Labware
The following table provides a complete list of labware options and the corresponding deck locations.
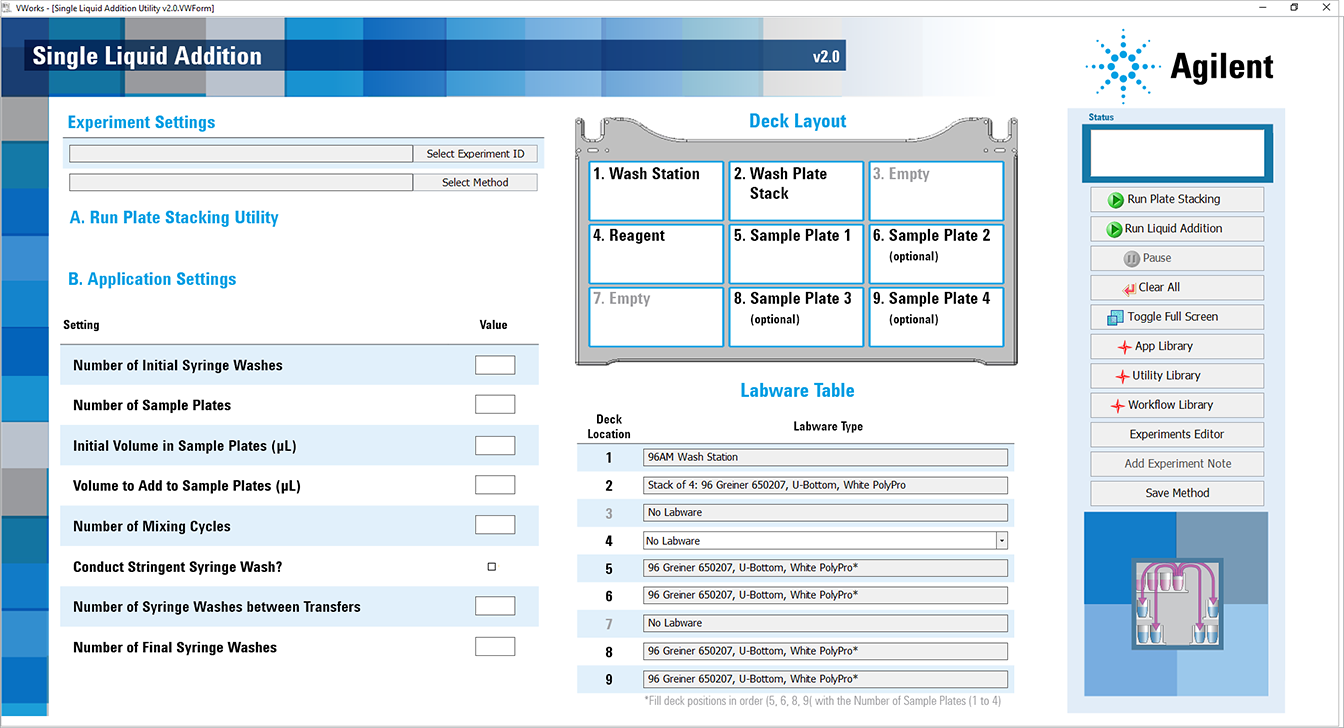
The following figure shows the nine Bravo deck locations for labware.
Figure Labware locations on the Bravo deck (top view)
.
 |
Labware | Manufacturer part number* | Deck location options |
|---|---|---|
12 Column, Low Profile Reservoir, Natural PP | Agilent 201280-100 | 4 |
8 Row, Low Profile Reservoir, Natural PP | Agilent 201282-100 | 4 |
96 ABgene 1127, 1mL Deep Well, Square Well, Round Bottom | ABgene AB-1127 | 4 |
96 Eppendorf 30129300, PCR, Full Skirt, PolyPro | Eppendorf 30129300 | 4 |
96 Greiner 652270, PCR, Full Skirt, PolyPro | Greiner 652270 | 4 |
96 Greiner 650201_U-Bottom, Clear PolyPro | Greiner 650201 | 4 |
96 Greiner 650207_U-Bottom, White PolyPro | Greiner 650207 | 2, 4, 5, 6, 8, 9 |
96 Costar 3363, PP Conical Bottom | Corning Costar 3363 | 4 |
96 V11 Manual Fill Reservoir | Agilent G5498B#049 | 4 |
*For dimensionally equivalent alternatives and other details about the labware, see the Labware Reference Guide in the Literature Library page of the Protein Sample Prep Workbench. | ||
Reagents
Make sure you:
• Prepare a reagent plate that contains the solution that you want to add to the Sample plates. Place the reagent plate at deck location 4.
• Prepare the Syringe Wash Buffer. For suggested solutions to use, see Preparing the solutions in the In‑Solution Digestion: Multi-Plate v2.0 User Guide.
• Ensure that you have four Greiner 650207 White U-Bottom plates for the wash plates. You must fill the plates with the Syringe Wash Buffer, and then run the Plate Stacking protocol to stack the wash plates at Bravo deck location 2. For details, see Running the Plate Stacking protocol.
Note: You can find the Labware Reference Guide in the Literature Library page of the Protein Sample Prep Workbench.
Experiment ID and method requirements
Each workbench application and utility has an Experiment Settings section that allows you to select an experiment ID and a method.
• An experiment ID is a database record that captures the steps executed and the settings used during each run of an application or utility. Any errors that may have occurred during a run are also recorded.
To create an experiment ID, you open the Experiments Editor by clicking  in any Workbench app or utility. For details, go to the Literature Library and open Using the Protein Sample Prep Workbench. In the browser that opens, click Using Experiment IDs.
in any Workbench app or utility. For details, go to the Literature Library and open Using the Protein Sample Prep Workbench. In the browser that opens, click Using Experiment IDs.• A method is a comprehensive collection of saved settings for an application or utility, which you can use to run the application or utility.
Experiment IDs and methods are required for compliance-enabled VWorks editions and optional for noncompliance-enabled VWorks editions.
VWorks edition | Experiment ID and method selection |
|---|---|
VWorks Plus | Required |
VWorks Standard | Optional |
Opening the Single Liquid Addition utility
To open the utility:
1 Open the Utility Library.
2 Locate Single Liquid Addition, and then click Utility.
 |
The Single Liquid Addition utility opens.
 |
Running the Plate Stacking protocol
The Plate Stacking protocol stacks the wash plates properly at Bravo deck location 2 to prevent collision during the Single Liquid Addition protocol run.
Before running the Plate Stacking protocol, prepare four Greiner 650207 White U‑Bottom plates as follows:
• Fill the plates with 300 µL Syringe Wash Buffer. The plates will serve as wash plates that are used for cleaning the syringes between liquid transfers.
• Make sure the filled wells correspond to the location of the samples in the sample plates.
To stack the prepared wash plates:
1 In the Single Liquid Addition form, click  . The protocol starts.
. The protocol starts.2 Follow the on-screen instructions for placing the wash plates at the appropriate locations on the AssayMAP Bravo deck.
3 Check the Status box in the upper right corner of the form. When the Protocol Complete message is displayed, click OK.
 |
Setting up the Single Liquid Addition protocol
Before starting the protocol, make sure the appropriate selections and values are specified in the Single Liquid Addition utility.
To set up the Liquid Addition protocol:
1 If applicable, click Select Experiment ID.
 |
The Experiments Editor opens.
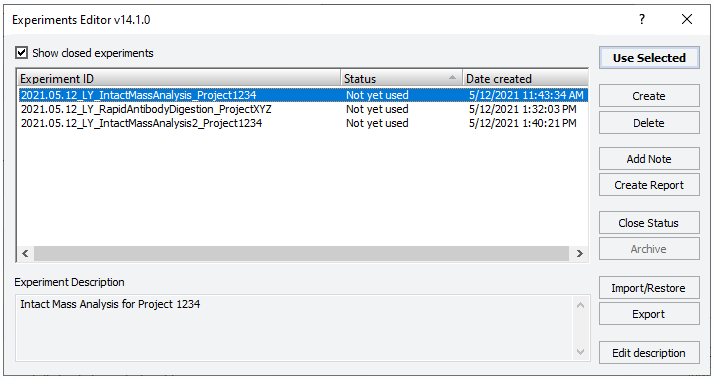 |
2 Select the Experiment ID that you want to use to record the steps performed during this application run, and then click Use Selected.
The Experiments Editor closes.
3 In the form, click Select Method to locate and select a method.
In the Open File dialog box, select the method, and click Open.
• To run the selected method, go to Starting the Single Liquid Addition run.
• To create or modify a method, proceed to step 4.
VWorks Plus. Administrator or technician privileges are required to create and modify methods.
4 In the Application Settings area, specify the following properties for the run:
Property | Description |
|---|---|
Number of Initial Syringe Washes | The number of cycles for rinsing syringes with deionized water at the beginning of the run. Range: 0–10 Default: 3 |
Number of Sample Plates | The number of sample plates (1-4) to which a liquid will be added in this utility. Place only the number of sample plates used on the deck. Positions 2-4 are optional and need not be filled. Range: 1–4 Default: 1 |
Initial Volume in Sample Plate | The initial volume of the samples. All plates must have the same sample volume. Range: 0–250 Default: 10 |
Volume to Add to Sample Plate | The volume of solution being added to the samples. This may be limited by the labware. Range: 0–250 Default: 50 |
Number of Mixing Cycles | The number of mixing cycles that will be used to homogenize the sample liquid and the liquid that is added. Range: 0–20 Default: 10 |
Conduct Stringent Syringe Wash | The option to wash the syringe with a solution in the wash plate between transfers. Select the check box to perform the wash. Clear the check box to skip the wash. Default: |
Number of Syringe Washes between Transfers | The number of Syringe Washes to be performed at the Wash Station, before adding liquid to the next sample plate. Range: 0–10 Default: 5 |
Number of Final Syringe Washes | The number of times to rinse syringes with deionized water. Range: 0–10 Default: 3 |
5 In the Labware Table, select that labware you are using at deck location 4.
6 To save the method:
a Click  .
.
.b In the Save File As dialog box, type the file name and click Save.
VWorks Plus. You must save the method before you can run it.
Starting the Single Liquid Addition run
To start the protocol run:
1 Ensure that the accessories and labware are at the assigned deck locations, as shown in the Deck Layout image of the form.
Make sure the labware are properly seated on the Bravo deck.
.
|
2 Click  to start the protocol run.
to start the protocol run.To monitor the progress of the run, check the Status box.
|
When the run is finished, remove the labware from the deck.
To pause the run, click Pause. The task currently in progress finishes before the protocol pauses. The Scheduler Paused dialog box opens. For details, see Emergency stops and pauses.
To troubleshoot errors, see the Error Recovery Guide and the Bravo Platform User Guide in the Literature Library page of the Protein Sample Prep Workbench.