Running the Reagent Plate Setup protocol
The Reagent Plate Setup protocol uses the AssayMAP Bravo Platform to transfer reagents in the Master Reagent plate to dedicated reagent plates.
Note: If you have already manually prepared the reagents, you can skip this topic.
Experiment ID and method requirements
Each workbench application and utility has an Experiment Settings section that allows you to select an experiment ID and a method.
• An experiment ID is a database record that captures the steps executed and the settings used during each run of an application or utility. Any errors that may have occurred during a run are also recorded.
To create an experiment ID, you open the Experiments Editor by clicking  in any Workbench app or utility. For details, go to the Literature Library and open Using the Protein Sample Prep Workbench. In the browser that opens, click Using Experiment IDs.
in any Workbench app or utility. For details, go to the Literature Library and open Using the Protein Sample Prep Workbench. In the browser that opens, click Using Experiment IDs.• A method is a comprehensive collection of saved settings for an application or utility, which you can use to run the application or utility.
Experiment IDs and methods are required for compliance-enabled VWorks editions and optional for noncompliance-enabled VWorks editions.
VWorks edition | Experiment ID and method selection |
|---|---|
VWorks Plus | Required |
VWorks Standard | Optional |
Before you start
Ensure that you
• If applicable, know which experiment ID to use to record the steps executed during the utility and app runs.
• Run the Startup protocol to prepare the AssayMAP Bravo Platform for the run. See System Startup/Shutdown v3.0 User Guide.
Setting up the Reagent Plate Setup protocol
Before starting the protocol, make sure the appropriate selections and values are specified in the application.
To set up the Reagent Plate Setup protocol:
1 Open the App Library.
2 Locate In-Solution Digestion: Multi-Plate, and then click App.
 |
The In-Solution Digestion: Multi-Plate application opens.
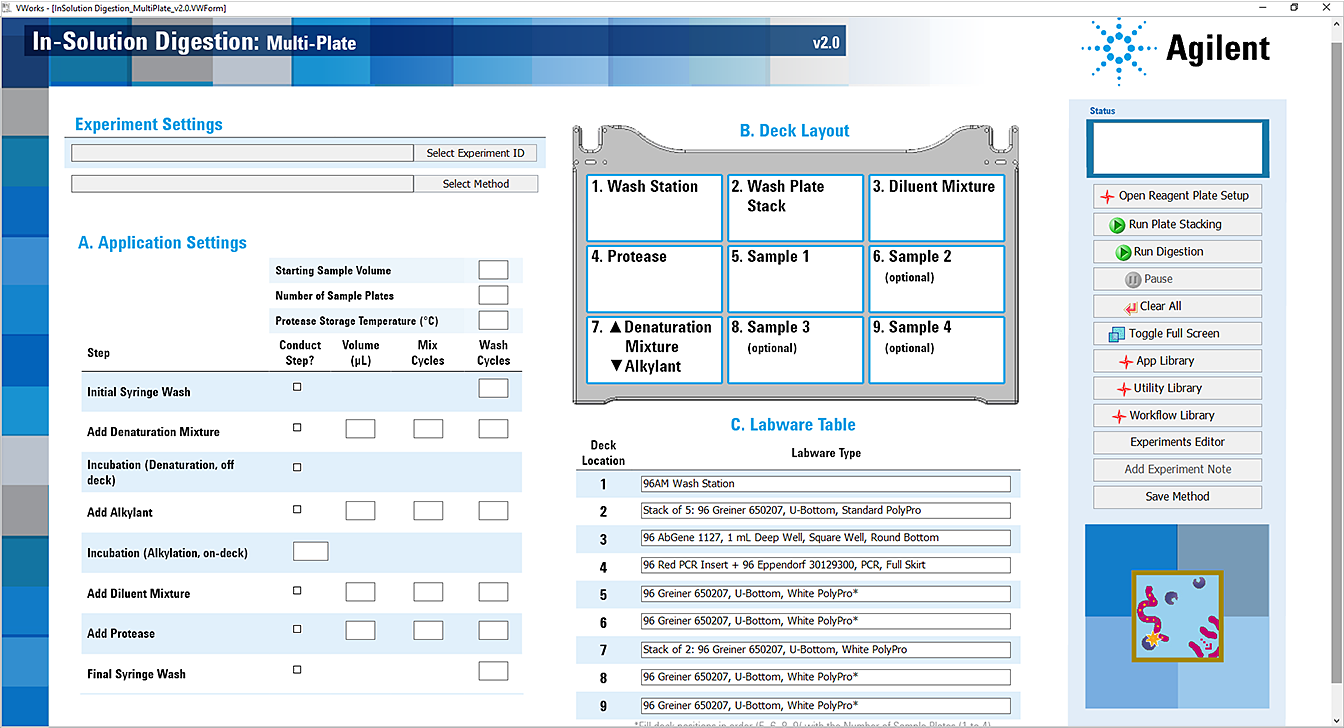 |
3 In the navigation pane on the right side of the form, click  . The Reagent Plate Setup form opens.
. The Reagent Plate Setup form opens. |
4 If applicable, click Select Experiment ID.
 |
The Experiments Editor opens.
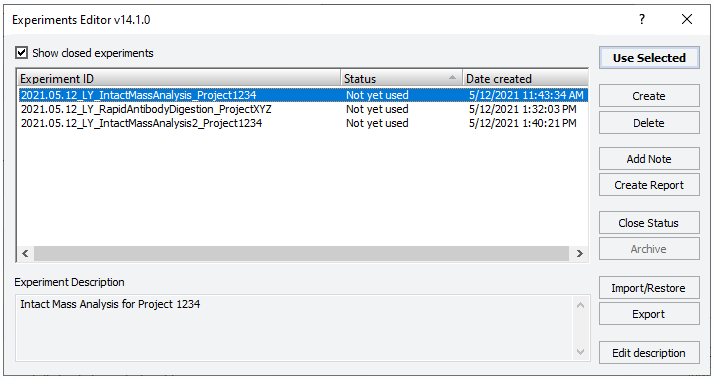 |
5 Select the Experiment ID that you want to use to record the steps performed during this application run, and then click Use Selected.
The Experiments Editor closes.
6 In the form, click Select Method to locate and select a method.
In the Open File dialog box, select the method, and click Open.
• To run the selected method, go to Running the Reagent Plate Setup protocol.
• To modify or create a method, proceed to step 7.
VWorks Plus. Administrator or technician privileges are required to create and modify methods.
7 In the Application Settings area, select the check boxes of the steps that you want to perform, and enter the values for the selected steps. For details, see Application Settings for Reagent Plate Setup.
Note: For any unselected steps, ensure that the volume, flow rate, and wash cycles boxes are blank to avoid potential confusion when a experiment ID report is generated.
8 To save the method, click Save Method. In the Save File As dialog box, type the file name and click Save.
VWorks Plus. You must save the method before you can run it.
Application Settings for Reagent Plate Setup
Setting or step | Description | Value | |
|---|---|---|---|
Number of Sample Plates | Specifies the number of sample plates to be processed. | Default: | 1 |
Range: | 1–4 | ||
Number of Columns per Plate | Specifies the number of columns in each reagent plate (Protease, Denaturation, and Alkylant) that will be filled with reagent aliquots. This number must be consistent with the number of columns of samples in each sample plate. The value is used with the Starting Column of Reagent Plates to determine which columns in the reagent plates will receive reagents. | Default: | 1 |
Range: | 1–12 | ||
Starting Column of Reagent Plates | Defines the first column in each of the reagent plates that will receive reagent aliquots. This value works with the Number of Columns per Plate to define the range of each reagent plate that will receive reagent. | Default: | 1 |
Range: | 1–12 | ||
Protease Storage Temperature | Specifies the temperature set-point that will be used for the Protease plate for the entire Reagent Plate Setup protocol. The temperature controller will not turn off after completion of the Reagent Plate Setup protocol. The assumption is that an In-Solution Digestion run will closely follow the Reagent Setup Run. | Default: | 10 °C |
Range: | 4–35 °C | ||
Columns of Tips in Pipette Tip Box | Specifies the number of full columns of 250 µL pipette tips in the source tip box. The columns of pipette tips must be contiguous and contain 8 pipette tips per column. If specifying fewer than 12 columns, ensure that no pipette tips are present in the unspecified columns. Make sure that the empty columns are on the right side of the tip box. | Default: | 12 |
Range: | 1–12 | ||
Add Denaturation Mixture | Transfers the specified volume, plus the required overage, to the Denaturation Mixture plate. | Default: | 30 µL* |
Range: | 1–250 µL | ||
Add Alkylant | Transfers the specified volume, plus the required overage, to the Alkylant plate. | Default: | 6 µL* |
Range: | 1–250 µL | ||
Add Protease | Transfers the specified volume, plus the required overage, to the Protease plate. | Default: | 9 µL* |
Range: | 1–250 µL | ||
* Input the value for the volume that you want to add to the samples during the digestion run. The Reagent Volume Calculator automatically adjusts the value to include the recommended overage and provides the volume that you need to add to the plate to transfer the desired volume. For example, if you set the Add Denaturation Mixture volume to 30 µL, then 50 µL will be added to each active well: 30 µL for the samples and 20 µL for overage. | |||
Running the Reagent Plate Setup protocol
To run the Reagent Plate Setup:
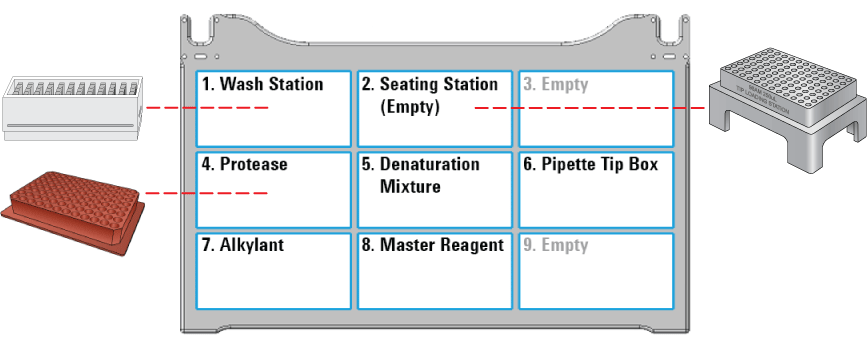
1 Ensure that the reagent plates, pipette tips, and accessories are at the assigned deck locations, as shown in the Deck Layout image of the form.
At deck location 4, ensure that the Red PCR Plate Insert is installed with the Protease plate. Otherwise, the protease will not be transferred properly.
 |
2 Click  to start the run.
to start the run. To monitor the progress of the run, check the Status box.
 |
To pause the run, click Pause. The task currently in progress finishes before the protocol pauses. The Scheduler Paused dialog box opens. For details, see Emergency stops and pauses.
To troubleshoot errors, see the Error Recovery Guide and the Bravo Platform User Guide in the Literature Library page of the Protein Sample Prep Workbench.
Cleaning up after Reagent Plate Setup
When the protocol run is finished, make sure you:
1 Remove the seating station with the used tips (deck location 2), the Master Reagent plate (deck location 8), and the pipette tip box (deck location 6) from the Bravo deck.
2 Discard the excess Master Reagents and used pipette tips following appropriate waste disposal procedures.
3 Keep all remaining labware on the AssayMAP Bravo deck.