System Startup/Shutdown v3.0 User Guide

The System Startup/Shutdown utility consists of two protocols:
• Startup. Prepares the AssayMAP Bravo Platform for use by:
– Initializing the device if this is the first time the Startup utility is run after powering up the AssayMAP Bravo Platform.
– Dispensing any remaining liquid in the syringes to the wash station.
Note: The w-axis (aspirate/dispense axis) is the up-and-down motion of the piston. The w-axis initialization results in emptying the syringes.
– Priming the wash station lines.
– Washing the syringes the specified number of wash cycles.
You should run Startup when you first start up the AssayMAP Bravo Platform, before running an AssayMAP Bravo application or utility if the Shutdown procedure was performed after the last AssayMAP run, or to return the AssayMAP Bravo to a known state.
• Shutdown. Prepares the AssayMAP Bravo Platform for idle time by:
– Washing the syringes the specified number of wash cycles.
– Aspirating 200 µL of Syringe Storage Liquid (water or a user-defined solution) into the syringes. The Syringe Storage Liquid prevents residual reagents from forming salts and corroding the syringe seals.
You should run Shutdown after every application protocol run, if the AssayMAP Bravo Platform will not be in use for at least 1 hour, and before turning off the device.
Before you run the Startup protocol
Before running the Startup protocol:
1 Check the liquid levels of the source and waste bottles for the wash station. Fill the source bottle and empty the waste bottle, as required.
Verify that the flip-top cover on each pump head is closed and that the tubing connections are secure.
Figure Wash station fill line (A) and empty line (B)
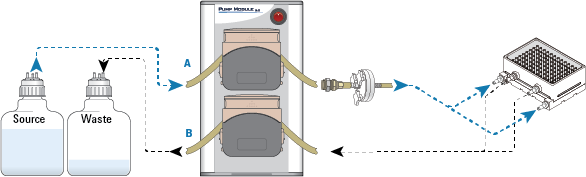 |
2 Turn on the Pump Module and Peltier Thermal Station Controller.
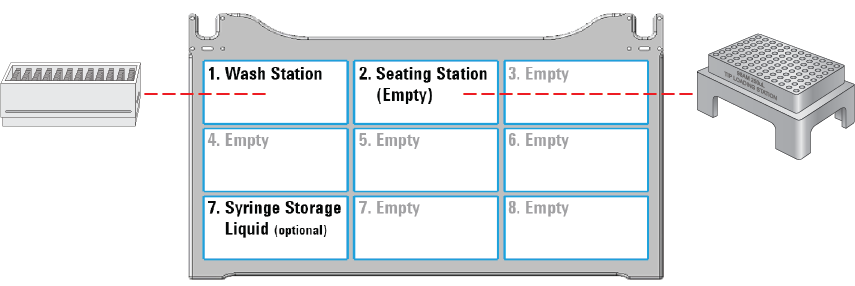
3 Ensure the following items are in position on the AssayMAP Bravo deck:
• 96AM Wash Station or the later model 96 Channel Wash Station at deck location 1
• Empty 96AM Cartridge & Tip Seating Station at deck location 2
4 Turn on the AssayMAP Bravo Platform.
5 Open the System Startup/Shutdown utility.
Before you run the Shutdown protocol
Before running the Shutdown protocol:
1 If more rigorous syringe washing is desired, run the Syringe Wash utility before running the Shutdown protocol. For instructions, see Syringe Wash v3.0 User Guide.
2 Check the liquid levels of the source and waste bottles for the wash station. Fill the source bottle and empty the waste bottle, as required. Verify that the tubing connections are secure.
3 Ensure the following items are in position on the AssayMAP Bravo deck:
• 96AM Wash Station or the later model 96 Channel Wash Station at deck location 1
• Empty 96AM Cartridge & Tip Seating Station at deck location 2
• Optional. Acceptable reservoir containing an appropriate Syringe Storage Liquid at deck location 7
4 Open the System Startup/Shutdown utility.
Experiment ID and method requirements
Each workbench application and utility has an Experiment Settings section that allows you to select an experiment ID and a method.
• An experiment ID is a database record that captures the steps executed and the settings used during each run of an application or utility. Any errors that may have occurred during a run are also recorded.
To create an experiment ID, you open the Experiments Editor by clicking  in any Workbench app or utility. For details, go to the Literature Library and open Using the Protein Sample Prep Workbench. In the browser that opens, click Using Experiment IDs.
in any Workbench app or utility. For details, go to the Literature Library and open Using the Protein Sample Prep Workbench. In the browser that opens, click Using Experiment IDs.• A method is a comprehensive collection of saved settings for an application or utility, which you can use to run the application or utility.
Experiment IDs and methods are required for compliance-enabled VWorks editions and optional for noncompliance-enabled VWorks editions.
VWorks edition | Experiment ID and method selection |
|---|---|
VWorks Plus | Required |
VWorks Standard | Optional |
Opening the System Startup/Shutdown utility
To open the Startup/Shutdown utility:
In the Utility Library, locate the System Startup/Shutdown utility, and then click Utility.
 |
The System Startup/Shutdown utility opens.
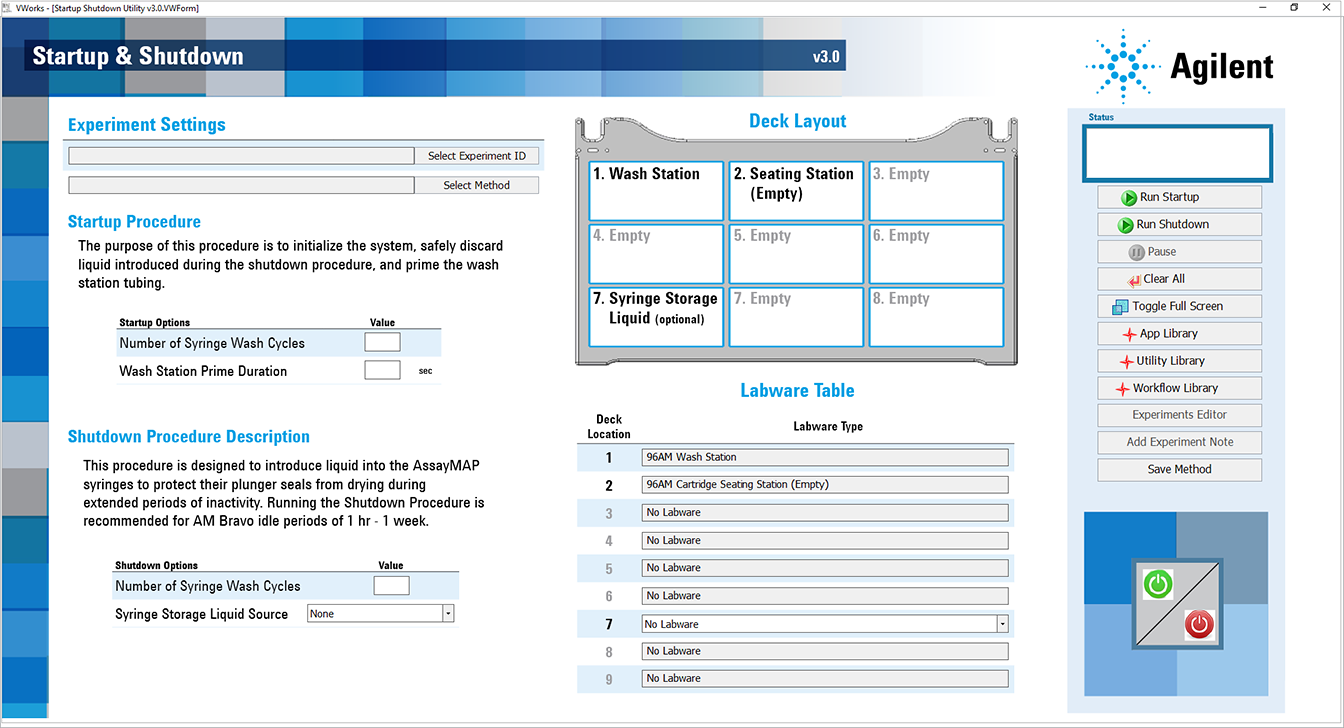 |
Setting up the Startup protocol
To set up the Startup protocol:
1 If applicable, click Select Experiment ID.
 |
The Experiments Editor opens.
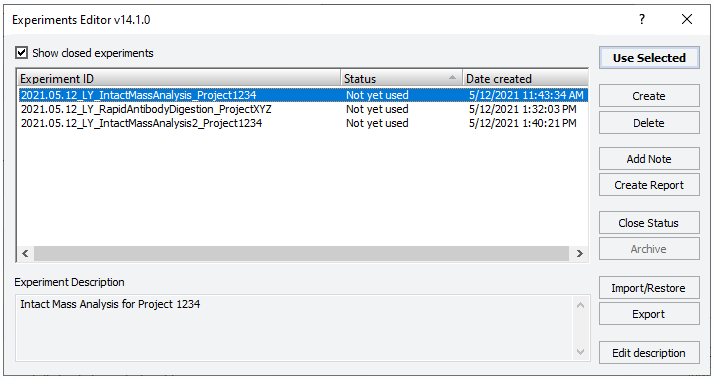 |
2 Select the Experiment ID that you want to use to record the steps performed during this application run, and then click Use Selected.
The Experiments Editor closes.
3 In the form, click Select Method to locate and select a method.
In the Open File dialog box, select the method, and click Open.
• To run the selected method, go to Starting the Startup run.
• To create or modify a method, proceed to step 4.
VWorks Plus. Administrator or technician privileges are required to create and modify methods.
4 In the Startup Options area of the form, enter the values for the following properties:
Property | Description |
|---|---|
Number of Syringe Wash Cycles | Specifies the number of syringe wash cycles that will be conducted at the wash station at deck location 1. Default: 3 Range: 0–10 |
Wash Station Prime Duration (sec) | Specifies how long (seconds) to run the wash station pumps in order to prime the tubing lines and wash station chimneys. If the tubing lines are dry, set this value to 60 seconds. Default: 10 Range: 0–300 |
5 To save the method:
a Click  .
.
.b In the Save File As dialog box, type the file name and click Save.
VWorks Plus. You must save the method before you can run it.
Starting the Startup run
To start the protocol run:
1 Ensure that the accessories are at the assigned deck locations, as shown in the Deck Layout image of the form.
 |
2 Click  .
.
. • If this is the first time the Startup utility has been run after powering up the AssayMAP Bravo Platform, the device initialization process begins. Proceed to step 3.
• If the platform is already initialized, skip to step 5.
3 When the following message appears, click Ignore and Continue, leaving device in current state to proceed to initialize the grippers.
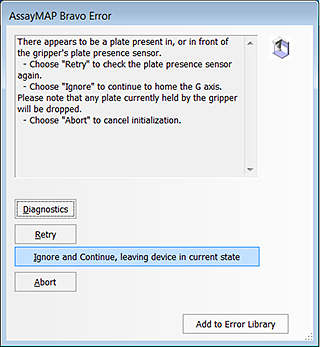 |
4 When the following message appears, click Ignore and Continue, leaving device in current state to delay initializing the w-axis. The w-axis will automatically initialize in a later step when the Bravo 96AM Head is positioned over the wash station at deck location 1.
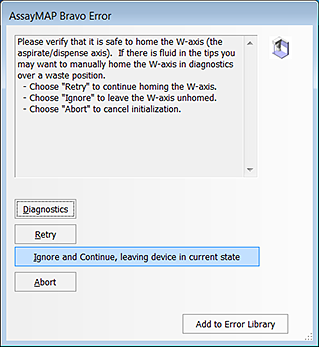 |
When the initialization process is finished, the orange lights on the AssayMAP Bravo Platform light panel flicker briefly and then begin to flash.
The Bravo 96AM Head does the following:
• Moves to deck location 2 and parks any cartridges remaining on the head.
• Moves to the wash station at deck location 1 and dispenses any liquid remaining in the syringes.
• Washes the syringes the specified number of times.
The priming step begins after the syringe wash.
5 During the priming step, ensure that fluid flows out of the top of each chimney. Check for any damaged chimneys in the wash station.
Click Continue to complete the Startup protocol.
Troubleshooting problems | Probable cause and solution |
|---|---|
Fluid does not flow out of a chimney. | A trapped air bubble can block the fluid flow out of a chimney. To clear the bubble: 1 Push the air out of a 1000 µL pipette with a pipette tip attached. Form a seal between the top of the problematic chimney and the 1000‑µL pipette tip, and then draw the air and then water through the chimney at a medium speed. 2 Run the Startup protocol again to determine if the bubble was successfully removed. 3 Repeat if necessary. |
Chimney deformity or irregularity | Chimney irregularities can result from a collision between the head and the wash station. For additional troubleshooting guidelines or to replace damaged chimneys, see the 96 Channel Wash Station Maintenance Guide. |
When all the chimneys are flowing evenly, the device is ready for operation.
To pause the run, click Pause. The task currently in progress finishes before the protocol pauses. The Scheduler Paused dialog box opens. For details, see Emergency stops and pauses.
To troubleshoot errors, see the Error Recovery Guide and the Bravo Platform User Guide in the Literature Library page of the Protein Sample Prep Workbench.
Setting up the Shutdown protocol
To set up the Shutdown protocol:
1 If applicable, click Select Experiment ID.
|
The Experiments Editor opens.
|
2 Select the Experiment ID that you want to use to record the steps performed during this application run, and then click Use Selected.
The Experiments Editor closes.
3 In the form, click Select Method to locate and select a method.
In the Open File dialog box, select the method, and click Open.
• To run the selected method, go to Starting the Shutdown run.
• To create or modify a method, proceed to step 4.
VWorks Plus. Administrator or technician privileges are required to create and modify methods.
4 In the Shutdown Options area of the form, enter the values for the following properties:
Property | Description |
|---|---|
Number of Syringe Wash Cycles | Specifies the number of syringe wash cycles to conduct at the wash station at deck location 1. Default: 3 Range: 0–10 |
Syringe Storage Liquid Source | Determines the location from which to aspirate the syringe storage liquid. The options are: • 96AM Wash Station. The liquid is aspirated from the chimneys of the wash station at deck location 1. • Syringe Storage Liquid. The liquid is aspirated from the labware that you specified at deck location 7. For this option, ensure that you: – Select the labware type for deck location 7 in the Labware Table area. – Provide the minimal volume overage required for the labware type being used, plus 200 µL per syringe. For the labware overage requirements, see the Labware Reference Guide (Workbench Literature Library page). |
5 To save the method:
a Click .
.b In the Save File As dialog box, type the file name and click Save.
VWorks Plus. You must save the method before you can run it.
Starting the Shutdown run
To start the Shutdown run:
1 Ensure that the accessories and labware are at the assigned deck locations, as shown in the Deck Layout image of the form.
|
2 Click  . The shutdown process begins.
. The shutdown process begins. 3 Observe the AssayMAP Bravo head as it does the following:
• Moves to deck location 2 and parks any cartridges remaining on the head.
• Moves to the wash station at deck location 1 and dispenses any liquid remaining in the syringes.
• Washes the syringes the specified number of times.
• Aspirates the 200 µL of Syringe Storage Solution into the syringes from the specified location.
4 When the protocol finishes:
a Remove all labware from the AssayMAP Bravo deck.
b Discard the excess Syringe Storage Liquid, if necessary.
c Empty the waste bottle.
5 If the AssayMAP Bravo Platform will remain unused overnight:
a Exit the Protein Sample Prep Workbench.
b Shut down and turn off the computer.
c Turn off the Bravo Platform.
d Turn off the accessories.
e At the Pump Module, lift the flip-top cover on each pump head to prevent flattening the tubing and to help maximize the tubing life.
Automation movements — Startup protocol
This section describes the basic movements of the AssayMAP Bravo Platform during the Startup protocol using the default protocol method. Changing the selections or parameters will alter the movements.
Head moves to deck location... | Action |
|---|---|
2 | Parks any cartridges that may have been mounted on the head from a protocol that had been previously aborted. |
1 | Dispenses any liquid remaining in the syringes into the wash station. |
1 | Washes the syringes the specified number of times. |
2 | Moves the head to a safe height above deck location 2 to enable user observation of the wash station at deck location 1. |
1 | Primes the wash line and fills the wash station with liquid from the wash buffer reservoir for the specified duration. |
1 | Moves the head to a safe height above deck location 1. |
Automation movements — Shutdown protocol
This section describes the basic movements of the AssayMAP Bravo Platform during the Shutdown protocol using the default method settings. Changing the selections or parameters will alter the movements.
Protocol steps | Head moves to deck location... | Action |
|---|---|---|
2 | Parks any cartridges that may have been mounted on the head from a protocol that had been previously aborted. | |
1 | Dispenses any liquid remaining in the syringes into the wash station. | |
1 | Washes the syringes the specified number of times. | |
1 | Fills the wash station chimneys with DI water. | |
1 or 7 | Aspirates 200 µL of DI water from the wash station into the syringes. | |
Aspirates 200 µL of Syringe Storage Liquid from the reservoir at deck location 7 into the syringes. | ||
1 | Moves the head to a safe height above deck location 1. |