Assay development guidelines and protocol notes

This topic explains the following:
• Guidelines and examples on how to vary the protocol settings
• Automation movements during an example protocol run
For a description of the settings, see Input Sample Settings and Input Addition Step Settings.
Examples of how to vary Addition steps by changing Incubation and Pause settings
The following examples demonstrate different ways of defining the following settings to produce different AssayMAP Bravo behaviors:
• Incubation Duration (min)
• Incubation Temperature (ºC)
• Pause After Addition
Note: The choice to use a lid or not is experiment dependent. Agilent recommends using a lid when doing incubations at elevated temperatures if evaporation is a concern.
Example 1. Basic addition of a reagent to the samples
This example shows the settings for a simple addition step that uses the bare AssayMAP probes to transfer 10 µL from the Reagent plate at deck location 5 into the Sample plate at deck location 4.
The settings are as follows:
• Incubation Duration 0 min
• Incubation Temperature OFF
• Pause After Addition not selected
Figure Example 1 settings
 |
Table Example 1: AssayMAP Bravo actions during the protocol
Action | Deck location |
|---|---|
a Uses the bare probes to aspirate 10 µL from the Reagent plate into the syringes. | 5 |
b Dispenses the 10 µL into the Sample plate. | 4 |
c Performs three mix cycles in the Sample plate to mix the contents. | 4 |
d Performs three syringe washes at the wash station. | 1 |
e Continues on to Addition Steps 2 to 5. | varies |
When to use these settings: In general, when incubation and deck manipulation are not required, set these addition steps as follows:
• Incubation Duration (min) to 0
• Incubation Temperature (°C) to OFF
However, if an Addition step with no incubation follows a step that includes incubation, make sure that you account for the ramp time to change the temperature. For details, see Additional incubation control considerations.
Example 2: Addition with on-deck incubation
This example uses the Peltier Thermal Station to automate an incubation step. The addition step settings include on-deck incubation after the liquid transfer to the Sample plate.
The settings are as follows:
• Incubation Duration 45 min
• Incubation Temperature 37 °C
• Pause After Addition not selected
Figure Example 2 settings
 |
Table Example 2: AssayMAP Bravo actions during the protocol
Action | Deck location |
|---|---|
a Sets the Peltier Thermal Station to 37 °C. Note: The heater is activated before the liquid transfer because it takes about 5 minutes for the temperature to reach the set point. | 4 |
b Uses the bare probes to aspirate 10 µL from the Reagent plate into the syringes. | 5 |
c Dispenses the 10 µL into the Sample plate. | 4 |
d Performs three mix cycles in the Sample plate to mix the contents. | 4 |
e Starts the incubation timer when the Peltier Thermal Station reaches 37 °C. | – |
f Performs three syringe washes at the wash station. | 1 |
g Remains idle for the remainder of the 45-minute incubation time. | – |
h Continues on to Addition Steps 2 to 5. | varies |
When to use these settings: Set the Incubation Duration and Incubation Temperature values for all addition steps where the Sample plate incubation will be conducted automatically on the AssayMAP Bravo deck.
Example 3: Addition with a pause
This example shows settings for an addition step that includes a pause after the liquid transfer to the Sample plate.
The settings are as follows:
• Incubation Duration 0 min
• Incubation Temperature OFF
• Pause After Addition selected
Figure Example 3 settings
 |
Table Example 3: AssayMAP Bravo actions during the protocol
Action | Deck location |
|---|---|
a Uses the bare probes to aspirate 10 µL from the Reagent plate into the syringes. | 5 |
b Dispenses the 10 µL into the Sample plate. | 4 |
c Performs three mix cycles in the Sample plate to mix the contents. | 4 |
d Performs three syringe washes at the wash station. | 1 |
e A Pause message appears on the screen and the AssayMAP Bravo Platform stops executing new tasks. The action remains paused until you click the Continue button that appears on the screen. | – |
f Continues on to Addition Steps 2 to 5. | varies |
When to use these settings: Select the Pause After Addition option to pause the run so that you can do the following:
• Replace used pipette tips with new pipette tips.
• Remove the Sample plate from the deck for off-deck incubation.
Example 4: Addition with on-deck incubation and a pause
This example uses the Peltier Thermal Station to automate an incubation step. After the incubation, the run will pause to allow the operator to modify something on the deck.
This settings are as follows:
• Incubation Duration 60 min
• Incubation Temperature 60 °C
• Pause After Addition check box selected
Figure Example 4 settings
 |
Table Example 4: AssayMAP Bravo actions during the protocol
Action | Deck location |
|---|---|
a Sets the Peltier Thermal Station to 60 °C. Note: The heater is activated before the liquid transfer because it takes about 5 minutes for the temperature to reach the set point. | 4 |
b Uses the bare probes to aspirate 10 µL from the Reagent plate into the syringes. | 5 |
c Dispenses the 10 µL into the Sample plate. | 4 |
d Performs three mix cycles in the Sample plate to mix the contents. | 4 |
e Starts the incubation timer when the Peltier Thermal Station reaches 60 °C. | – |
f Performs three syringe washes at the wash station. | 1 |
g Remains idle for the remainder of the 60-minute incubation time. | – |
h A Pause message appears on the screen and the AssayMAP Bravo Platform stops executing new tasks. The action remains paused until you click the Continue button that appears on the screen. Note: The Peltier Thermal Station remains at temperature (60 °C in this case) until the Pause message is cleared. | – |
i Continues on to Addition Steps 2 to 5. | varies |
When to use these settings: Use these settings to incubate a plate.
Example 5: Addition with only Incubation Temperature Set and Pause Activated
This example uses the Peltier Thermal Station to partially automate an incubation step. The on-deck incubation of the Sample plate is activated by setting the Incubation Temperature, but no Incubation Duration is specified. The Pause After Addition option is selected, which will cause the incubator to be active during the pause so that the operator can control the duration of the incubation.
The settings are as follows:
• Incubation Duration 0 min
• Incubation Temperature 60 °C
• Pause After Addition selected
Figure Example 5 settings
 |
Table Example 5: AssayMAP Bravo actions during the protocol
Action | Deck location |
|---|---|
a Sets the Peltier Thermal Station to 60 °C. Note: The heater is activated before the liquid transfer because it takes about 5 minutes for the temperature to reach the set point. | 4 |
b Uses the bare probes to aspirate 10 µL from the Reagent plate into the syringes. | 5 |
c Dispenses the 10 µL into the Sample plate. | 4 |
d Performs three mix cycles in the Sample plate to mix the contents. | 4 |
e Performs three syringe washes at the wash station. | 1 |
f A Pause message appears on the screen and the AssayMAP Bravo Platform stops executing new tasks. The action remains paused until you click the Continue button that appears on the screen. Note: The Peltier Thermal Station remains at temperature (60 °C in this case) until the Pause message is cleared. | – |
g Continues on to Addition Steps 2 to 5. | varies |
When to use these settings: Use this combination of settings when it is necessary to apply a robust seal to the plate, but still use the on-deck incubator to heat or cool the samples.
Note: In this case, the operator is responsible for timing the incubation step because the system does not keep track of the time that the plate was removed or returned to the deck.
Additional incubation control considerations
The time that it takes the Peltier Thermal Station to reach the set temperature is called ramp time. The temperature is in flux during the ramp time. The ramp time duration greatly depends on whether the Peltier Thermal Station is being used to actively control the temperature to the next set point or not. The following table provides approximate temperature ramp times for common incubation scenarios.
Table Examples of approximate ramp time (min) to reach target temperature
Scenario | Uses Peltier Thermal Station? | Start temperature (°C) | Target temperature (°C) | Ramp time (min), approximate |
|---|---|---|---|---|
1 | Yes | 25 | 60 | < 5 |
2 | Yes | 25 | 10 | < 5 |
3 | Yes | 60 | 10 | < 10 |
4 | Yes | 37 | 25 | < 5 |
5 | No | 37 | 25 | > 15 |
6 | No | 60 | 25 | > 30 |
7 | No | 10 | 25 | > 20 |
The following examples illustrate why temperature ramp times are an important consideration when defining an In-Solution Digestion method.
Example 1: Addition with incubation followed by addition with heater turned off
Figure Example 1 settings
 |
In this example:
• Addition 1 requires an incubation of 45 minutes at 60 °C.
• Addition 2 does not require incubation, so the Incubation Temperature is set to Off.
Intuitively, it makes sense to turn off the incubator if it is not required, but this could have unintended consequences for Addition 2 and subsequent additions. After completing Addition 1, the Peltier Thermal Station will be turned off in preparation for Addition 2, but its temperature will still be very close to 60 °C. According to the preceding table of example ramp times, the Peltier Thermal Station requires at least 30 minutes to return to ambient temperature (~25 °C). The elevated temperature at deck location 4, where the Peltier Thermal Station is installed, could be problematic if later addition steps are sensitive to elevated temperature. In most cases, this problem can be mitigated by using the Peltier Thermal Station to actively cool the temperature back to ambient temperature, as described in Example 2.
Example 2: Addition with incubation followed by addition with heater at ambient temperature
Figure Example 2 settings
 |
In this example:
• Addition 1 requires an incubation of 45 minutes at 60 °C.
• Addition 2 requires at 25 °C (ambient temperature) at deck location 4.
These settings will cause the Peltier Thermal Station to actively cool the temperature from Addition 1 to ambient temperature for Addition 2. The approximate time required is 5 minutes for this temperature change. See the preceding table of example ramp times.
Error messages
Before executing an In-Solution Digestion: Single Plate method, the application performs several error checks to ensure that a feasible run has been specified.
The following table lists some of the types of error checks.
Error check | Description |
|---|---|
Sample Plate Capacity | Compares the Initial Sample Volume input to the Sample Plate Labware selection to verify that it does not exceed the labware volume capacity. |
Reagent Plate Capacity | Compares each Reagent Addition Volume input to its respective Labware Selection to ensure that it does not exceed the labware volume capacity. |
Cumulative Volume | Calculates the cumulative digest volume (Initial Sample Volume + sum of Reagent Addition Volumes) to ensure that the final digest volume does not exceed the Sample Plate Labware volume capacity. |
Sample Plate Pipette Tip Compatibility | If a deep-well plate type is selected for the Sample Plate Labware, each addition step is verified to ensure that the Use Pipette Tips for Addition? option is selected. |
Reagent Plate Pipette Tip Compatibility | If a deep-well plate type is selected for any of the five reagent Labware Selections, the corresponding Use Pipette Tips for Addition? setting is verified to ensure that pipettes will be used for the transfer. |
No Addition Steps | Checks to see that at least one reagent addition step has been specified by ensuring that not all of the Reagent Names settings have been set to NONE. |
If a problem is identified, an error message displays. The following table lists some of the error messages, reasons for the error, and a description of how to correct the error.
Method Status error message | Reason for error | How to correct the error |
|---|---|---|
File chosen is not a valid Method file. | The method file selected is for a different application. | Click Select Method, and then select a valid method file. |
File type is incorrect. Please choose a correct Method file. | The file selected is not a method file. | Click Select Method, and then select a valid method file. |
Error: Total volume will exceed Sample Labware capacity (0 µL). Please select a larger capacity Sample Labware. | No labware is selected for the Sample Plate. | Under Input Sample Settings, select the labware that you are using from the Sample Plate Labware list. |
Error: Total volume will exceed Sample Labware capacity (n µL). Please select a larger capacity Sample Labware. | The initial sample volume exceeds the capacity of the selected labware type. | Do one of the following: • Select a labware type with a larger capacity from the Sample Plate Labware list. • Reduce the value in the Starting Sample Volume box to a number that is within the capacity of the current labware selection. For a list of maximum volumes by labware type, see Labware. |
Error: Sample Plate is a type of deep well labware. Tips are needed in all steps. | Some of the addition steps specify the use of the AssayMAP bare probes, which cannot access the bottom of most deep-well plates. Pipette tips are required for addition steps that include a deep-well plate on the AssayMAP Bravo Platform. | Do one of the following: • Select the Use Tips for Addition check box for each Addition step to ensure that pipette tips are used for the transfers instead of the AssayMAP probes. • If you do not want to use pipette tips for the transfers, ensure that no deep-well plates are selected in the Sample Plate Labware list and the Labware Selection lists for the Addition steps. |
Error: Check Step 1 for volume/labware/tip combination. | The Volume input for one or more of the Addition Steps is greater than the volume capacity for the selected labware type. | Do one of the following for the corresponding Addition step: • Select a labware type with a larger capacity from the Labware Selection list. • Reduce the value in the Addition Volume box to a number that is within the capacity of the current labware selection. For a list of maximum volumes by labware type, see Labware. |
Error: Check Step 1 for volume/labware/tip combination. Error: Total volume will exceed Sample Labware capacity. Please select a larger capacity Sample Labware. | The cumulative volume in the sample plate, after all addition steps have completed, would be greater than the capacity of the selected Sample plate labware type. | Do one of the following: • Select a labware type with a larger capacity from the Sample Plate Labware list. • Reduce the values in the Starting Sample Volume box and/or the Addition Volume boxes to volumes that are within the capacity of the current labware selection. For a list of maximum volumes by labware type, see Labware. |
There are no reagent steps included on the form. Please double check and start the protocol again. | The Addition Name for all five addition steps is set to None, which causes all steps to be skipped. | For each addition step you want to include, select or type a name in the Addition Name box. Ensure that you have entered settings for at least one addition step in the Input Addition Step Settings area. |
Error: Incubation temperature for Addition step 1 is out of range. | The Incubation Temperature (°C) is set to a value that is outside of the allowable range (4 to 100 °C). | If you want to specify an on-deck incubation, enter a value within the allowable range (4 to 100 °C) in the Incubation Temperature (°C) box. If you do not want to specify a temperature, select OFF. |
Error: No labware associated with Addition step 1. | The Labware Selection is set to No Labware for one or more addition steps. | For each addition step you want to include, select the corresponding labware from the Labware Selection list. |
Error Check Step 1 for volume/labware/tip combination. | A deep-well plate is selected for one or more of the addition steps, but these steps are specified to use AssayMAP Probes, which cannot access the bottom of most deep-well plates. | Do one of the following: • Select the Use Tips for Addition check box for each Addition step to ensure that pipette tips are used for the transfers instead of the AssayMAP probes. • If you do not want to use pipette tips for the transfers, ensure that no deep-well plates are selected in the Labware Selection lists for the Addition steps. |
Error: Addition step 1 labware is a reservoir, lids cannot be used. | The selected labware type cannot have a lid, but the Plate Lidded setting is set to Lid. | Do one of the following: • Select No Lid in the Plate Lidded box for this Addition step. • Select a type of labware that can use a lid in the Labware Selection list for this Addition. |
Automation movements during the protocol
In-Solution Digestion: Single Plate is designed to mimic common manual in‑solution digestion procedures for successively adding digestion reagents to samples and then incubating. In this application, a 96-well sample plate is placed at Bravo deck location 4, and up to five 96‑well plates containing digestion reagents are placed at deck locations: 5—9. During the protocol, the AssayMAP Bravo Platform transfers each of the digestion reagents into the sample plate, one at a time, with optional heated incubation steps after each reagent addition. The automation movements are dependent on the choices selected in the method.
The following figure shows an example of an In-Solution Digestion method and the following table lists the automation movements for this example.
Figure Example method settings
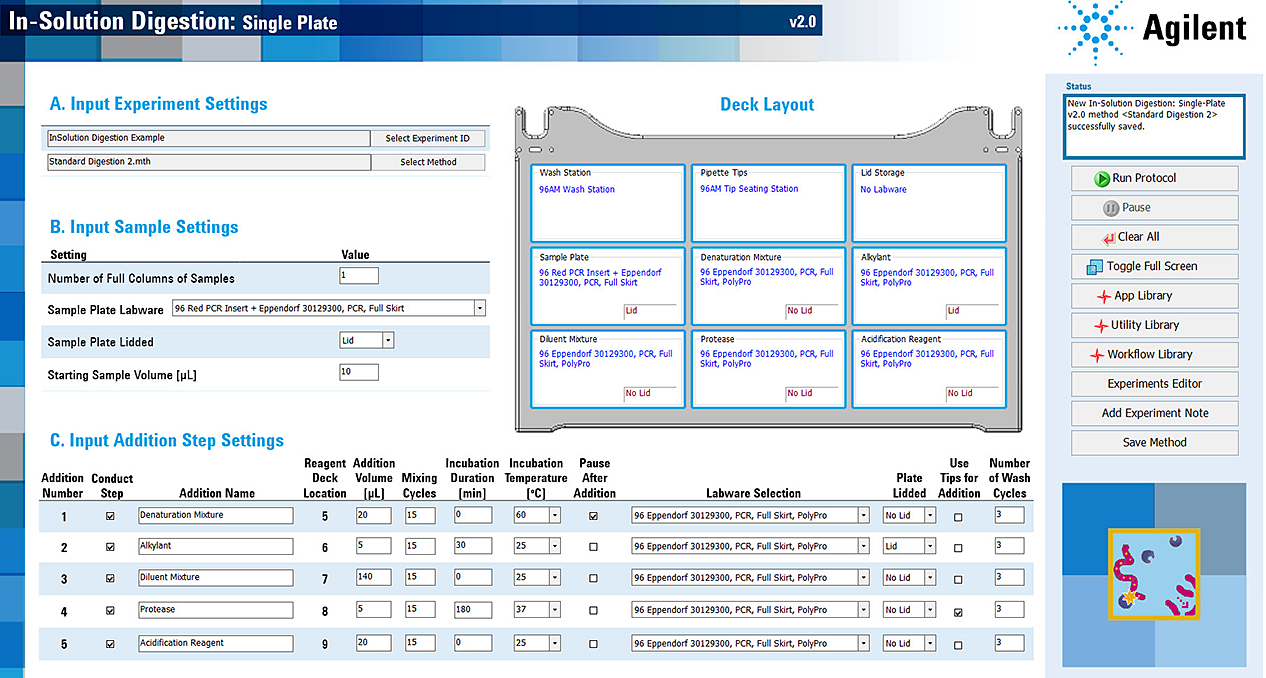 |
Table Automation movements for example method
Protocol step | Head moves to deck location... | Action |
|---|---|---|
Starting protocol | 2 | Parks all cartridges that might have been loaded on the head from a previously aborted protocol. |
1 | Dispenses any liquid remaining in the syringes into the wash station. | |
Addition step 1 | 1 | Washes the syringes. |
1 | Sets the Peltier Thermal Station to 60 °C and pauses until the temperature reaches 55 °C. | |
5 | Aspirates air into the syringes while moving to location 5. | |
5 | Prewets the syringes by cycling up and down 3 times. Goes to the top of the wells and dispenses air and then performs a tip touch. Aspirates 20 µL of Denaturation Mixture. | |
4 | Picks up the lid. | |
3 | Drops off the lid. | |
4 | Dispenses 20 µL of Denaturation Mixture, and then cycles up and down 15 times to mix the solution. Goes to the top of the wells and dispenses air and then does a tip touch. | |
3 | Picks up the lid. | |
4 | Drops off the lid. | |
1 | Dispenses any air remaining in the syringes, and then washes the syringes. Note: The protocol pauses until you click Continue in the Scheduler Paused window. | |
Addition step 2 | 1 | Sets the Peltier Thermal Station to 25 °C and pauses until the temperature reaches 30 °C. |
6 | Picks up the lid. | |
3 | Drops off the lid. | |
6 | Aspirates air into the syringes while moving to location 6. | |
6 | Prewets the syringes by cycling up and down 3 times. Goes to the top of the wells and dispenses air and then performs a tip touch. Aspirates 5 µL of Alkylant. | |
3 | Picks up the lid. | |
6 | Drops off the lid. | |
4 | Picks up the lid. | |
3 | Drops off the lid. | |
4 | Dispenses 5 µL of Denaturation Mixture, and then cycles up and down 15 times to mix the solution. Goes to the top of the wells and dispenses air and then does a tip touch. | |
3 | Picks up the lid. | |
4 | Drops off the lid. | |
1 | Dispenses any air remaining in the syringes, and then washes the syringes. | |
1 | Waits for 30-minute incubation. | |
Addition step 3 | 1 | Sets the Peltier Thermal Station to 25 °C and pauses until the temperature reaches 20–25 °C. |
7 | Aspirates air into the syringes while moving to location 7. | |
7 | Prewets the syringes by cycling up and down 3 times. Goes to the top of the wells and dispenses air and then performs a tip touch. Aspirates 140 µL of Diluent Mixture. | |
4 | Picks up the lid. | |
3 | Drops off the lid. | |
4 | Dispenses 140 µL of Diluent Mixture, and then cycles up and down 15 times to mix the solution. Goes to the top of the wells and dispenses air and then does a tip touch. | |
3 | Picks up the lid. | |
4 | Drops off the lid. | |
1 | Dispenses any air remaining in the syringes, and then washes the syringes. | |
1 | Waits for 0-minute incubation. | |
Addition step 4 | 1 | Sets the Peltier Thermal Station to 37 °C. |
1 | Moves the syringes up and down for 4 cycles with a wicking across the chimneys after every cycle. | |
2 | Mounts the pipette tips on the head. | |
8 | Aspirates air into the syringes while moving to location 8. | |
8 | Prewets the pipette tips by cycling up and down 3 times. Goes to the top of the wells and dispenses air and then performs a tip touch. Aspirates 5 µL of Protease. | |
4 | Picks up the lid. | |
3 | Drops off the lid. | |
4 | Dispenses 5 µL of Protease, and then cycles up and down 15 times to mix the solution. Goes to the top of the wells and dispenses air and then does a tip touch. | |
3 | Picks up the lid. | |
4 | Drops off the lid. | |
1 | Dispenses any air remaining in the syringes, and then washes the pipette tips. | |
2 | Parks the pipette tips in the seating station. | |
1 | Waits for 180-minute incubation. | |
Addition step 5 | 1 | Sets the Peltier Thermal Station to 25 °C. |
9 | Aspirates air into the syringes while moving to location 9. | |
9 | Prewets the syringes by cycling up and down 3 times. Goes to the top of the wells and dispenses air and then performs a tip touch. Aspirates 20 µL of Acidification Reagent. | |
4 | Picks up the lid. | |
3 | Drops off the lid. | |
4 | Dispenses 20 µL of Acidification Reagent, and then cycles up and down 15 times to mix the solution. Goes to the top of the wells and dispenses air and then does a tip touch. | |
3 | Picks up the lid. | |
4 | Drops off the lid. | |
1 | Dispenses any air remaining in the syringes, and then washes the syringes. | |
1 | Waits for 0-minute incubation. |