Running the protocol

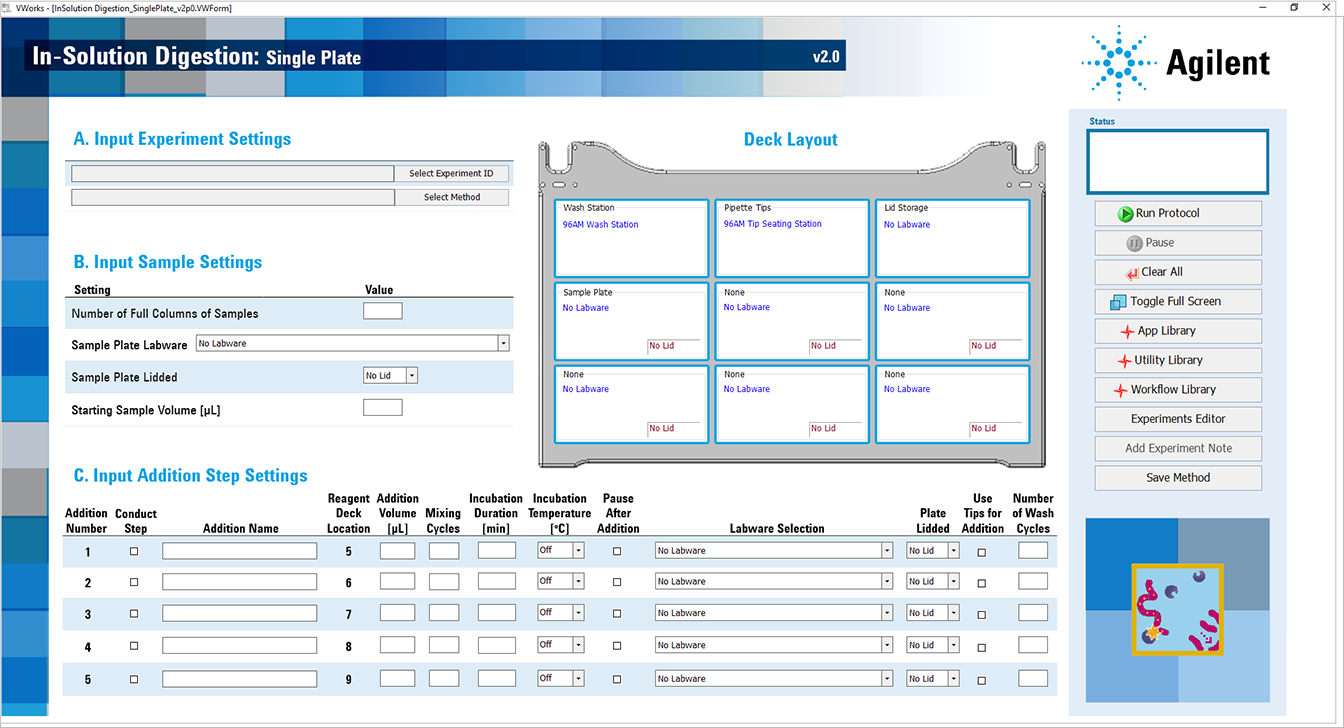
The In-Solution Digestion: Single Plate protocol performs up to five successive liquid-addition steps. Each addition step transfers a reagent or mixture of reagents into a common sample plate, followed by incubation on or off deck. The sample volume, incubation duration, incubation temperature, labware, and other parameters can be customized for each of the five addition steps.
Experiment ID and method requirements
Each workbench application and utility has an Experiment Settings section that allows you to select an experiment ID and a method.
• An experiment ID is a database record that captures the steps executed and the settings used during each run of an application or utility. Any errors that may have occurred during a run are also recorded.
To create an experiment ID, you open the Experiments Editor by clicking  in any Workbench app or utility. For details, go to the Literature Library and open Using the Protein Sample Prep Workbench. In the browser that opens, click Using Experiment IDs.
in any Workbench app or utility. For details, go to the Literature Library and open Using the Protein Sample Prep Workbench. In the browser that opens, click Using Experiment IDs.• A method is a comprehensive collection of saved settings for an application or utility, which you can use to run the application or utility.
Experiment IDs and methods are required for compliance-enabled VWorks editions and optional for noncompliance-enabled VWorks editions.
VWorks edition | Experiment ID and method selection |
|---|---|
VWorks Plus | Required |
VWorks Standard | Optional |
Before you start
Ensure that you:
• Prepare the reagents. See Preparing the solutions.
• Prepare the samples. See Preparing the samples.
• If applicable, make sure that you know which experiment ID to use to record the steps executed during the utility and app runs.
• Run the Startup utility to prepare the AssayMAP Bravo Platform for the run. See System Startup/Shutdown v3.0 User Guide.
• Runs that require pipette tips. Prepare the seating station with the appropriate number and configuration of pipette tips to match the samples to be processed. To prepare the pipette tips, run the Pipette Tip Transfer utility. For details, see Pipette Tip Transfer v2.0 User Guide.
Setting up the protocol
Before you start the protocol, make sure the appropriate selections and values are specified in the In-Solution Digestion application.
To set up the protocol:
1 Open the App Library.
2 Locate In-Solution Digestion: Single Plate, and then click App.
 |
The In-Solution Digestion: Single Plate application opens.
 |
3 If applicable, click Select Experiment ID.
 |
The Experiments Editor opens.
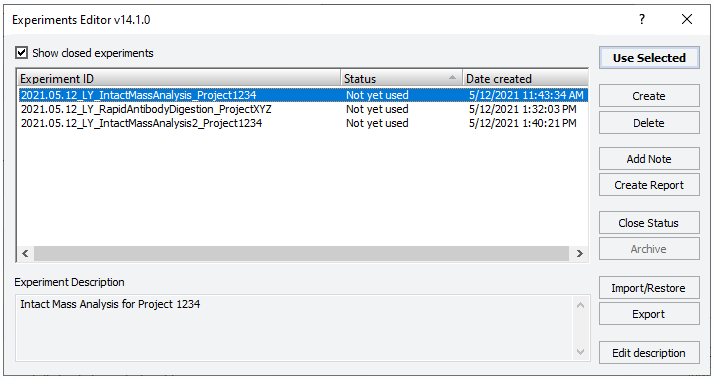 |
4 Select the Experiment ID that you want to use to record the steps performed during this application run, and then click Use Selected.
The Experiments Editor closes.
5 In the form, click Select Method to locate and select a method.
In the Open File dialog box, select the method, and click Open.
Note: The software includes an example method file that you can use as a template to create your own methods.
• To run the selected method, go to Starting the protocol run.
• To create or modify a method, proceed to step 6.
VWorks Plus. Administrator or technician privileges are required to create and modify methods.
6 Under Input Sample Settings, specify the settings to meet the requirements of your run. For details, see Input Sample Settings.
7 Under Input Addition Step Settings, select the check boxes of the steps that you want to perform, and enter the values and labware selections for the selected steps. For details, see Input Addition Step Settings
Note: To avoid potential confusion when a experiment ID report is generated, ensure the following for any unselected addition steps:
• Addition Volume, Mixing Cycles, Incubation Duration, and Number of Wash Cycles boxes are blank.
• Pause After Addition and Use Tips check boxes are cleared.
• Labware Selection is set to No Labware.
• Plate Lidded is set to No Lid.
8 To save the method:
a Click  .
.
.b In the Save File As dialog box, type the file name and click Save.
VWorks Plus. You must save the method before you can run it.
A series of error checks are performed. If any errors are detected, a message displays a description of the problem. For details, see Error messages.
Input Sample Settings
The following table gives a brief description of each setting you specify about the Sample Plate at deck location 4.
Table Input Sample Settings overview
Setting | Description | Value range |
|---|---|---|
Number of Full Columns of Samples | Specifies the number of full columns of samples in the sample plate at deck location 4. | 1–12 |
Sample Plate Labware | Specifies the type of labware or labware plus thermal insert that will be placed at deck location 4, which contains the samples to be digested. Note: A thermal insert is critical for proper temperature regulation by the Peltier Thermal Station at this location. Note: The selected plate must be able to hold the initial volume and the volume that will be added to this plate over the course of the run. Note: If a deep-well plate is selected, pipette tips are required for the liquid transfers. For labware options, see Labware. | See Labware. |
Sample Plate Lidded | Specifies whether the sample plate has a lid. • If you select Lid, ensure that the sample plate has a universal microplate lid present at the start of the run. For details see Labware. • If you select No Lid, ensure the sample plate does not have a lid at the start of the run. | Lid, No Lid |
Starting Sample Volume | Specifies the volume of sample that is initially present in the sample plate at the beginning of the run. | 0–1000 µL |
Input Addition Step Settings
The following table gives a brief description of each setting you specify for each of the five reagent addition steps. For examples of how to vary the addition steps by changing the Incubation and Pause After Addition settings, see Assay development guidelines and protocol notes.
The values that you use can vary dramatically from experiment to experiment. For an example of an approach that uses values like those in the supplied method, Standard Digestion 1.mth, see Agilent Application Note 5991-4872EN in the Reference library.
Table Input Addition Step Settings overview
Setting | Description | Value range |
|---|---|---|
Conduct Step | Indicates whether to perform the corresponding addition step. | Selected, Not selected |
Addition Name | Specifies a name for the addition step. | – |
Addition Volume | Specifies the volume of reagent that will be transferred from the reagent plate into the sample plate at deck location 4. Note: The Reagent Deck Location column shows the deck location of the reagent plate. Note: Accuracy and precision decrease with volumes less than 5 µL. | 0–1000 µL |
Mixing Cycles | Specifies the number of mixing cycles that will be used to mix the samples and reagents after the reagent addition. Note: The number of mixes must be determined empirically. In general, if the total volume in the wells are greater than 200 µL or the viscosity is high, the mix cycles must be greater than 10. | 0–100 |
Incubation Duration | Specifies the amount of time that the sample plate will be incubated (deck location 4) after the reagent is added and the mixing is completed. The reagent addition step will not start until the reading on the Peltier Thermal Station is within 5 °C of the specified incubation temp. Note: The combination of setting the Incubation Duration to 0 and selecting Pause After Addition allows off-deck incubation for as long as desired. This may be required for high-temperature incubations where evaporation or condensation on the plate lid is a concern. | 0–1000 min |
Incubation Temperature | Specifies the temperature set point of the Peltier Thermal Station during the sample plate incubation (deck location 4). | OFF, 4–110 °C |
Pause After Addition | Pauses the protocol after completing the tasks in the step and before starting the next addition step. See Assay development guidelines and protocol notes for instructions on effectively using the Pause feature. | Selected, Not selected |
Labware Selection | Specifies the labware type that will be present at the corresponding Reagent Deck Location for the step. | See Labware. |
Plate Lidded | Specifies whether the reagent plate (deck locations 5–9) will have a lid during the run. • If you select Lid, ensure that the reagent plate associated with the step has a universal microplate lid present at the start of the run. For details see Labware. • If you select No Lid, ensure the reagent plate associated with the step does not have a lid. | No Lid, Lid |
Use Tips for Addition | Specifies whether pipette tips (deck location 2) will be used instead of the bare probes to transfer this reagent into the sample plate. • To use bare probes, clear the check box. • To use pipette tips, select the check box. You must fill the seating station with the appropriate number and configuration of pipette tips to match the samples to be processed. To prepare the pipette tips, run the Pipette Tip Transfer utility (Pipette Tip Transfer v2.0 User Guide). | Selected, Not selected |
Number of Wash Cycles | Specifies the number of wash cycles to be performed at the wash station after the reagent addition step has completed. • If the Use Tips for Addition check box is selected, this step washes the pipette tips. • If the Use Tips for Addition check box is cleared, the protocol washes the bare syringe probes. | 0 - 10 |
About performing a mock run (optional)
If you are unfamiliar with the protocol and would like to see how it operates before running it with valuable samples and reagents, you can perform a mock run. A mock run uses empty or water-filled labware and source bottles.
You prepare for a mock run the same way you would prepare for a real protocol run, except that you use empty labware for a totally dry run or labware containing water for a wet run. To decrease the run time, you can decrease the volumes.
If your In-Solution Digestion protocol requires pipette tips, you must use pipette tips for the mock run. For instructions on how to set up the pipette tips in the seating station, see Pipette Tip Transfer v2.0 User Guide.
Starting the protocol run
To start the protocol run:
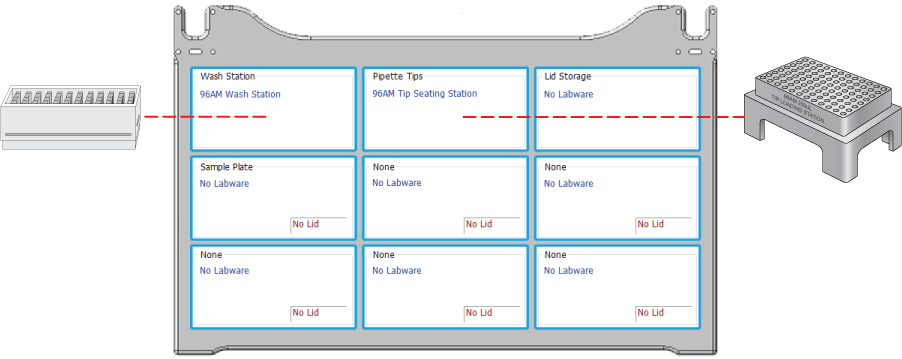
1 Ensure that the accessories and labware are at the assigned deck locations, as shown in the Deck Layout image of the form.
• Place the filled Sample Plate at deck location 4 and the filled reagent plates at their respective deck locations.
• Ensure that all plates that require lids have been properly lidded, and no lids are present on other labware.
• If pipette tips are required, ensure the pipette tips are in the seating station at deck location 2.
Make sure the labware are properly seated on the Bravo deck.
 |
2 Click  to start the run.
to start the run. To monitor the progress of the run, check the Status box.
 |
To pause the run, click Pause. The task currently in progress finishes before the protocol pauses. The Scheduler Paused dialog box opens. For details, see Emergency stops and pauses.
To troubleshoot errors, see the Error Recovery Guide and the Bravo Platform User Guide in the Literature Library page of the Protein Sample Prep Workbench.
Adding an experiment ID note after the run
After the protocol run ends or during a pause, you can add a note to the experiment ID. For example, a note can describe any observations during the run or any offline steps that are being executed. The notes that you add will appear in any reports generated for the experiment ID.
To add a note to an open experiment ID:
1 While the experiment ID is still selected in the Experiment Settings area, click  . The Add Note dialog box opens.
. The Add Note dialog box opens.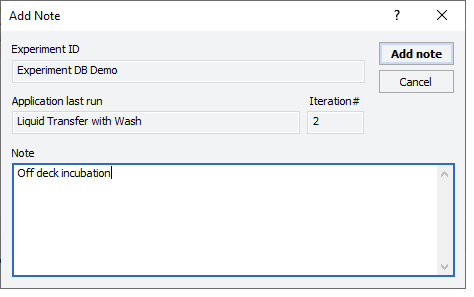 |
2 In the Note area, type the note, and then click OK.
For detailed instructions on working with Experiment IDs, see Using Experiment IDs.
Cleaning up
To clean up after a run:
1 Remove used labware from the deck.
2 Discard leftover reagents appropriately.
3 Optional. Conduct stringent washing of the syringes:
a Open the Syringe Wash utility  .
.
.b If applicable, click Select Experiment ID to open the Experiments Editor.
|
c In the Experiments Editor, select the Experiment ID that you want to use to capture the steps performed during this utility run, and then click Use Selected.
d Click Select Method to select and load the method for this utility.
e Confirm that the labware and accessories on the AssayMAP Bravo deck match the display in the Deck Layout area of the form.
f Click to start the run.
to start the run.To shut down at the end of the day:
Run the System Shutdown utility. See System Startup/Shutdown v3.0 User Guide.