Syringe Test v2.0 User Guide

The Syringe Test v2.0 utility and the AssayMAP Syringe Test Kit enable verification of the integrity of the probes and syringes in the Bravo 96AM Head.
When to use the AssayMAP Syringe Test Kit
• As a part of routine hardware quality control to verify head functionality
• To verify the functioning of one or more syringes that produce suspicious results
• After a Bravo 96AM Head collision in which syringes may have been damaged
• After replacing any syringes in the Bravo 96AM Head
How it works
The AssayMAP Syringe Test kit contains a rack of resin-free cartridges, labware, and a viscous dye solution. You place the resin-free cartridges and labware containing the dye solution on the Bravo deck at the specified locations, and then run the Syringe Test utility. The Syringe Test protocol does the following:
• Mounts the 96 resin-free cartridges on the syringes in the AssayMAP head.
• Places the cartridge tips in the syringe test solution. The syringes are quickly drawn to a 225 µL draw position. The speed of the aspiration is faster than the liquid can be drawn through the resin-free cartridges into the syringes, so a partial vacuum is formed in the syringes. The cartridges remain in the syringe test solution for 5 minutes to allow the test solution to be drawn into the syringes.
• Ejects the cartridges, and then dispenses the dye solution into a 96-well flat bottom plate.
The absorbance of dye solution in each well of the plate is measured using a microplate reader.
If a syringe is damaged or the seal between the syringe probes and the cartridges is compromised, air will be drawn into the syringes from the vacuum. The air leak will decrease the amount test solution drawn into the syringes and have a lower signal identifying the syringe as damaged.
Hardware
The following figure and table show the components of the AssayMAP Bravo Platform, which are required for running the AssayMAP protocols.
Figure AssayMAP Bravo Platform components
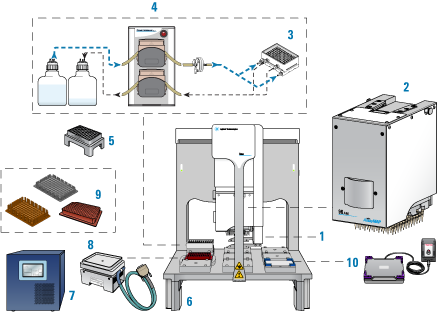 |
Item | Required hardware |
|---|---|
1 | Gripper upgrade |
2 | Bravo 96AM Head |
3 | 96AM Wash Station or the later model 96 Channel Wash Station |
4 | Pump Module 2.0 and two carboys |
5 | 96AM Cartridge & Tip Seating Station |
6 | Risers, 146 mm |
7 | STC controller |
8 | Peltier Thermal Station with custom plate nest |
9 | Thermal plate insert |
10 | Orbital Shaking Station with Control Unit |
Note: The white wide-bore chimneys work for both 5-µL and 25-µL cartridges and are standard on wash stations purchased in 2020 onward. The wide-bore chimneys are white plastic, whereas the standard-bore chimneys are a semi-clear plastic. For details, see the 96 Channel Wash Station Maintenance Guide.
Additional required equipment
Required equipment | Description |
|---|---|
Centrifuge | Centrifuge with a microplate rotor capable of achieving 500 x g |
Microplate reader | Spectrophotometer capable of detecting absorbance at 425 nm in a 96-well microplate and generating a text (TXT) file of the data. Note: Although 425 nm is optimal, 405 nm is also acceptable. |
Software
The following table lists the minimum software requirements.
Software | Version |
|---|---|
Agilent VWorks Plus (compliance-enabled edition) or VWorks Standard | 14.4 |
Agilent Protein Sample Prep Workbench | 4.0.2 |
Microsoft Excel Required for the reagent volume calculators and method setup tools. | Microsoft Office 365 32-bit edition |
For an overview of the software components, see Overview of software architecture.
AssayMAP Syringe Test Kit components
One AssayMAP Syringe Test Kit provides enough materials and reagents to perform 20 tests of the 96 syringes in the Bravo 96AM head.
The following table provides a description of the kit components.
Component | Description | Part Number | Quantity |
|---|---|---|---|
Syringe Test Kit includes | G5496-60050 | 1 | |
• AssayMAP Resin-Free Cartridges | 96 cartridges used for testing | G5496-60009 | 1 rack |
• Test solution | Aqueous colormetric solution with appropriate viscosity | 5190-7471 | 3 bottle (250 mL each) |
• Reservoir, Seahorse 201254-100, PP, no walls, pyramid bottom | Required reusable labware | 201254-100 | 2 |
• 96 Greiner 655101 PS Clr Rnd Well Flat Btm | Required reusable labware | 655101 | 2 |
Labware requirements
The Syringe Test requires the following labware:
• Open reservoir, (2 per test) to hold water (deck location 4) and diluted test solution (deck location 7).
• 96-well microplate, (2 per test) for test sample collection and a centrifugation balance plate (deck locations 8 and 9).
The following figure shows the labware locations on the Bravo deck. The table lists the options for labware type by deck location.
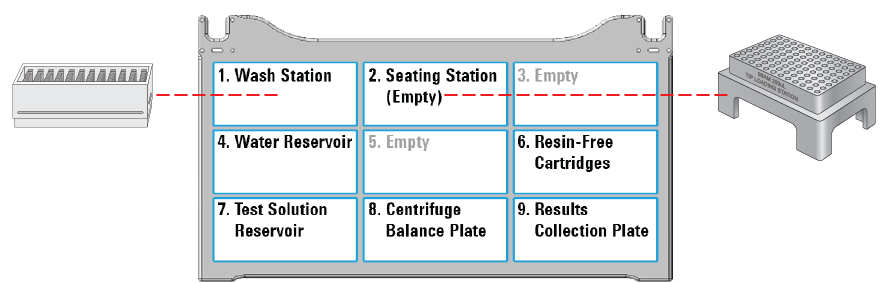 |
Table Labware options by deck location
Labware options | Manufacturer part number | Deck location |
|---|---|---|
Reservoir, Seahorse 201254-100, PP, no walls, pyramid bottom | Agilent 201254-100 | 4, 7 (default) |
Reservoir, Axygen Scientific RES‑SW96-LP, 86mL pyramid bottom | Axygen Scientific RES‑SW96-LP | 4, 7 |
12 Column, Low Profile Reservoir, Natural PP | Agilent 201280-100 | 4, 7 |
96 V11 Manual Fill Reservoir | Agilent G5498B#049 | 4, 7 |
96 Greiner 655101 PS Clr Rnd Well Flat Btm | Greiner Bio-One 655101 | 8, 9 (default) |
96 Nunc 269620, Flat Bottom, Polystyrene | Thermo-Fisher 269620 | 8, 9 |
96 Corning 9017, Flat bottom, polystyrene, clear | Corning 9017 | 8, 9 |
Workflow
Step | For this task... | See... |
|---|---|---|
1 | Run the Startup protocol in the System Startup/Shutdown utility. | |
2 | Set up the Syringe Test protocol. | |
3 | Set up the AssayMAP Bravo deck for the syringe test. | |
4 | Run the Syringe Test. | |
5 | Analyze the results. | |
6 | Verify defective syringes. |
Experiment ID and method requirements
Each workbench application and utility has an Experiment Settings section that allows you to select an experiment ID and a method.
• An experiment ID is a database record that captures the steps executed and the settings used during each run of an application or utility. Any errors that may have occurred during a run are also recorded.
To create an experiment ID, you open the Experiments Editor by clicking  in any Workbench app or utility. For details, go to the Literature Library and open Using the Protein Sample Prep Workbench. In the browser that opens, click Using Experiment IDs.
in any Workbench app or utility. For details, go to the Literature Library and open Using the Protein Sample Prep Workbench. In the browser that opens, click Using Experiment IDs.• A method is a comprehensive collection of saved settings for an application or utility, which you can use to run the application or utility.
Experiment IDs and methods are required for compliance-enabled VWorks editions and optional for noncompliance-enabled VWorks editions.
VWorks edition | Experiment ID and method selection |
|---|---|
VWorks Plus | Required |
VWorks Standard | Optional |
Setting up the Syringe Test protocol
The following procedure specifies volume requirements for the default labware selections. If you choose different labware types from the list of options, you should adjust the volumes accordingly.
To set up the protocol:
1 Open the Utility Library.
Locate Syringe Test, and then click Utility.
 |
The Syringe Test utility opens.
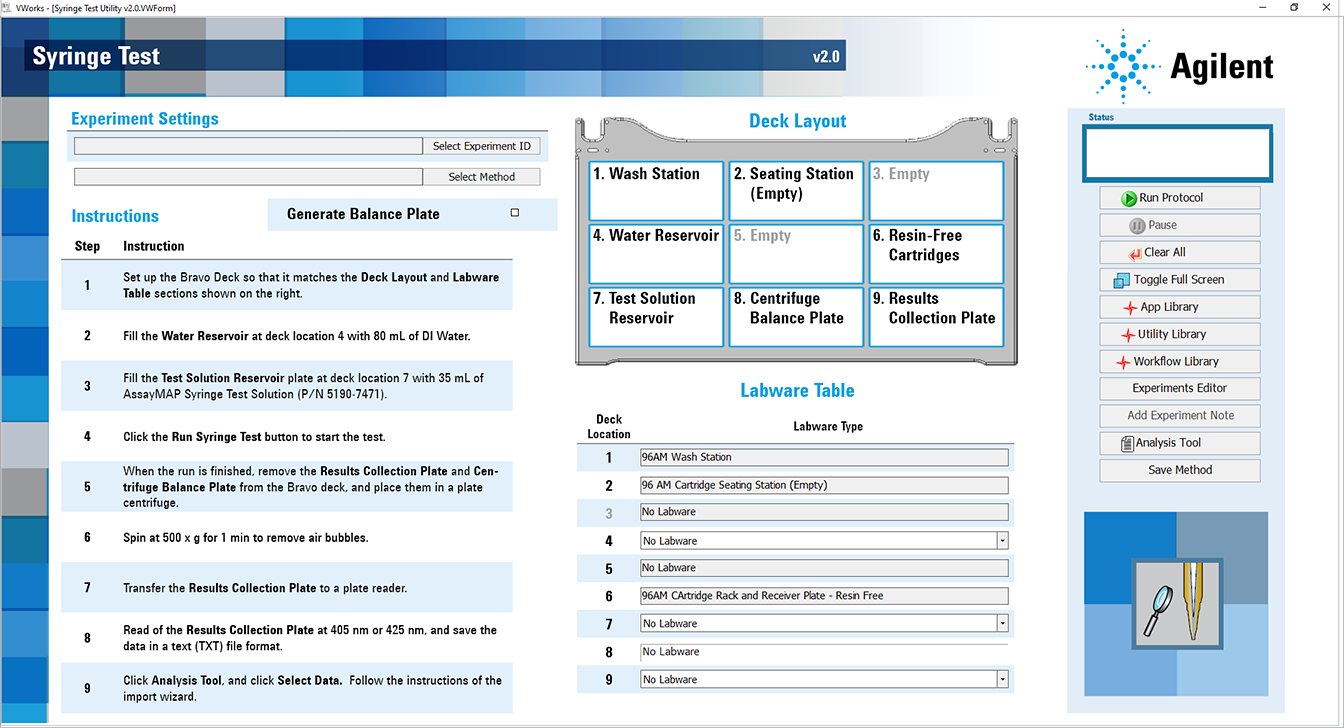 |
2 If applicable, click Select Experiment ID.
 |
The Experiments Editor opens.
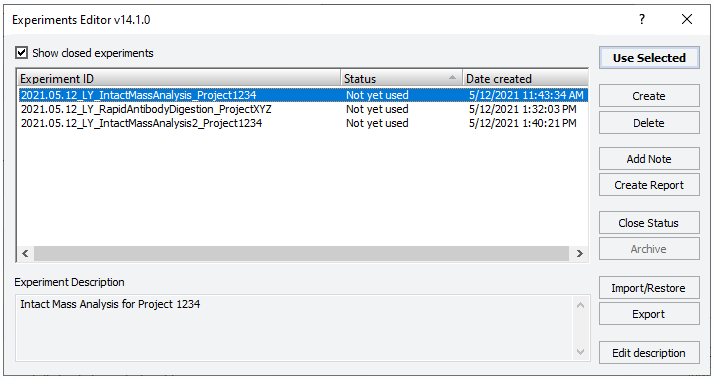 |
3 Select the Experiment ID that you want to use to record the steps performed during this application run, and then click Use Selected.
The Experiments Editor closes.
4 In the form, click Select Method to locate and select a method.
In the Open File dialog box, select the method, and click Open.
• To run the selected method, go to Starting the Syringe Test protocol run.
• To create or modify a method, proceed to step 5.
VWorks Plus. Administrator or technician privileges are required to create and modify methods.
5 In the Labware Table area, select the labware you are using for the protocol run.
6 Optional. To have the Centrifuge Balance Plate filled with 200 µL water by the Bravo Platform, select the Generate Balance Plate check box.
7 To save the method:
a Click  .
.
.b In the Save File As dialog box, type the file name and click Save.
VWorks Plus. You must save the method before you can run it.
Starting the Syringe Test protocol run
To start the Syringe Test protocol run:
1 Place the accessories or components on the AssayMAP Bravo deck.
|
Deck location | Accessory or component | Purpose |
|---|---|---|
1 | 96AM Wash Station or the later model 96 Channel Wash Station | Washes syringes and exterior cartridges |
2 | 96AM Cartridge & Tip Seating Station | Ensures proper seating of the cartridges on the head |
4 | Reservoir, Seahorse 201254-100, PP (default)* | Holds water for the balance plate and dilution of test solution. |
6 | Cartridge rack with 96 resin-free cartridges | Holds test cartridges at beginning and end of protocol |
7 | Reservoir, Seahorse 201254-100, PP (default)* | Holds the 1X test solution |
8 | 96 Greiner 655101 PS Clr Rnd Well Flat Btm (default)* | Microplate of same type as the collection plate for balancing in the centrifuge |
9 | 96 Greiner 655101 PS Clr Rnd Well Flat Btm (default)* | Receives the test solution from the syringes and is used for the absorbance read. |
* For other options, see Labware requirements. | ||
2 Ensure the following:
• The physical layout on the Bravo deck matches the Deck Layout image in the form.
• The selections in the Labware Table reflect the labware you are using for the protocol run.
• The labware are properly seated on the Bravo deck.
3 Dispense 80 mL of water into the reservoir at deck location 4.
4 Dispense 35 mL of the Test Solution into the reservoir at deck location 7.
5 Click  to start the run.
to start the run.  |
After the protocol run starts, you can walk away from the AssayMAP Bravo Platform for the duration of the protocol.
To pause the run, click Pause. The task currently in progress finishes before the protocol pauses. The Scheduler Paused dialog box opens. For details, see Emergency stops and pauses.
To troubleshoot errors, see the Error Recovery Guide and the Bravo Platform User Guide in the Literature Library page of the Protein Sample Prep Workbench.
Adding an experiment ID note after the run
After the protocol run ends or during a pause, you can add a note to the experiment ID. For example, a note can describe any observations during the run or any offline steps that are being executed. The notes that you add will appear in any reports generated for the experiment ID.
To add a note to an open experiment ID:
1 While the experiment ID is still selected in the Experiment Settings area, click  . The Add Note dialog box opens.
. The Add Note dialog box opens.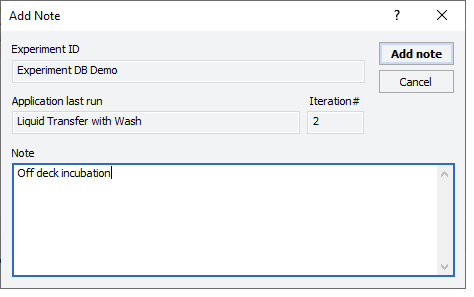 |
2 In the Note area, type the note, and then click OK.
For detailed instructions on working with Experiment IDs, see Using Experiment IDs.
Automation movements during the Syringe Test run
This section describes the basic movements of the AssayMAP Bravo Platform during the Syringe Test protocol using the Default Method settings. Changing the selections or parameters will alter the movements.
Protocol step | Head moves to location... | Action |
|---|---|---|
Start protocol | 1 | Dispenses any liquid remaining in the syringes into the wash station between the chimneys. |
1 | Washes the syringes. | |
Cartridge transfer | 6 | Mounts the resin-free cartridges on the head. |
2 | Parks the cartridges in the seating station. | |
Water transfer | 4 | Aspirates 125 µL of water. |
9 | Dispenses 100 µL water. | |
1 | Dispenses 25 µL water. | |
4 | Mixes 5 times, and then aspirates 200 µL of water. | |
8 | Dispenses 200 µL of water. | |
Internal Cartridge Wash | 4 | Aspirates 150 µL water. |
2 | Dispenses 10 µL of water into the cartridge cups. | |
2 | Mounts the cartridges on the head. | |
1 | Dispenses 100 µL of water through the cartridges into the wash station between the chimneys. | |
1 | Washes the exterior tips of the cartridges. | |
2 | Parks the cartridges in the seating station. | |
Test Solution transfer | 1 | Dispenses 40 µL of water into the wash station between the chimneys. |
2 | Aspirates a 25 µL air gap. | |
2 | Mounts the cartridges on the head. | |
7 | Submerges the cartridges in Test Solution. Rapidly aspirates 225 µL Test Solution and equilibrates for 5 min with the cartridge tips submerged. | |
2 | Parks the cartridges in the seating station. | |
1 | Dispenses 125 µL of Test Solution into the wash station between the chimneys, and then washes the exterior of the syringe probes. | |
9 | Dispenses 100 µL of Test Solution and mixes it. | |
9 | Dispenses 5 µL of the air gap. | |
1 | Dispenses remaining 20 µL of the air gap. | |
1 | Washes the syringes. | |
Cup wash | 4 | Aspirates 50 µL of water. |
2 | Washes the cartridge cups and exercises the cartridges off task. | |
1 | Dispenses the water into the wash station between the chimneys, and then does an external probe wash. | |
Internal Cartridge Wash | 4 | Aspirates 150 µL water. |
2 | Mounts the cartridges on the head. | |
1 | Dispenses the water into the wash station between the chimneys, and then washes the exterior of the cartridge tips. | |
6 | Ejects the cartridges. | |
Final syringe wash | 1 | Washes the syringes. |
Analyzing the results
How the data is analyzed
The absorbance measurement of each well is compared to an expected reference value, which is determined from a statistical analysis of the data from all wells.
Any syringe that has a corresponding value > 10% of the reference value fails the test.
To analyze the syringe test results:
1 After the run is completed, remove the collection microplate and the balance microplate from the Bravo deck and spin them in a centrifuge at 500 x g for 1 min to remove any bubbles within the wells.
2 Set up the plate reader to:
• Detect absorbance at 425 nm
Note: Although 425 nm is optimal, 405 nm is also acceptable.
• Save the results to a file with a text (TXT) file format
Note: Alternatively, you can save the data to a Microsoft Excel file (XLSX) and then use the copy and paste commands to transfer the data to the Analysis Tool.
3 Transfer the file to the computer running the Protein Sample Prep Workbench.
4 In the Syringe Test form, click  to open the AssayMAP Syringe Test Analysis Tool.
to open the AssayMAP Syringe Test Analysis Tool.The AssayMAP Syringe Test Analysis Tool opens in Microsoft Excel.
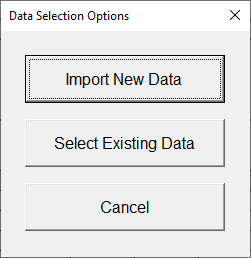
5 To choose the data for analysis:
a Click Select data.
b In the Data Selection Options dialog box, click Import New Data.
 |
c In the Import Text File dialog box, select the text (TXT) data file you want to analyze and click Import.
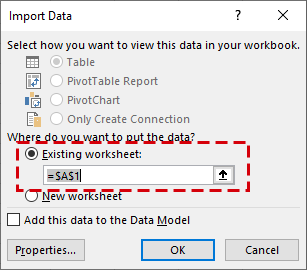
d Follow the instructions in the text import wizard:
– In the Text Import Wizard Step 1 of 3 dialog box, click Finish to accept the default settings.
– In the Import Data dialog box, make sure Existing worksheet is selected and then click OK.
 |
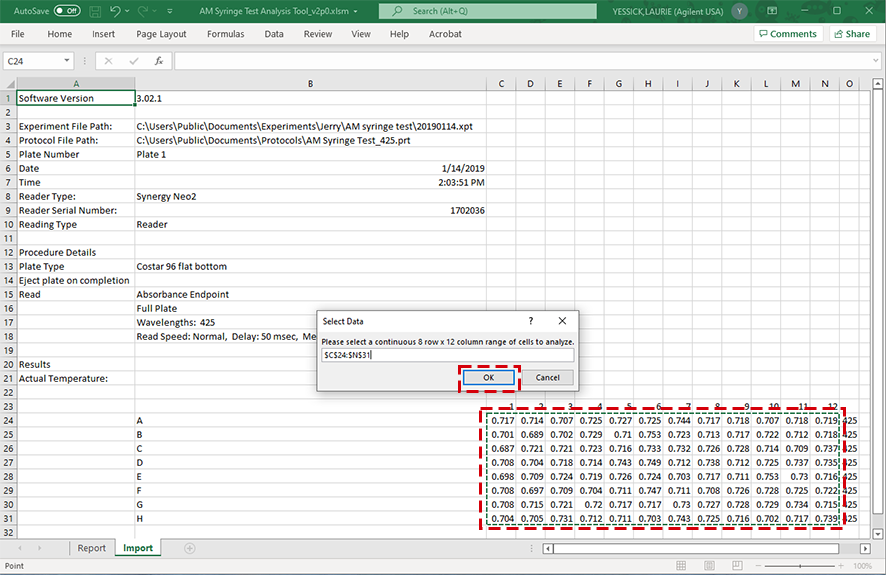
e When the Select Data dialog box appears asking you to Select a continuous 8 row by 12 column range of cells to analyze, select the 96 cells you want to analyze and click OK.
You must select 96 cells, otherwise you will receive a message requesting you to select 96 entries.
 |
The data appears in the Analysis Tool window.
 |
6 Click Analyze. The Analysis Tool analyzes the imported data and displays the results in the Analysis - Plate View area.
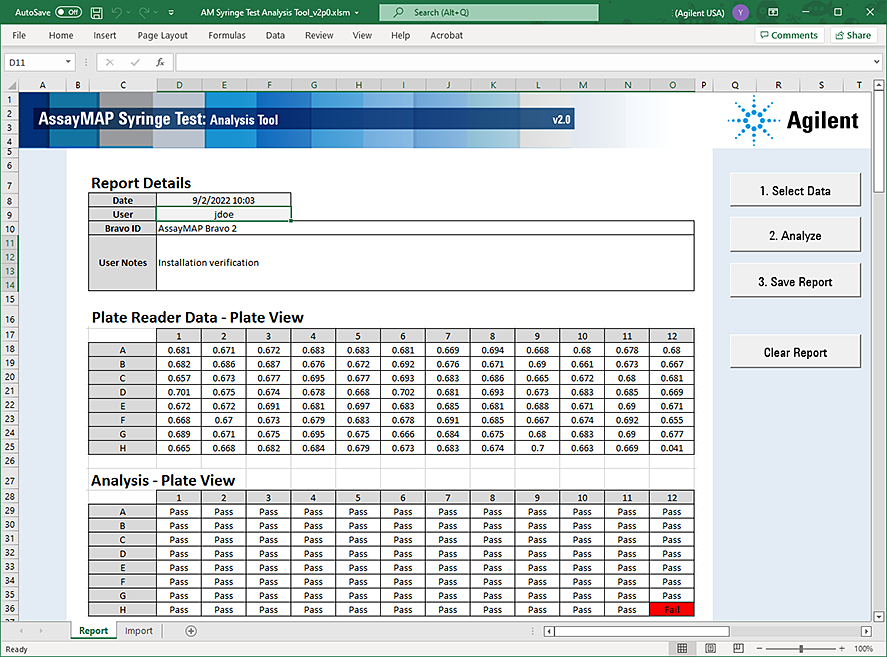 |
Failed syringes are indicated by red cells. A list of the failed syringes is located below the analysis results.
 |
To verify that failures are defective syringes, go to Verifying defective syringes.
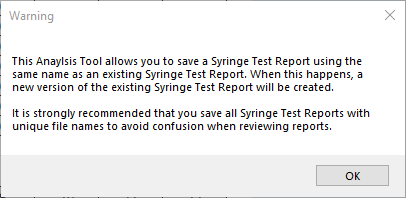
7 Save the results of the test:
a Click Save Report.
b Read the warning message that opens, and then click OK.
 |
c In the Control Panel login window, type your VWorks user name and password, and click Log In.
 |
d In the Save File dialog box, specify the file name and the storage location:
 |
Make sure the file name is unique to avoid creating multiple versions of the Syringe Test report with the same name, for example,
YYYYMMDD_Syringe Test
YYYYMMDD_Syringe Test
The default Shared Service storage location is
• VWorks Plus:
… /VWorks Projects/VWorks/Experiments/Reports
… /VWorks Projects/VWorks/Experiments/Reports
• VWorks Standard:
C:\OLSS Projects\VWorks Projects\VWorks\Experiments/Reports
C:\OLSS Projects\VWorks Projects\VWorks\Experiments/Reports
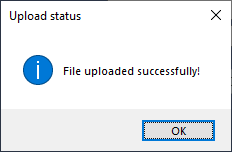
Click Save.
8 Click OK when the uploaded successfully message appears.
 |
Exporting a Syringe Test report
To create a copy of the report that you can open in Excel, use the following procedure to export the report.
To export a Syringe Test report:
1 In the navigation pane of the Syringe Test form, click  to turn off full screen display so that the VWorks menu bar is visible.
to turn off full screen display so that the VWorks menu bar is visible. 2 In the VWorks window, click File > Export Misc File.
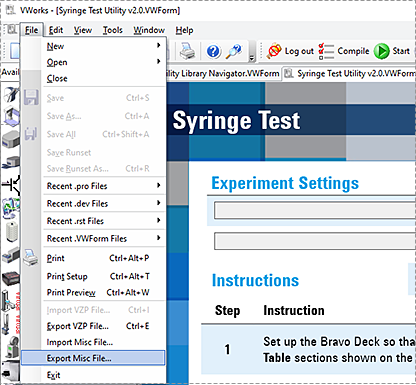 |
3 In the Open File dialog box, select the report (.csv file) and then click Open.
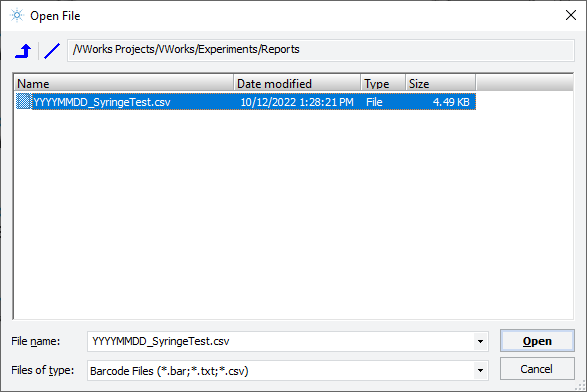 |
4 In the Export Miscellaneous File dialog box, select the destination export location, and then click Save.
Verifying defective syringes
Use the following procedure to verify that failed test results indicate defective syringes and not a non-syringe-related problem.
This procedure specifies volume requirements for the default labware selections. If you choose different labware types from the list of options, you should adjust the volumes accordingly.
Before you start
• Check the wash station carboys to ensure:
– Source carboy has a sufficient supply of source water.
– Waste carboy has sufficient unused capacity to accept the waste water from the run.
• Prime the wash station by running the Startup protocol. See Setting up the Startup protocol.
• Rotate the rack of test cartridges at location 6 by 180° so that the cartridge that was in the A1 position is now in the H12 position.
• Add 65 mL of water to the remainder of the liquid in the Water Reservoir at deck location 4.
• Add 22 mL of Test Solution to the remainder of the liquid in the Test Solution Reservoir at location 7.
Procedure
To verify defective syringes:
1 Rerun the Syringe Test utility protocol. See Starting the Syringe Test protocol run.
2 Analyze the data. See Analyzing the results.
3 Compare the results to the first test:
• If a syringe fails both tests, the syringe is defective and should be replaced. See Replacing defective syringes for repair options.
• If a failing test result is not replicated, the syringe is acceptable for use. The initial failing result might have been the result of a non-syringe related problem.
For example, a faulty cartridge will give a failing result on both the test and retest, but the location of the failure will track with the cartridge. This is why the cartridge rack is rotated by 180-degrees before the verification test.
Replacing defective syringes
To replace damaged syringes, do one of the following:
• Use the AssayMAP Syringe Replacement Kit (part number G5409-68002), and follow the included instructions.
• Contact Agilent Technical Support to schedule a service call.
If you continue to use the AssayMAP Bravo Platform while awaiting repair, do not use data obtained from the defective syringe.