Installing and setting up an Orbital Shaking Station
Description
The Orbital Shaking Station is a microplate shaker that can be installed at any deck location on top of a short adapter pad instead of a platepad. The Orbital Shaking Station has the option of using its own control module, or an Inheco Single TEC controller (STC) or Multi TEC controller (MTC). For a full description of the Orbital Shaking Station, see the manufacturer’s documentation.
Figure Orbital Shaking Station with its own control module and an adapter pad
 |
Setup workflow
Step | Procedure | See… |
|---|---|---|
1 | Install the Orbital Shaking Station. | |
2 | Configure the station in Diagnostics. | |
3 | Test the station operation. | |
4 | Edit the teachpoint using the pipettor teach plate. Be sure to consider the 10-mm thickness of the teach plate when you edit the teachpoint. |
Installing the Orbital Shaking Station
Before you start
Make sure you have the following:
• Orbital Shaking Station with adapter pad and attachment screws
• Hex wrenches: M2, M4, and M5
If the Orbital Shaking Station does not have its own control module, make sure that you have an Inheco Single TEC controller (STC) or Multi TEC controller (MTC).
Ensure that you remove the platepad from the deck location where you plan to install the Orbital Shaking Station.
To install the Orbital Shaking Station:
1 Position the adapter pad at the target deck location aligning the dowel pins with the corresponding holes in the deck.
Make sure the adapter pad sits level on the deck.
2 Insert the M6 x 12-mm flathead screw into the center of the adapter pad and tighten the screw.
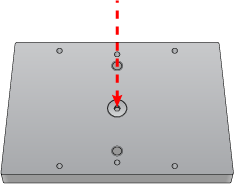 |
3 Place the Orbital Shaking Station atop the adapter pad so that the cable is towards the back of the Bravo deck.
Make sure the station is completely centered on top of the adapter and sits level.
4 Insert the two M3 x 18-mm socket-head cap screws into the holes at the front and back end of the adapter pad and use a 2.5-mm hex driver to tighten the screws.
Tighten screws evenly to ensure the feet on the bottom of the Orbital Shaking Station are pressed evenly into the adapter pad and the pad remains level.
Note: The feet of the Orbital Shaking Station are compressible, and these screws do not reach a hard stop as a result.
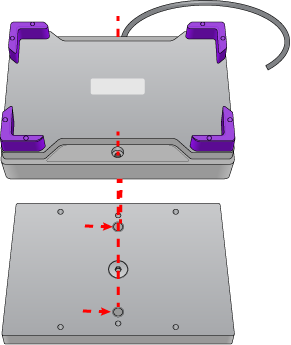 |
Connecting the Orbital Shaking Station
Connecting a station that uses the STC or MTC Controller
To connect a station that uses the Inheco STC or MTC Controller:
1 Connect the cable from the station to the Controller.
2 Connect the STC or MTC Controller to the computer using the provided USB cable.
Connecting a station that has its own control module
If the station that has its own control module, you connect the serial cable from the speed control (on the power cord) to the serial port on the Bravo computer, as described in the following procedure.
To connect an Orbital Shaking Station that has its own control module:
1 Route the Orbital Shaking Station cable off the deck and connect it to the control module that contains the power plug. See following figure, item 1.
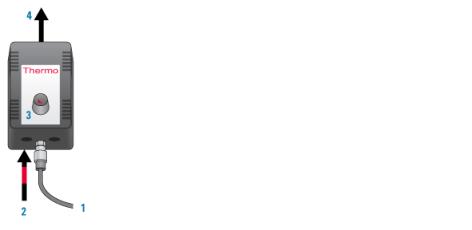 |
2 Connect the serial cable with the red stripe to the leftmost port on the control module (figure, item 2). Connect the other end of the cable to the serial port, if available, on the controlling computer.
3 On the control module, ensure that the knob is turned fully counterclockwise so that the red arrow (3) is pointing to the RS-232 setting.
4 Connect the power cable (4) from the control module to an AC outlet with a grounded circuit.
5 Turn on and test the Orbital Shaking Station as follows:
a On the control module, turn the knob clockwise to the maximum position, and verify that the Orbital Shaking Station vibrates.
b Slowly, turn the knob back counterclockwise to the minimum position until the station stops vibrating but is not fully off.
6 Place a sample microplate on the Orbital Shaking Station. Verify that the microplate fits within the four corner tabs but has no extra space.
If necessary, use the supplied hex driver to adjust the fit of the four corner tabs for your microplate.
Note: Before the accessory is ready for use, you will verify the deck configuration in the corresponding Bravo profile and set the teachpoint for the accessory location.
Uninstalling the Orbital Shaking Station
To uninstall the station:
1 Disconnect the Orbital Shaking Station power cord from the AC outlet.
2 Disconnect the control module serial cable from the Bravo computer.
3 Using the M2 hex wrench, remove the two socket-head screws in the Orbital Shaking Station.
4 Remove the Orbital Shaking Station from the adapter pad.
5 Using the M5 hex wrench, remove the screw in the center of the adapter pad, and then remove the adapter pad.
Next steps:
1 Install a platepad or accessory at this deck location.
2 In Diagnostics, select the appropriate profile, and then click the Configuration tab and reconfigure this location.
3 Adjust the teachpoint of the location.
Configuring the Orbital Shaking Station in Bravo Diagnostics
To configure the Orbital Shaking Station:
1 In Diagnostics, click the Profiles tab, and verify that the correct profile is initialized.
2 In the Configuration tab, select the Location of the Orbital Shaking Station.
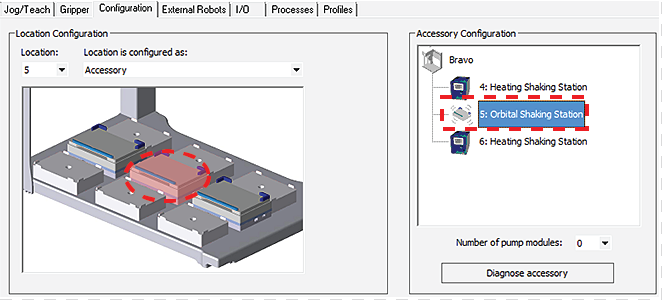 |
3 Under Location is configured as, select Accessory. The Bravo Accessories Wizard opens.
4 Follow the instructions in the Accessories Wizard to:
a Verify the Location of the installed Orbital Shaking Station.
b Choose the Orbital Shaking Station accessory.
c Select the controlling computer Serial Port that connects to the Orbital Shaking Station.
Note: The Serial Port parameter is automatically defined when a USB-to-serial adapter is connected to the computer. You might need to look up the port number assigned to this device in the Microsoft Windows Device Manager.
Note: Occasionally, a port number is reassigned for a USB-to-serial connection if you disconnect and reconnect the accessory. If this happens, you must verify that the correct Serial Port is set in each profile.
d Select the Module number that indicates the position of the Orbital Shaking Station you are configuring.
For example, select 1 if the station is connected directly to the controlling computer. Select 2 for a station that is connected to the first station, and so on.
5 Click Finish.
6 When the configuration message appears, click Yes to initialize the accessory and move the teachpoint to a safe height. You must set the teachpoint after completing this procedure.
7 In the Profiles tab, click Update this profile.
8 VWorks Plus only. If an audit trail is being logged, the Audit Comment dialog box opens. Select or type the audit comment, and then click OK.
Test the station operation using the following procedure, and then verify and adjust the teachpoint for the accessory location. See Adjusting the teachpoint using a teach plate.
Testing the Orbital Shaking Station
Ensure that the profile is initialized in Bravo Diagnostics before you perform the following procedure.
To test the Orbital Shaking Station:
1 In the Accessory Configuration area, click the Orbital Shaking Station icon, and then click Diagnose accessory. The Bravo Accessory Diagnostics dialog box opens.
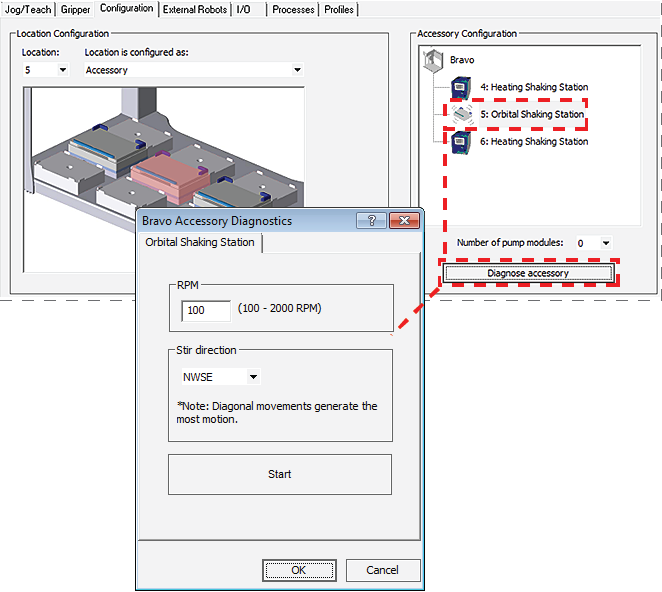 |
2 Type the RPM, select the Stir direction, and then click Start.
3 At the Orbital Shaking Station on the deck, verify that the accessory operates correctly.
4 In the Bravo Accessory Diagnostics dialog box, click Stop, and then click OK.
Related information
For information about… | See… |
|---|---|
Bravo Platform hardware components | |
Adjusting the teachpoint | |
Using the accessory in a protocol | VWorks Automation Control User Guide |