Configuring a height offset for a platepad
About this topic
This topic explains how to use Bravo Diagnostics to configure the Plate Pad Offset accessory.
When to configure this accessory
You can configure the Plate Pad Offset accessory at a platepad where
• The platepad teachpoint is at a different altitude than where the labware will be seated, for example, if a plate riser or insert is seated on the platepad.
• The tabs on the side of a labware locator are taller than normal, requiring extra clearance when picking and placing labware.
For example, your application might require that you place a Bravo Plate Riser atop the platepad at a given deck location. The Bravo Plate Riser raises the teachpoint z-axis coordinate by 28.5 mm, approximately. You can either set the teachpoint for the location including this extra height, or you can configure the height offset in the profile. In this case, configuring the Plate Pad Offset might provide more flexibility if you want to copy the teachpoints from one profile to another.
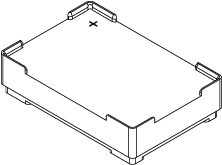
Figure Bravo Plate Riser
 |
Before you start
Ensure that you have calipers to measure the height accurately.
Configuring the deck location in the software
To configure a height offset for a platepad:
1 In Diagnostics, click the Profiles tab, and verify that the correct profile is initialized.
2 Click the Configuration tab.
3 In the Location is configured as list, select Accessory.
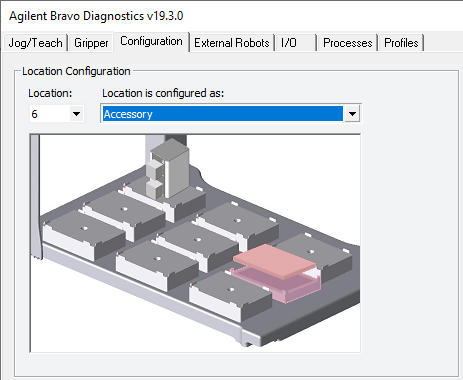 |
4 When the Bravo Accessories Wizard opens, follow the instructions to:
• Choose the Location.
Note: Your selection in the Accessories Wizard overrides the selection in the Configuration tab.
• Select the Plate Pad Offset accessory.
• Set the following properties.
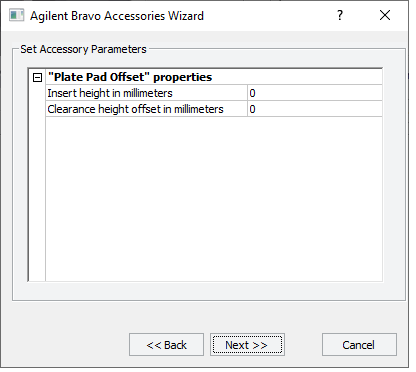 |
Property | Description |
|---|---|
Insert height in milllimeters | Specify the height (mm) of the plate riser or plate insert seated on the platepad. Measure from the lowest point that rests on the platepad to the top surface of the plate riser or insert, not including any positioning tabs. For example, if you are place the Bravo Plate Riser on a standard platepad, you would enter 28.5 mm, approximately For any setting greater than zero, all operations involving the location (for example, pick, place, and pipetting) will behave as though the teachpoint for that location is the specified height (mm) above where it was actually taught. |
Clearance height offset in millimeters | If the plate locator at the deck location has extra-high positioning tabs, specify the clearance height (mm) as the difference between • How high the locator tabs reach above the bottom of labware at the location, and • The height of standard platepad tabs (5.08 mm, approximate) The following figure shows a standard platepad. 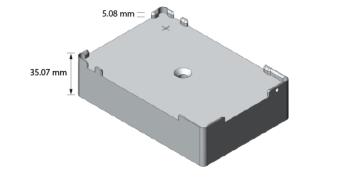 If this deck location does not require additional clearance for taller tabs, set this property to zero. For any setting greater than zero, all pick operations involving that location will lift the labware the specified clearance offset (mm) before moving it sideways, and all place operations will position the labware that many millimeters higher before lowering it onto the location. |
5 Click Next, and then click Finish.
 |
6 When the accessory configuration message appears, do one of the following:
• If you have not yet edited the teachpoint, click Yes. After the software initializes the accessory, edit the teachpoint.
• If you have already verified the teachpoint, click No.
7 In the Profiles tab, click Update this profile.
8 VWorks compliance-enabled edition. If an audit trail is being logged, the Audit Comment dialog box opens. Select or type the audit comment, and then click OK.
Related information
For information about... | See... |
|---|---|
Bravo Platform hardware components | |
Editing teachpoints | |
Copying teachpoints to another profile |