(Bravo SRT only) Setting up an LT tip box location
About this topic
Read this topic if you have a Bravo SRT Platform and you are using the 250‑µL tips. The height limitation on the Bravo SRT requires a special platepad and a deck location configured for the 250‑µL tip box operations.
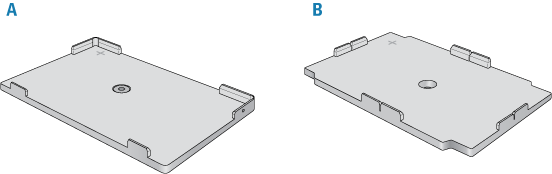
The following figure shows the SRT platepad options for tip operations.
Figure SRT platepads: (A) ST tip loading station, and (B) SRT platepad for 250 µL LT tip boxes
 |
Before you start
• Be aware that the Bravo SRT has insufficient clearance to move labware if the 250-µL tips are installed on the liquid-handling head. The Bravo SRT can move labware only if 250-µL tips are not on the liquid-handling head.
• Limit tips on and tips off tasks to deck locations where an SRT 250-µL tip box platepad is physically installed and configured in the Bravo Diagnostics software. This special platepad provides additional z‑axis clearance, and is designed for a tip box that holds 96 250-µL tips.
• Use labware classes for each deck location so that the 250‑µL tip box operations are not attempted at deck locations with insufficient z‑axis clearance.
• Use VWorks Task Groups to ensure that tips on and tips off tasks are performed before plate movement tasks in the protocol.
Ensure that you have the following:
• M5 hex wrench for removing a standard SRT platepad
• SRT platepad for 250‑µL tip box
• Star-head screw and wrench for installing the SRT 250‑µL tip box platepad
Workflow
Step | For this task... | See... |
|---|---|---|
1 | Install an SRT platepad for 250‑µL tip boxes at any deck location where you plan to do tips on and tips off tasks. | |
2 | In Bravo Diagnostics, configure the location and set the teachpoint. | |
3 | In the Labware Editor, set up appropriate labware classes. For example, limit the tip box location to a labware class that uses the SRT platepad for 250‑µL tip boxes, and other locations to a class that uses a standard SRT platepad. | VWorks Automation Control Setup Guide |
4 | In the VWorks software, edit the device file to specify the appropriate labware class for each deck location. | |
5 | In the VWorks software, use Task Groups to ensure that tips on and tips off tasks are performed before plate movement tasks in the protocol | VWorks Automation Control User Guide |
Installing the 250-µL tip box platepad on the Bravo SRT
To install the SRT platepad for 250‑µL tip boxes:
1 Remove the M6 screw in the center of the platepad, and remove the standard SRT platepad.
2 Position the SRT platepad for 250‑µL tip boxes so that the crosshairs are at the back left side of the deck location.
Make sure that the platepad sits level on the deck.
3 Insert the supplied star-head screw into the center of the 250‑µL tip box platepad, and use the star-head wrench to tighten the screw.
Configuring the platepad in Bravo Diagnostics
To configure the SRT platepad for 250‑µL tip boxes:
1 In Bravo Diagnostics, click the Profiles tab, and open the profile for the given Bravo SRT platform.
2 In the Profiles tab, select the This is a Bravo SRT check box.
3 In the Configuration tab, select the Location.
4 In the Location is configured as list, select (SRT only) platepad for 250 µL tips.
 |
5 Click the Jog/Teach tab, and teach the deck location using the crosshairs on the platepad. See Setting teachpoints.
If you previously taught this deck location using the Set all teachpoints based upon selected teachpoint feature, you can:
a Select the platepad Location, and click Move to go to the preset teachpoint.
b Using small increments, jog down in the z‑axis until you have paper-thin z-axis clearance between the pipette tip and the crosshairs.
c When the tip is in the correct position (directly over the crosshairs with paper-thin clearance), click Teach.
Note: Although the 250‑µL tip box actually sits on the Bravo SRT deck, the software makes an adjustment in the z-axis to compensate for the height difference.
6 In the Profiles tab, click Update this profile.
7 VWorks Plus only. If an audit trail is being logged, the Audit Comment dialog box opens. Select or type the audit comment, and then click OK.
Related information
For information about... | See... |
|---|---|
Starting Diagnostics | |
Editing teachpoints |