Setting microplate properties
Before you start
• You must be logged in as an administrator or technician to perform this procedure.
• You must first create an entry for the labware.
• VWorks Plus only. Each labware entry is a record of interest that transitions through development states. A VWorks technician or administrator can edit labware entries that are In Development or In Validation. The parameter settings in the Labware Entries tab are unavailable if the labware entry is Released.
Setting microplate properties
To set microplate properties:
1 Open the Labware Editor.
2 In the Labware Entries tab, click the Plate Properties sub-tab.
Figure Plate Properties sub-tab
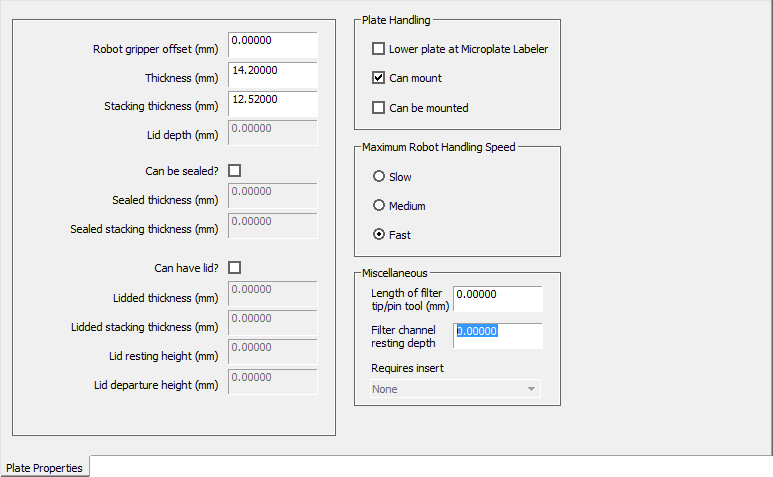 |
3 Enter the values for the available parameters according to the labware type you are defining. The following table describes each parameter.
Note: The Base Class you select in the General Properties section determines which microplate properties are available.
Parameter | Description |
|---|---|
3-Axis Robot only. Robot gripper offset (mm) | Not supported. This VWorks version does not support the 3-Axis Robot or the BioCel Systems. |
Thickness (mm) | The distance from the bottom of the microplate skirt to the top of the microplate. For a tip box, this is the distance from the bottom of the box to the top of the tips. For a filter plate that has filter nozzles that extend below the skirt, measure the distance from the bottom of the filter plate skirt to the top of the filter plate. You will use the parameters in the Miscellaneous section to account for the filter nozzles. Figure Example of the thickness measurement for a filter plate 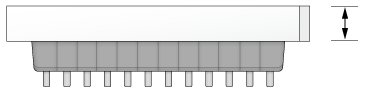 To increase the number of contact points, measure the distance at the corner of the microplate or tip box (using calipers). This method prevents the calipers from angling inward, which can produce inaccurate measurements.  |
Stacking thickness (mm) | The thickness of two stacked microplates of the same type minus the thickness of one microplate. Measure the distance using calipers. Example: Thickness of two stacked microplates (x) = 23.14 mm Thickness of one microplate = 14.14 mm Stacking thickness: 23.14 mm - 14.14 mm = 9.00 mm  |
Lid depth (nm) | The height of the lid interior, which is measured from the bottom resting surface of the lid to the underside of the lid’s top surface. 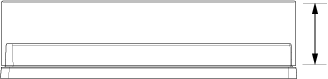 |
Can be sealed? | The option to include the microplate seal. |
Sealed thickness (mm) | The thickness of the microplate with a seal in place. Available only if Can be sealed? is selected. |
Sealed stacking thickness (mm) | The stacking thickness of the microplate with a seal in place. Available only if Can be sealed? is selected. |
Can have lid? | The option to include a microplate lid. |
Lidded thickness (mm) | The thickness of the microplate with a lid in place. Available only if Can have lid? is selected. |
Lidded stacking thickness (mm) | The stacking thickness of the microplate with the lid in place. Available only if Can have lid? is selected. |
Lid resting height (mm) | The height (c) above the bottom of the microplate (d) at which the bottom of a microplate lid rests. 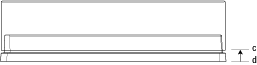 |
Lid departure height (mm) | The height (e) above the lid resting height to which the lid is lifted. In the BenchCel Microplate Handler, the lid is lifted to this height, and then the lid is removed. 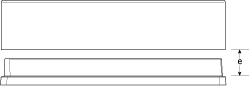 |
Plate Handling | |
Lower plate at Microplate Labeler | The option to lower the Microplate Labeler stage if the microplate has a tall skirt or a raised surface in the middle of each side. Lowering the stage allows the Microplate Labeler to place the label above the tall skirt or raised surface. Note: The two vertical plate stage positions are set mechanically. To adjust the positions, see the Microplate Barcode Labeler User Guide for instructions. |
Can mount | The option to place this microplate on top of another microplate. This property is for filter plates that are placed on top of waste plates during filtration steps of a protocol. This option can also be used to mount lids onto microplates. |
Can be mounted | The option to place another microplate on top of this microplate. This property is for collection microplates that collect filtrate from filter plates during the filtration steps of a protocol. Many different microplates might be able to fit under any one type of filter plate. This option can also be used to mount lids onto microplate. |
Maximum Robot Handling Speed | |
Maximum robot handling speed | The maximum speed at which the robot can move this type of microplate. In addition to this microplate-specific speed, you set the general robot speed via the Tools > Options menu in the VWorks software. If these speeds are different, the robot uses the slower of the two speeds. Note: To increase throughput, you can use a higher speed when the robot is not carrying labware. To set this option, click Tools > Options to display the Options dialog box. For details, see Setting general and view options. |
Miscellaneous | |
Length of filter tip/pin tool (mm) | Available for labware of the Filter plate or Pin tool Base Class only. The length of the pins that protrude below the pin tool head, or the distance that the filter nozzle extends below the bottom edge of the filter plate skirt. Use a caliper to measure the length. Figure Length of filter tip 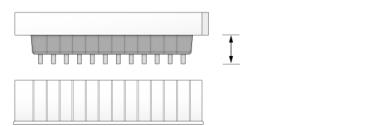 |
Filter channel resting depth | Available for labware of the Filter plate Base Class only. The distance from the tip of the protruding filter nozzles to the point at which the filter plate rests on another plate. Use a caliper to measure the distance. Figure Filter plate channel resting depth 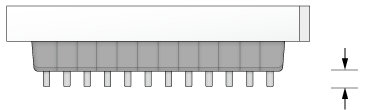 Figure Filter channel resting depth (filter plate on microplate) 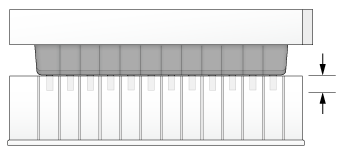 The software uses this parameter to calculate the effective height (Zg-axis) of the gripper and ensure sufficient clearance when gripping and moving the filter plates. |
Requires insert | The option to require an insert for use with nestable tip boxes. |
Related information
For information about... | See... |
|---|---|
Workflow for adding labware to the Labware Editor | |
Opening the Labware Editor | |
Setting general properties for labware |