CentrifugeAuto
Description
Note: If you want to manage counterweights and counterweight modes using JavaScript, see the examples in Using JavaScript with the CentrifugeAuto task.
Note: The CentrifugeAuto task ( ) performs all the functions of the Centrifuge Process task but does not require a subprocess.
) performs all the functions of the Centrifuge Process task but does not require a subprocess. The CentrifugeAuto task ( ) can be used with the Microplate Centrifuge (
 ) and Centrifuge with Loader (
 ) devices to spin microplates according to the task parameter settings. The CentrifugeAuto task enables you to spin one microplate with a counterweight or spin two microplates from a protocol process, at the same time. Counterweights can be placed manually or robotically. When using counterweights, you can use multiple counterweights for protocols with multiple processes. This is accomplished by using the Configure Labware feature to manage the centrifuge tasks.
) can be used with the Microplate Centrifuge () and Centrifuge with Loader () devices to spin microplates according to the task parameter settings. The CentrifugeAuto task enables you to spin one microplate with a counterweight or spin two microplates from a protocol process, at the same time. Counterweights can be placed manually or robotically. When using counterweights, you can use multiple counterweights for protocols with multiple processes. This is accomplished by using the Configure Labware feature to manage the centrifuge tasks.Task is available for... | Task is available in... |
|---|---|
Centrifuge | Main Protocol |
Centrifuge with Loader | Main Protocol |
The CentrifugeAuto task cannot be used in the following cases:
• Within a Loop task
• Within a Spawn process as a subroutine, as this will result in a deadlock
• Within a Macro
• As the first task in a process
You cannot assign multiple devices to a single CentrifugeAuto task.
Task parameters
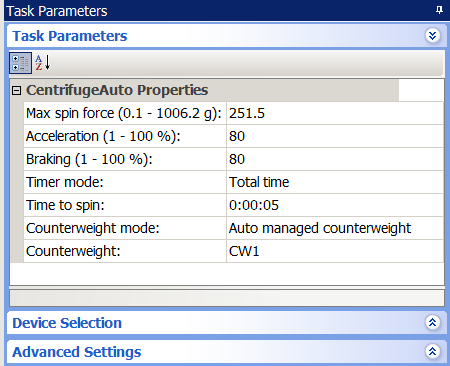
After adding the CentrifugeAuto task in the main protocol, set the CentrifugeAuto Properties in the Task Parameters area:
 |
Parameter | Description |
|---|---|
Max spin force (0.1 - 1006.2 × g) | The rotor velocity, as a multiple of gravity. |
Acceleration (1–100%) | The rate of centrifugation, as a percent of maximum acceleration. |
Braking (1–100%) | The deceleration of the centrifuge, as a percent of maximum deceleration. |
Timer mode | The way the spin time is implemented: • Total time. The specified spin time includes acceleration and braking. • Time at speed. The specified spin time does not include acceleration and braking. |
Time to spin | The length of time to spin the microplates in the desired mode. |
Counterweight mode | The method used to keep the Centrifuge balanced during a spin. |
Fixed counterweight | The manual mode for placing the counterweight. Place the counterweight in the device before the run (in bucket 2) and remove it after the run is finished. |
Auto managed counterweight | A counterweight managed as a Configure Labware process. The robot will move the counterweight from a platepad or Labware MiniHub (specified by the plate process) into the Centrifuge during the run and return it to the platepad when the run is finished. If you select this mode, use the Counterweight parameter to select the Configure Labware process that corresponds to the counterweight you want to use. Guidelines for use To avoid deadlocks when there are two or more CentrifugeAuto tasks in a protocol: If the tasks are placed before pipetting tasks for both source and destination processes, and if the destination plate is spun first, set up an additional temporary-storage location for the destination plate. This mode can be used in combination with the Use 2 protocol plates mode in the same protocol. See Guidelines for use with two modes (Auto managed and Use 2 protocol plates) for additional guidelines. |
Use 2 protocol plates | A second process plate used as the counterweight. During the run, the robot places the first two microplates into the centrifuge. After spinning, the robot replaces the two microplates with the next pair, and so on. If you are processing an odd number of microplates, and three microplates are remaining, the robot will not remove the second from the last microplate so that the last microplate is paired. Guidelines for use To avoid deadlocks, whenever using this task, set Simultaneous plates to 2 or greater and run the protocol at least twice. To avoid deadlocks when there are two or more CentrifugeAuto tasks in a protocol: • If the tasks are within the same process and are using different devices and if Simultaneous plates is set to 2, run an even number of microplates. • If the tasks are within the same process and are using the same device and if you are running an odd number of plates, set up an additional temporary storage location to accommodate the odd plate. • If the tasks are placed before pipetting tasks for both source and destination processes, and if the destination plate is spun first, set up an additional temporary-storage location for the destination plate. • If using the same Centrifuge with Loader, ensure the tasks are not adjacent to each other. Note: This is true only for the Centrifuge with Loader and not for the Centrifuge. This mode can be used in combination with the Auto managed mode in the same protocol. See Guidelines for use with two modes (Auto managed and Use 2 protocol plates) for additional guidelines. |
Counterweight | A configured labware used as the counterweight. This parameter is available only if you selected the Auto managed counterweight mode. Tip boxes and reservoirs, or any other labware not compatible with the Microplate Centrifuge or Centrifuge with Loader, cannot be used as counterweights. If the list of counterweights do not appear, make sure you have configured the labware correctly. See Example: Auto managed counterweight mode for instructions. |
Guidelines for use with two modes (Auto managed and Use 2 protocol plates)
Use the following guidelines to avoid deadlocks when the protocol has two or more CentrifugeAuto tasks, and one task uses the Auto managed mode and another uses the Use 2 protocol plates mode.
Multiple CentrifugeAuto tasks using the same device
If the tasks are using the same device, run an even number of plates.
A Reorder task is between two CentrifugeAuto tasks
• If using the Reorder task between two CentrifugeAuto tasks with the same device, and if placing the auto-managed CentrifugeAuto task before the Reorder task, set the Number of plates to store in the Reorder task to an even number.
• If using the Reorder task between two CentrifugeAuto tasks and if placing the Use 2 protocol plates mode CentrifugeAuto task before the Reorder task, set the Number of plates to store in the Reorder task to an even number.
A long Incubation task is between two CentrifugeAuto tasks
If placing a long Incubation task between two CentrifugeAuto tasks that use the same device, and if the Auto managed CentrifugeAuto task is before the Incubation task, set the number of incubation locations to an even number.
Device selection
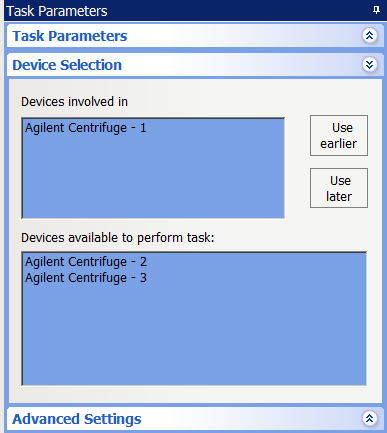
You must select a device for each CentrifugeAuto task. After adding the CentrifugeAuto task at the desired point in the protocol, select the task, and then click Device Selection in the Task Parameters area.
To select a device for the task:
Double-click the desired device in the Devices available to perform task area to move it to the Devices involved in task area. Only one device can be assigned to a given task.
 |
Example: Auto managed counterweight mode
Goal
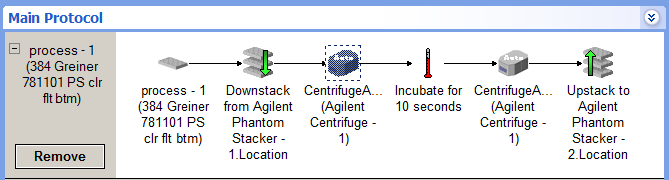
Perform two spins on one microplate with a different task between spins, in this case, an incubate task. Both spins are performed with the same device and each spin uses a different counterweight.
Implementation
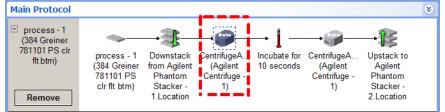
1 Create a protocol process that includes a Downstack, Spin, Incubate, a second Spin, and an Upstack task.
2 Select the parameters in the Task Parameters area for the Downstack, Incubate, and Upstack tasks.
 |
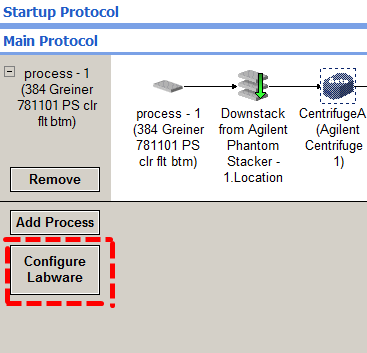
3 Create a Configure Labware process for each counterweight as follows:
a Click Configure Labware.
 |
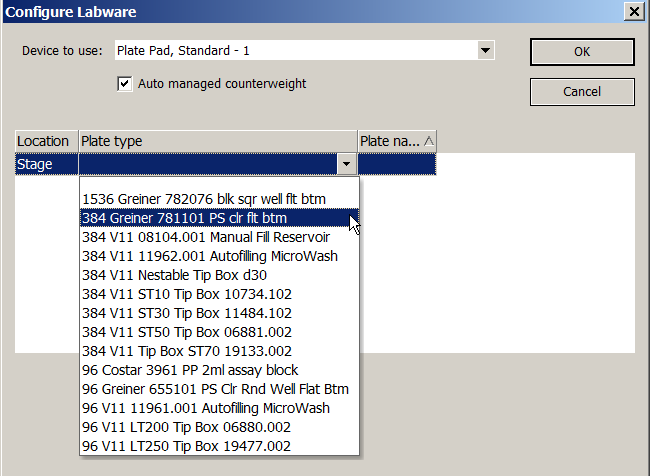
b In the Configure Labware dialog box, do the following:
• Select the location of a counterweight from the Device to use list.
• Select Auto managed counterweight.
• Select the microplate from the Plate type list.
• Click OK.
 |
The configure labware process appears.
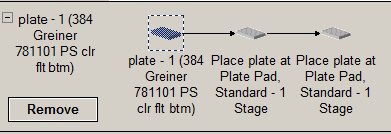 |
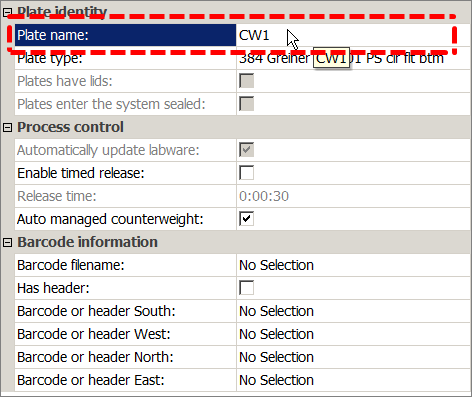
c In the Task Parameters area, type a name for the Configure Labware process in the Plate name field (in this case, CW1).
Note: When the Auto managed counterweight option is selected, the Simultaneous plates and Automatically update labware options are not available.
 |
d Repeat steps 3a through 3c for the second counterweight.
4 Select the device for the CentrifugeAuto tasks:
a Select the first CentrifugeAuto task in the process.
 |
b In the Device Selection area, drag Agilent Centrifuge-1 to the Devices involved in task area.
|
c Repeat steps 4a and 4b for the second CentrifugeAuto task.
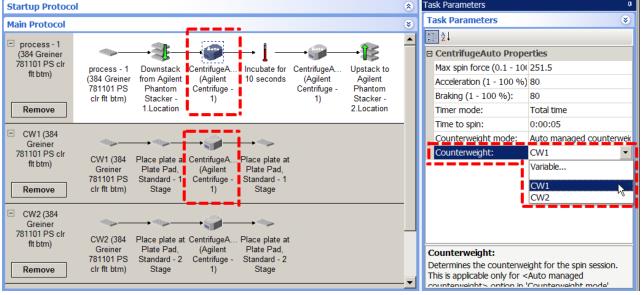
5 When setting the parameters of the first CentrifugeAuto task, select the Auto managed counterweight mode, and then select CW1 from the Counterweight list.
Note: A CentrifugeAuto task is automatically added to the Configure Labware process chosen for the counterweight.
 |
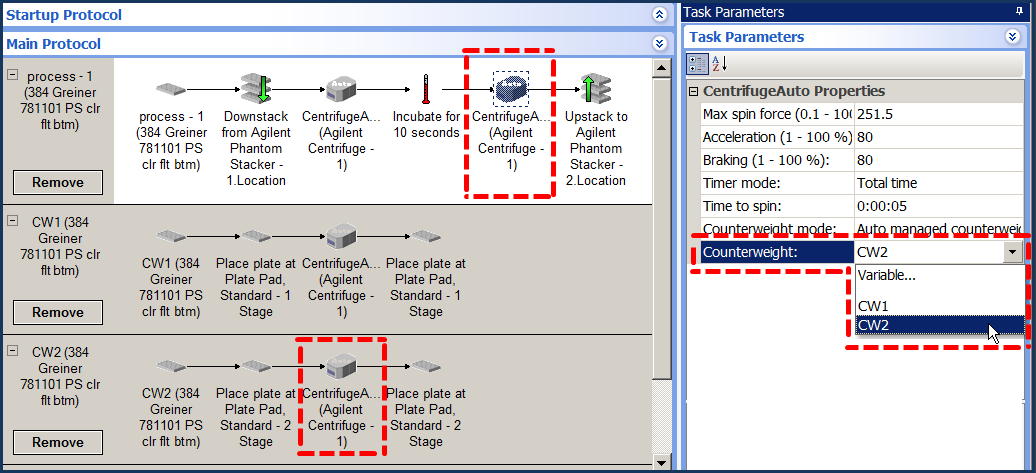
6 When setting the parameters of the second CentrifugeAuto task, select the Auto managed counterweight mode, and then select CW2 from the Counterweight list.
 |
7 Before you start the run, make sure the counterweights are at their starting locations.
Plate movement
When the protocol runs, the robot will place the downstacked microplate in bucket 1 of the centrifuge and the counterweight, CW1, into bucket 2. Counterweight CW1 will be swapped out for counterweight CW2 after the microplate is incubated and after it is placed back into bucket 1 of the Centrifuge. Both counterweight plates will automatically be placed back on their starting locations at the end of the process.
Related information
For information about... | See... |
|---|---|
Adding devices | • Device user guide |
Adding tasks in a protocol | |
Configuring labware | |
Microplate-storage tasks | |
Scheduling tasks |