Print
Description
The Print task ( ) prints barcode labels using the Microplate Labeler. The task does not apply labels to labware.
) prints barcode labels using the Microplate Labeler. The task does not apply labels to labware.Use this task if you want to print labels and manually apply the labels to labware such as tubes or other containers. You can also apply the labels to pages in your lab notebook for record keeping purposes.
Task is available for... | Task is available in... |
|---|---|
Microplate Labeler (standalone only) | Startup Protocol Cleanup Protocol |
Requirements
The requirements for the Print task are identical to the requirements for the Print and Apply task. See Print and Apply.
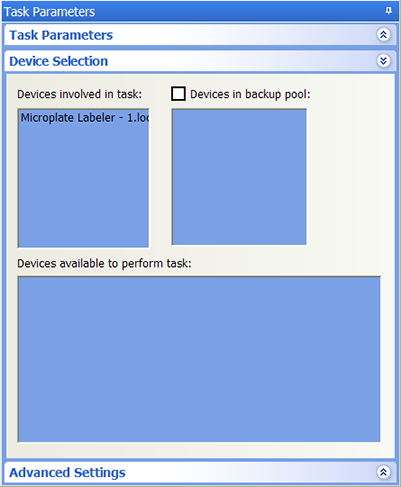
Selecting devices for the task
You must select a device for the Print task before you can set the task parameters. After adding the Print task in the protocol, select the task, and then click Device Selection in the Task Parameters area.
To select a device for the task:
Double-click the desired device in the Devices available to perform task area to move it to the Devices involved in task area.
 |
Setting the task parameters
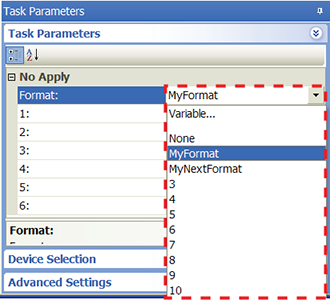
After selecting the device to use for the Print and Apply task, you can set the parameters in the Task Parameters area. The area lists the four sides of a microplate (south, west, north, and east). For each side, you can select a label format and specify the data that will substitute for the text and barcode fields in the label format.
To set the task parameters:
1 Select the barcode format in the Format list:
 |
Format selection | Description |
|---|---|
None | Indicates no label will be printed. |
Format name or number | Uses a format that was set up in Microplate Labeler Diagnostics. Note: If you do not see a list of formats, make sure the label formats are not empty (formats must contain at least one field), the formats are uploaded to the printer, and the Microplate Labeler device is initialized. |
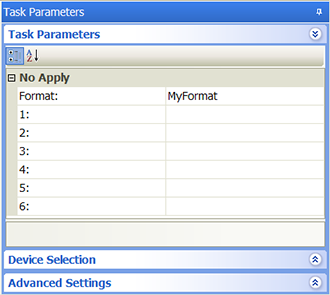
As soon as you select a format, fields appear in the Task Parameters area. You can specify the information you want to print in these fields.
Note: The number of fields that appear depends on the format you select.
 |
2 Click a field, and then click the  button that appears. The Field Composer dialog box opens.
button that appears. The Field Composer dialog box opens.The Field Composer allows you to specify the information to print on the barcode label. For example, you can print the current date and time.
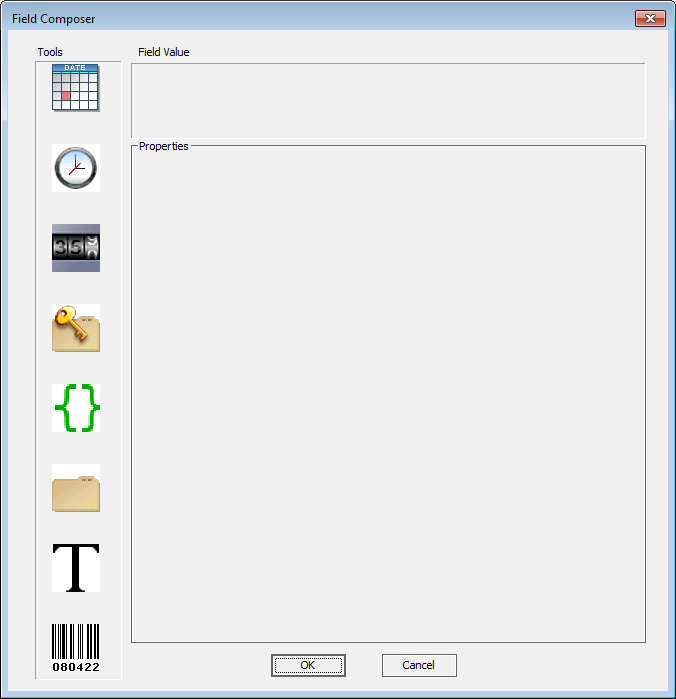 |
3 In the Tools area, double-click one or more of the following icons to specify the information to be printed on the barcode label. The selected icon appears in the Field Value area.
Icon | Description |
|---|---|
 | Prints the current date. Click the icon in the Field Value area. In the Properties area, select the desired date format. YYYY is the year, MM is the month, and DD is the day. Note: The Use System Format option uses the local computer’s date format. 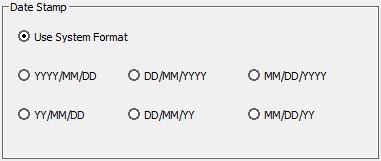 |
 | Prints the current time. Click the icon in the Field Value area. In the Properties area, select the desired data format: 12 hours (AM/PM) or 24 hours.  |
 | Prints a numeric or alphanumeric value that can be incremented. Click the icon in the Field Value area. Set the following in the Properties area: • Character Set. The option to use either numeric or alphanumeric characters. • Start at. The starting value. • Increment by. The amount by which the value increments. • Total number of digits. The total number of digits or characters, including leading 0s. • Increment every N plates. The increment value. For example, 1 increments the value every microplate. 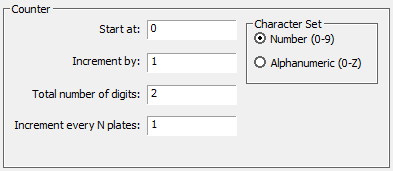 |
 | Not used. If you add this icon, the software will ignore it. |
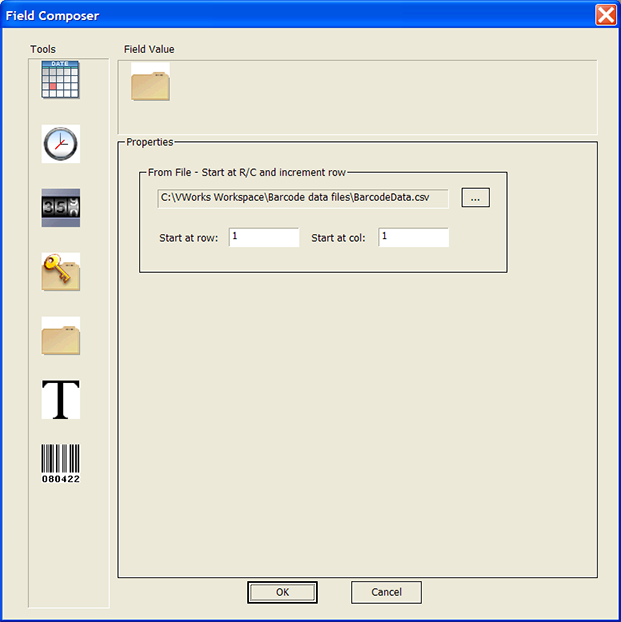
 | Prints the values in the specified barcode input file. Click the icon in the Field Value area. In the Properties area, click the  button to select the input file. Specify the row and column number of the starting value. During the run, the software automatically increments to the next row to print the next value. button to select the input file. Specify the row and column number of the starting value. During the run, the software automatically increments to the next row to print the next value.For example, Start at row is set at 2, Start at col is set at 3. During the run, the software starts with the value in row 2 column 3 (C00002). Then, the software moves to row 3 column 3 (C00003), row 4 column 3 (C00004), row 5 column 3 (C00005), and so on. 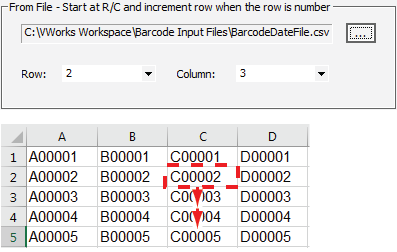 |
 | Prints the text you specify. Click the icon in the Field Value area. In the Properties area, type the text you want to print on every microplate.  |
 | Not used. If you add this icon, the software will ignore it. |
Example: Printing a barcode label and applying the label to a microplate
4 When you are finished, click OK. The information you specified appears in the Task Parameters area.
Example
Goal
Using the Microplate Labeler, print values read from a barcode data file. The software should start reading the file from row 1 column 1.
The software should pause after it prints a label to permit you to remove the label from the device and manually apply it to a page in your lab notebook.
Implementation
Note: This example assumes that the Microplate Labeler is set up correctly and the format, MyFormat, is already defined and loaded to the printer. MyFormat contains two fields. Field 1 is a human-readable text field. Field 2 is a barcode field.
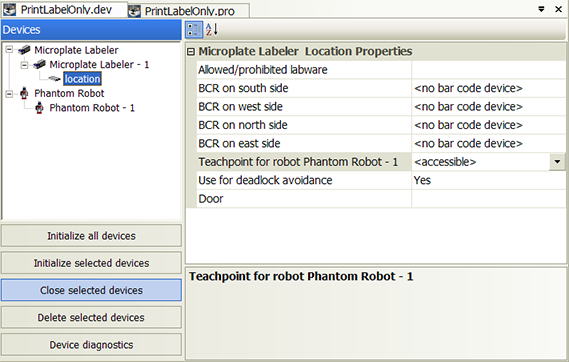
Create a device file that contains both the Microplate Labeler and a Phantom Robot, as shown. In the Microplate Labeler Location Properties area, make sure the Teachpoint for Phantom Robot is <accessible>.
 |
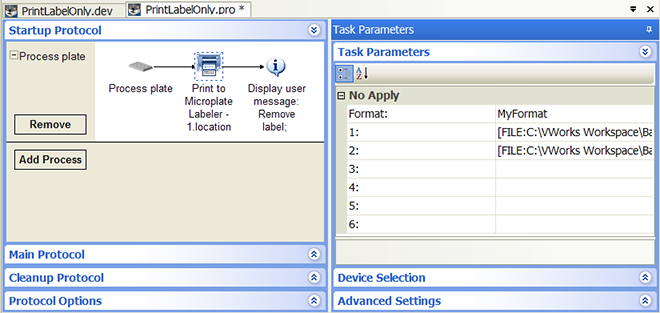
Create a Startup Protocol as shown and add a Print task and a User Message task. The User Message task creates the pause to permit you to remove the label from the device. When setting the Print and Apply task parameter, select MyFormat.
 |
For each of the two format fields (1 and 2), open the Field Composer dialog box and double-click the data file icon in the Tools area to add it to the Field Value area. In the Properties area, locate and select the data file. In the Start at row box, type 1. In the Start at col box, type 1.
 |
Related information
For information about... | See... |
|---|---|
Adding devices | • Device user guide |
Adding tasks in a protocol | |
Print and Apply task | |
Specifying the barcode input file directory | |
Liquid-handling tasks | |
Microplate-handling tasks | |
Microplate-storage tasks |