Print and Apply
Description
The Print and Apply task ( ) allows you to:
) allows you to:• Specify the contents to be printed on a microplate label.
• Print the specified contents on a label.
• Apply the label to a labware.
Task is available for... | Task is available in... |
|---|---|
Microplate Labeler | Main Protocol |
Requirements
Before adding the Print and Apply task, make sure you complete the following:
Step | For this task... | See... |
|---|---|---|
1 | Set up the Microplate Labeler. | |
2 | Specify the label format. | |
3 | Optional. Create barcode data files. | |
4 | Select the option to lower the plate stage when labeling. | |
5 | Optional. Specify the label location on labware for barcode reading. |
Setting up the Microplate Labeler
For instructions on how to set up the Microplate Labeler (installing the device, adding the device in the VWorks software, creating a profile for the device in diagnostics, and so on), see the Microplate Barcode Labeler User Guide.
Specifying the label format
In Microplate Labeler Diagnostics, you specify the label format (label design). The format you specify includes the following:
• Number of fields to be printed (up to six are permitted)
• Type of content to be populated in a field (human-readable text or barcode)
• Font type of the human-readable text, or symbology of the barcode
• Position (coordinates) of the information on the label
• Field attributes, such as field size
• Position (coordinates) of the information on the label
For instructions, see the Microplate Barcode Labeler User Guide.
After you specify the label format, you can use the Print and Apply task to specify the content that will populate each field. When you run the protocol that contains the Print and Apply task, the software substitutes the data (label content) for the text and barcode fields in the label format, and then prints the label.
Creating barcode data files
The Print and Apply task provides many methods to create barcode label contents. Two of the methods require the use of barcode data files:
• The software reads data from the data file and prints that data on the label.
Note: You specify the row and column number of the starting value when you set the Print and Apply task parameter. For instructions, see Setting the task parameters.
 |
• The software reads the barcode on one side of a labware, looks up the barcode (key) in the data file, locates the data found in another column (value), and prints and applies the new label to the same side. The primary use of this function is for label replacement.
Note: You specify the key and value columns when you set the Print and Apply task parameter. For instructions, see Setting the task parameters.
 |
Barcode data files must meet the following requirements:
• Be a comma-delimited text file with the .csv file name extension
• Optional. Contain a header, which can be in any format.
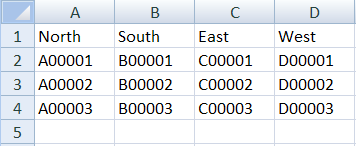
• Contain at least one column. For example, the file can contain four columns, each representing a side of the microplate.
The following example shows a data file displayed in Excel. The file contains four columns, each representing a side of the microplate. In addition, the file contains a header in row 1.
 |
Ensure that the data file is stored in the barcode file directory that you specify in the Protocol Options area of the protocol.
If you plan to use data files, make sure the files meet the requirements described in this section. In addition, make sure you select the correct data file when setting the Print and Apply task parameters. See Setting the task parameters.
Lowering the plate stage
The Microplate Labeler plate stage has two vertical positions, top and bottom, which are used to accommodate two different sized microplates. By default, the system uses the top position during a protocol run. If the labware has a tall skirt (1) or has a raised surface on the sides (2), you can specify that the Microplate Labeler use the bottom position (or lower the stage) during the run so that the label can be applied above the skirt or raised surface.
 |
Note: The two vertical plate stage positions are set mechanically. To adjust the positions, see the Microplate Barcode Labeler User Guide for instructions.
To lower the plate stage during a run:
1 Open the Labware Editor, and then click the Plate Properties tab.
2 Select the labware from the list on the left of the dialog box.
3 In the Plate Handling area, select Lower plate at Microplate Labeler.
 |
Specifying label location for barcode reading
If you plan to use a barcode reader at the Microplate Labeler, you must specify the location of the barcode label on the labware so that the system will know which side to scan during the run.
You specify the barcode label location when you set the plate parameters. For more information, see Setting plate parameters.
 |
If you plan to scan a new label after it is applied, you must also select the Verify barcodes after Print and Apply option in the Microplate Labeler Diagnostics Profiles tab. For more information, see the Microplate Barcode Labeler User Guide.
Selecting devices for the task
After adding the Print and Apply task, you must select a device for the task before you can set the task parameters. If you have multiple devices of the same type, you can:
• Prioritize the list of devices for the task. If the first device in the list is busy, the software will automatically use the next device in the list. If all of the devices in the list are busy, the task that needs the device will wait until one becomes available.
• Set up a backup pool. If the primary device encounters an error, the software will automatically use the next device in the primary list. However, if all of the devices in the primary list are in an error state, the software will automatically use the device in the backup pool.
After adding the Print and Apply task at the desired point in the protocol, select the task, and then click Device Selection in the Task Parameters area.
To select a device for the task:
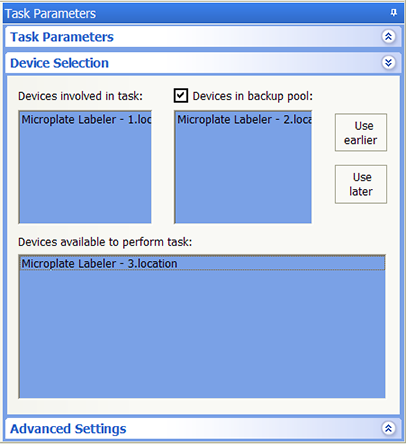
1 Double-click the desired device in the Devices available to perform task area to move it to the Devices involved in task area. If you have multiple devices of the same type, you can move them to the Devices involved in task area.
2 If you have multiple devices in the Devices involved in task area, select a device, and then click Use earlier or Use later to prioritize it.
3 Optional. Select backup devices to use in case all of the devices in the Devices involved in task area encounter an error.
a Select Devices in backup pool.
b Drag one or more devices from the Devices available to perform task area to the Devices in backup pool area.
c If you have multiple devices in the backup pool, select a device in the Devices in backup pool area, and then click Use earlier or Use later to prioritize it.
 |
Setting the task parameters
After selecting the device to use for the Print and Apply task, you can set the parameters in the Task Parameters area. The area lists the four sides of a microplate (south, west, north, and east). For each side, you can select a label format and specify the data that will substitute for the text and barcode fields in the label format.
To set the task parameters:
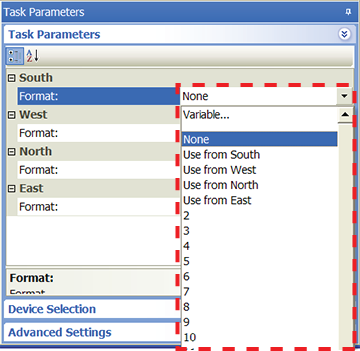
1 For the side on which the barcode label will be applied, select the barcode format in the Format list:
 |
Format selection | Description |
|---|---|
None | Indicates no label will be applied. |
Use from <side> | Uses the format from another side of the microplate to print a new label and apply it to the selected side. For example, suppose you have already selected a format and specified the label contents for the South side. You want to use the same format and contents on the West side without having to reselect and respecify the same information. Then in the West Format list, select Use from South. 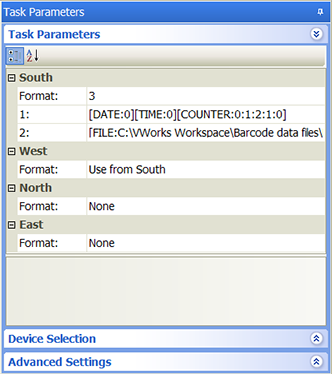 |
Format name or number | Uses a format that was set up in Microplate Labeler Diagnostics. Note: If you do not see a list of formats, make sure the label formats are not empty (formats must contain at least one field), the formats are uploaded to the printer, and the Microplate Labeler device is initialized. |
As soon as you select a format, fields appear in the Task Parameters area. You can specify the information you want to print in these fields.
Note: The number of fields that appear depends on the format you select.
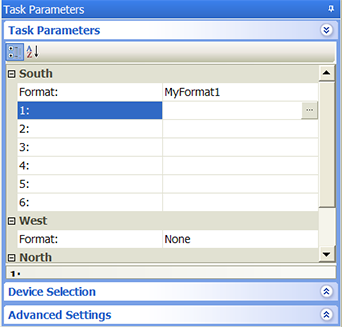 |
2 Click a field, and then click the  button that appears. The Field Composer dialog box opens.
button that appears. The Field Composer dialog box opens.The Field Composer allows you to specify the information to print on the barcode label. For example, you can print the current date and time.
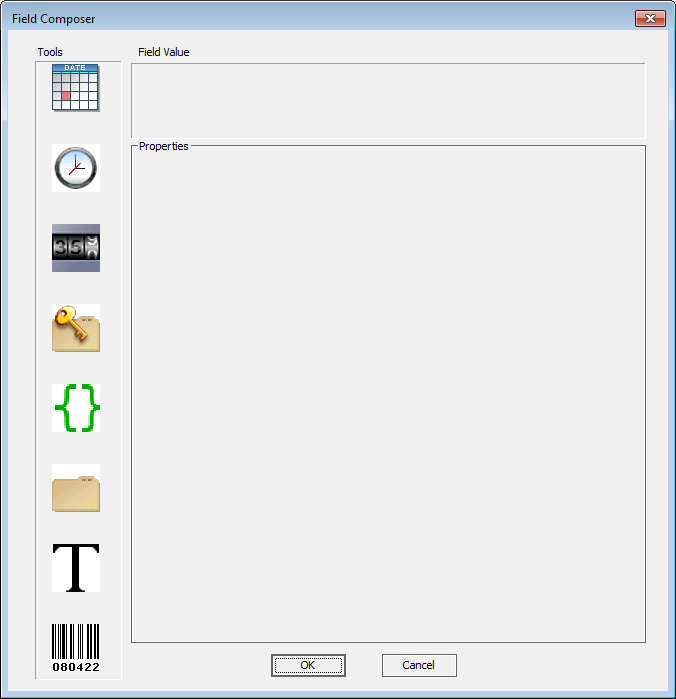 |
3 In the Tools area, double-click one or more of the following icons to specify the information to be printed on the barcode label. The selected icon appears in the Field Value area.
Icon | Description |
|---|---|
 | Prints the current date. Click the icon in the Field Value area. In the Properties area, select the desired date format. YYYY is the year, MM is the month, and DD is the day. Note: The Use System Format option uses the local computer’s date format. 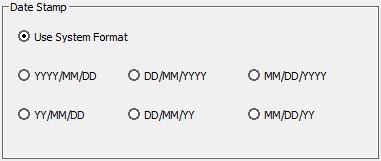 |
 | Prints the current time. Click the icon in the Field Value area. In the Properties area, select the desired data format: 12 hours (AM/PM) or 24 hours.  |
 | Prints a numeric or alphanumeric value that can be incremented. Click the icon in the Field Value area. Set the following in the Properties area: • Character Set. The option to use either numeric or alphanumeric characters. • Start at. The starting value. • Increment by. The amount by which the value increments. • Total number of digits. The total number of digits or characters, including leading 0s. • Increment every N plates. The increment value. For example, 1 increments the value every microplate. 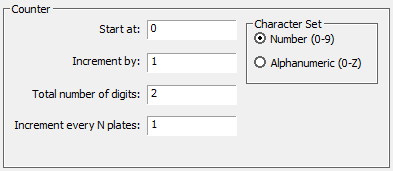 |
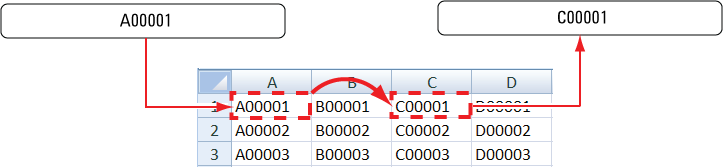
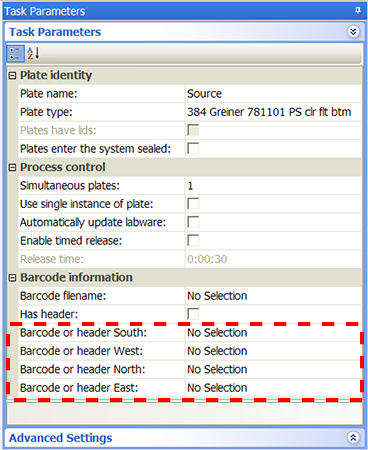
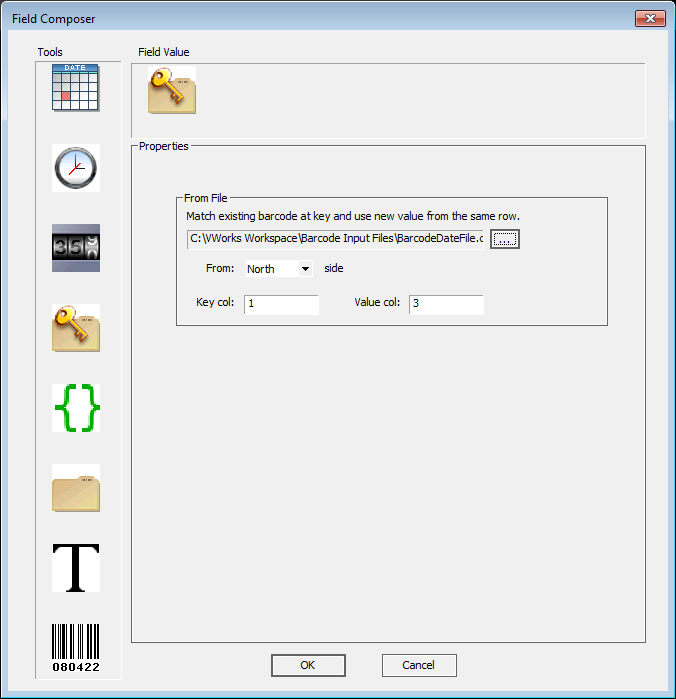
 | Looks up a value (key) in the specified barcode data file and prints the corresponding value found in the file. Click the icon in the Field Value area. In the Properties area, click the  button to select the barcode data file. In the From list, select the scanned side of the labware. Specify the column number that contains the lookup value (key) and the column number that contains the values you want to print. button to select the barcode data file. In the From list, select the scanned side of the labware. Specify the column number that contains the lookup value (key) and the column number that contains the values you want to print.For example, From is set at South, Key col is set at 2, and Value col is set at 4. During the run, a B00001 barcode is scanned on the south side of the labware. The software looks up B00001 in the specified file, and prints the barcode, D00001, found in the fourth column. Note: The plate parameters must specify Barcode or header South in the Barcode information area so the system knows to scan the south side of the incoming microplates. 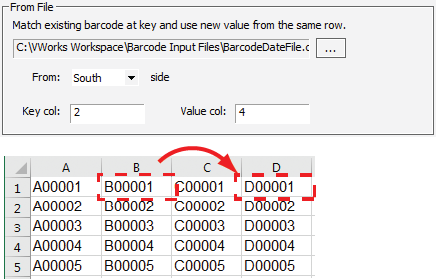 |
 | Prints the values in the specified barcode input file. Click the icon in the Field Value area. In the Properties area, click the button to select the input file. Specify the row and column number of the starting value. During the run, the software automatically increments to the next row to print the next value.For example, Row is set at 2, Column is set at 3. During the run, the software starts with the value in row 2 column 3 (C00002). Then, the software moves to row 3 column 3 (C00003), row 4 column 3 (C00004), row 5 column 3 (C00005), and so on. 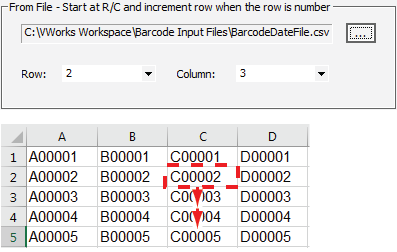 |
 | Prints the text you specify. Click the icon in the Field Value area. In the Properties area, type the text you want to print on every microplate.  |
 | Copies the barcode data from an existing label on the selected side to print a new label. Note: You can only copy barcode data from another label. You cannot copy human-readable text. Click the icon in the Field Value area. In the Properties area, select the side (barcode) to be copied. For example, an incoming microplate already has a label on the west side. You want to copy the barcode data from the west-side label to print a new label, and apply the new label to the south side. In the Task Parameters area, you specify that the south side of the labware will be labeled. In the Field Composer dialog box, you specify Use barcode from processing plate, and select West. 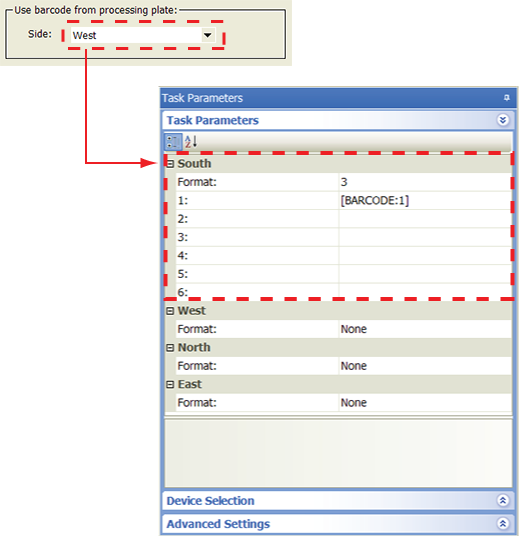 |
When you are finished, click OK. The information you specified appears in the Task Parameters area.
Repeat the procedure if you want to print labels on other sides of the microplate.
Example 1: Copy label contents from one side of the microplate and print and apply to a new side
Goal
For each incoming microplate, scan the label on the east side of the microplate, print the same contents on a new label, and apply the new label to the north side of the microplate.
Implementation
Note: This example assumes that the Microplate Labeler is set up correctly and the format, MyFormat, is already defined and loaded to the printer. MyFormat contains two fields. Field 1 is a human-readable text field. Field 2 is a barcode field. The device file and protocol are correctly created.
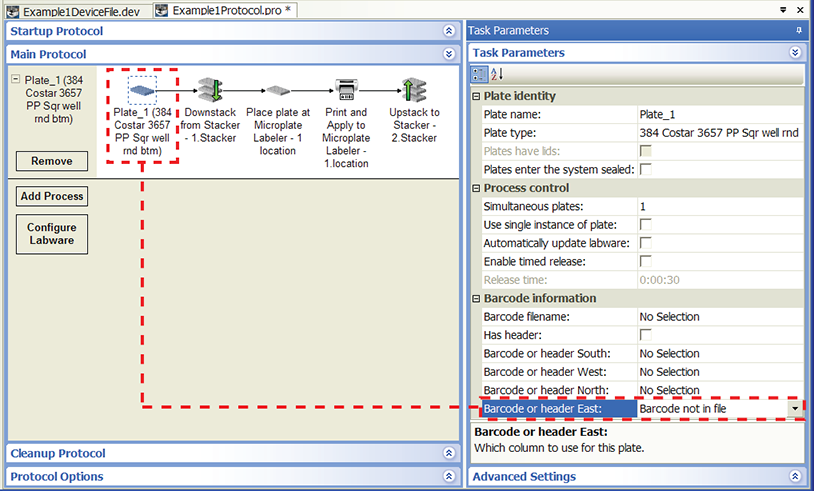
When setting the plate parameters, select Barcode or header East in the Barcode information area so the system knows to scan the east side of the incoming microplates. No barcode verification file will be used, so select Barcode not in file.
 |
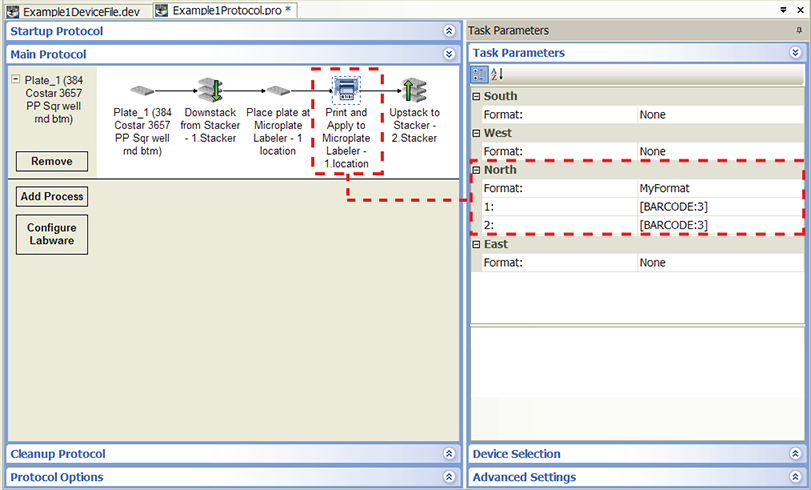
When setting the Print and Apply task parameter, select MyFormat for the side you want to label: North.
 |
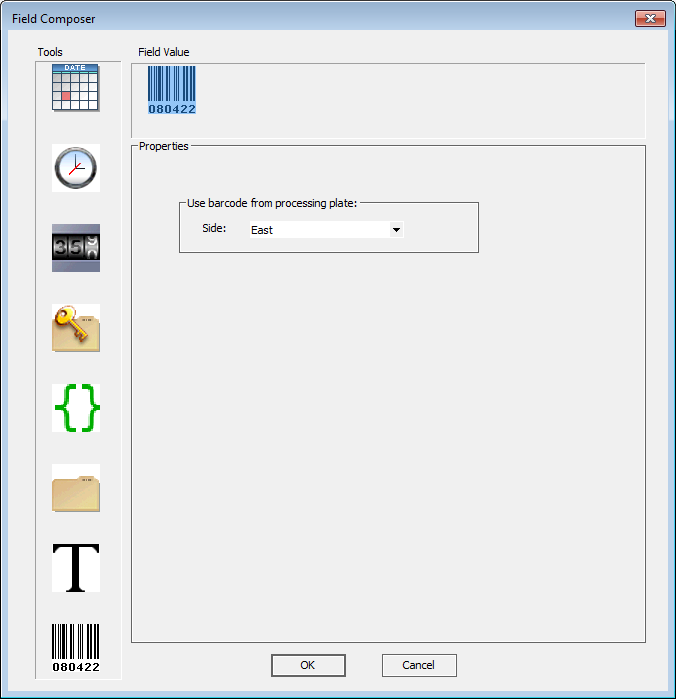
For each of the two format fields (1 and 2), open the Field Composer dialog box and double-click the barcode icon in the Tools area to add it to the Field Value area. Because you want to copy the barcode information from the east side of the microplate, select East from the Side list.
 |
Example 2: Use a barcode data file to print and apply labels
Goal
For each incoming microplate, scan the label on the east side of the microplate, locate the information (key) in the first column in the data file, print the corresponding information (value) from the third column in the file on a new label, and apply the new label to the same (east) side of the microplate.
Implementation
Note: This example assumes that the Microplate Labeler is set up correctly and the format, MyFormat, is already defined and loaded to the printer. MyFormat contains two fields. Field 1 is a human-readable text field. Field 2 is a barcode field. The barcode data file is stored in C:\VWorks Workspace\Barcode data files. The device file and protocol are correctly created.
When setting the plate parameters, select Barcode or header East in the Barcode information area so the system knows to scan the east side of the incoming microplates. No barcode verification file will be used, so select Barcode not in file.
|
When setting the Print and Apply task parameter, select MyFormat for the same side: East.
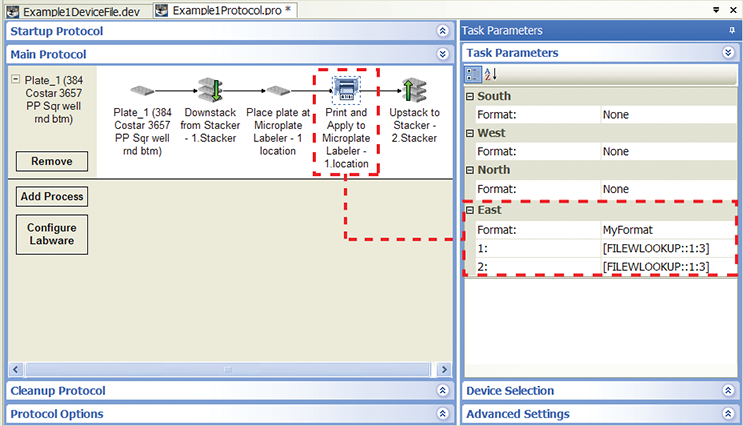 |
For each of the two format fields, open the Field Composer dialog box and double-click the key-file icon in the Tools area to add it to the Field Value area. In the From File area, locate and select the data file to use. In the From list, select the East side. In the Key col box, type 1. In the Value col box, type 3.
 |
Related information
For information about... | See... |
|---|---|
Adding devices | • Microplate Barcode Labeler User Guide |
Adding tasks in a protocol | |
Barcode data file and barcode input file | |
Protocol options | |
Rotate Stage (Microplate Labeler) task | |
Writing JavaScript for the Print and Apply task | |
Microplate-handling tasks | |
Microplate-storage tasks | |
Liquid-handling tasks | |
Scheduling tasks |