Setting plate parameters
About this topic
You need to set parameters for process plates and configured labware. This topic explains how to set the parameters for both.
Procedure for setting plate parameters
To set plate parameters:
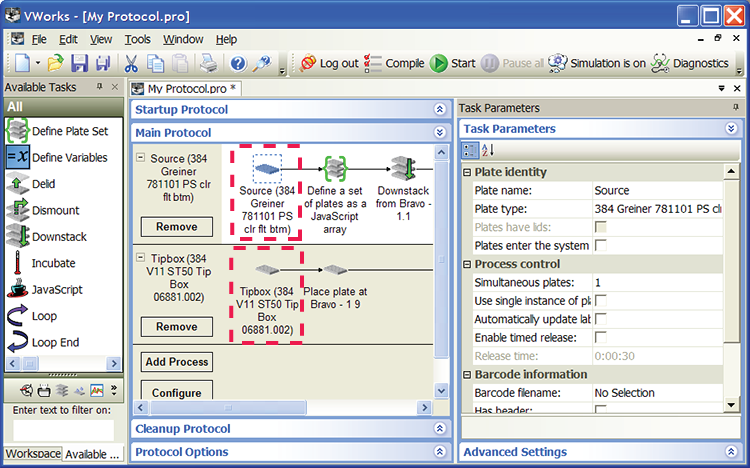
1 In the Protocol area, select the process plate icon or the configured labware icon.
 |
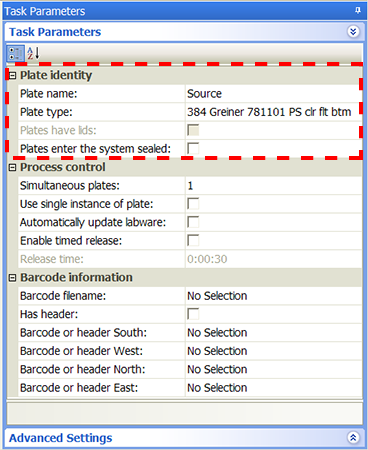
2 In the Plate identity area, set the following parameters:
 |
Property | Description |
|---|---|
Plate name | The name that will help you identify the labware. For example, you can use Source Plate or Destination Plate. |
Plate type | The type of labware. The list of labware types is created in the Labware Editor. |
Plates have lids | The indicator that the labware entering the system has a lid. Select the check box if the labware has a lid. Clear the check box if the labware does not have a lid. Note: The selection is only available if the Can have lid option is selected in the Labware Editor. |
Plates enter the system sealed | The indicator that the labware entering the system is sealed. Select the check box if the labware is sealed. Clear the check box if the labware is not sealed. Note: The selection is only available if the Can be sealed option is selected in the Labware Editor. |
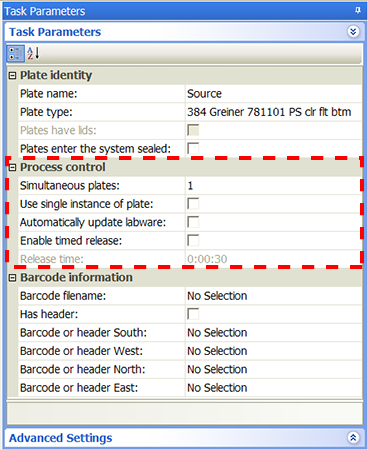
3 In the Process control area, set the following parameters:
 |
Property | Description |
|---|---|
Simultaneous plates | The maximum number of labware instances that are processed in the system at one time. For details about how to determine the optimum number, see Determining the number of simultaneous plates. |
Use single instance of plate | The indicator that the plate type has only one instance and will be used repeatedly during the run. For example, you might have a single source plate from which you will aspirate repeatedly during a protocol. Select the check box if the labware has only one instance. Clear the check box if the labware has more than one instance. |
Automatically update labware | The indicator that the labware is configured labware. Select the check box if the labware is a configured labware and will be used by one or more tasks in the protocol process. When you revise the protocol, the changes are automatically reflected in the configured labware process. Clear the check box if you want to convert the configured labware to a process plate. |
Enable timed release | The indicator that the labware is delivered into the system in timed intervals. If you select this property, you also need to set the Release time. Select the check box if you want the system to deliver the labware in timed intervals. Clear the check box if the system can deliver the labware without waiting the specified time. |
Release time (Sec) | The length of time to wait before delivering the next labware instance into the system. For details about how to determine the release time, see Determining the correct microplate release rate. |
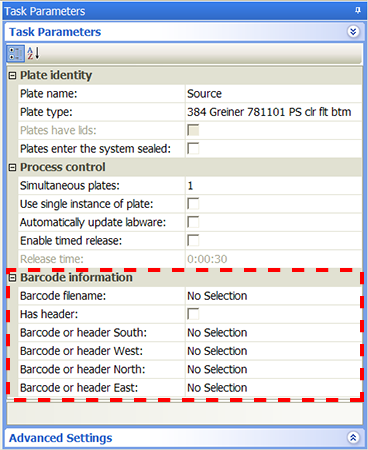
4 In the Barcode information area, set the following parameters:
 |
Property | Description |
|---|---|
Barcode file name | The file you want to use to verify barcodes on incoming labware. Select from the list of barcode files. Depending on the setting in Protocol Options, the list of barcode files is from Shared Services storage or from the local file system. If you do not see a list, make sure you specified the file location in the Protocol Options. See Adding information about the protocol. For details on the file structure and content, see Input files. To import barcode files into Shared Services storage, see Importing and exporting miscellaneous files. |
Has header | The indicator that the first line of the barcode file contains a header. Select if the code file name contains a header. Clear the check box if the file does not contain a header. |
Barcode or header South/West/North/East | The column ID in the barcode file. Select the column ID for the side of the labware. For example, if the barcode is on the east side of the labware, select the column ID in the Barcode or header East field. Select from the list of column IDs. If you do not see a list, make sure you specified the file location in the Protocol Options and selected the file from the Barcode file name property. |
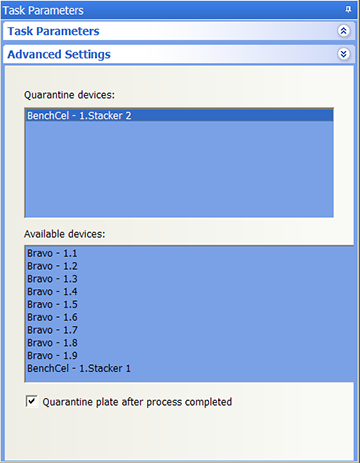
5 Optional. Reserve a device to store quarantined labware. Labware can be quarantined (moved aside and not processed) if a barcode label is misread, the labware orientation is incorrect, or the wrong labware type is detected. The quarantine option allows the system to continue running the protocol even though it is unable to resolve problems with the labware.
To reserve a device to store quarantined labware:
a Click Advanced Settings.
b In the Available devices list, double-click the device you want to use to store quarantined labware. The device appears in the Quarantined devices list.
c Select Quarantine plate after process completed if you want to quarantine labware after the protocol is finished. Clear the check box if you want to quarantine the labware as soon as it is encountered in the run.
 |
For more information about how to set up quarantine criteria, see Setting up automated error responses.
Determining the number of simultaneous plates
Factors to consider
The number of simultaneous plates you specify depends on the following:
• The number of positions available during a protocol process.
In general, you can specify one simultaneous plate for every task in the protocol, because each task typically uses one microplate position. For example, if your protocol downstacks a microplate, seals the microplate, labels the microplate, and then upstacks the microplate, you have three positions available: one in the robot grippers, one on the microplate sealer, and one on the microplate labeler.
• The number of positions in the system that will incubate microplates.
A Labware MiniHub that has 3 shelves has 12 possible microplate positions. If your protocol downstacks a plate, dispenses liquid, incubates the microplate in the 12‑position MiniHub, and then dispenses more of the same liquid, you have 14 positions available: one in the robot grippers, one on the dispenser, and 12 in the MiniHub.
• The number of microplates in a Reorder task.
If the protocol includes a Reorder task, the number of simultaneous plates must be equal to, or greater than, the number of microplates in the Reorder task.
• The slowest or rate-limiting task.
A task such as a long read step or wash task on a single device can impact the number of microplates that can enter the system.
How throughput is impacted
The number of simultaneous plates you specify can impact throughput as follows:
• The value is too high. The protocol run might slow down because the robot will move around to avoid a deadlock. (A deadlock occurs when the number of locations available in the system is less than the number of microplates in the system, and the protocol stops.)
• The value is too low. The time for the protocol run can be longer than desired.
Determining an optimum number of simultaneous plates
By default, the number of simultaneous plates is set to one for each protocol process. If your protocol process uses multiple devices, you can increase the throughput of the system by increasing the number of plate instances to be processed simultaneously. The optimum number should balance high throughput and deadlock avoidance.
To determine the optimum number of simultaneous plates:
1 Run the protocol in simulation, noting the protocol process time in the log.
2 Increase the number of simultaneous plates.
3 Repeat steps 1 and 2 until the simulated process time no longer decrease. The simultaneous plates value is optimum when the process time no longer decreases.
Determining the correct microplate release rate
You can use the Enable timed release and Release time plate properties to control the microplate release rate and prevent bottlenecks and deadlocks. An optimum release rate should balance the number of microplates entering into the system with the number of microplates exiting the system.
Bottlenecks can occur when tasks or incubation times cause the number of incoming microplates to be greater than the number of outgoing microplates. To prevent the bottleneck, you can limit the rate of microplates entering into the system.
To determine the optimum microplate release rate:
1 Run the protocol using empty labware.
2 During or after the run, open the Gantt Chart dialog box to find the task that is causing the bottleneck and determine the length of time for the task to finish. (For information about the Gantt Chart dialog box, see Tracking the run progress of instances or devices.)
3 Select Enable timed release. Type the length of the bottlenecking task time in the Release time box.
4 Run the protocol again using empty labware.
5 Determine whether the bottleneck is still occurring.
• If the bottleneck is resolved, determine if previous tasks can process microplates during the wait time so that you can improve throughput. If so, decrease the release time.
• If the bottleneck still occurs, increase the release time.
6 Repeat steps 1 through 5 until the bottleneck is resolved and the throughput is optimized.
For example:
A protocol is running with three simultaneous plates. A pipetting task in the middle of the protocol takes 3 minutes. During this time, two other microplates have already entered the system and must wait for the pipetting task to finish. A deadlock error occurs, because the system is unable to find a storage location for the third microplate that entered the system.
By turning on the timed release property and setting the release time to 180 seconds (or 3 minutes), the system will wait 3 minutes after the first microplate is in the system before delivering the next microplate. However, a microplate-piercing task and a microplate-shaking task take a total of 1 minute before the pipetting task. So the release time can be decreased to 120 seconds (or 2 minutes) to improve throughput.
Note: Bottlenecks in a protocol might not always cause a deadlock error. Instead, microplates might wait on platepads. Monitor the dry protocol run to check for non-error-causing bottlenecks.
Related information
For information about... | See... |
|---|---|
Labware Editor | |
Barcode file folder location | |
Monitoring run progress of instances, processes, and devices | |
Setting up quarantine criteria | |
Quarantining labware that are downstacked from a BenchCel stacker |