Setting protocol options
When you create a protocol, you need to specify which device file to use with the protocol. Optionally, you can specify additional information to associate with your protocol.
Specifying the device file for a protocol
To specify the device file:
1 In the Protocol area, click Protocol Options to view the properties.
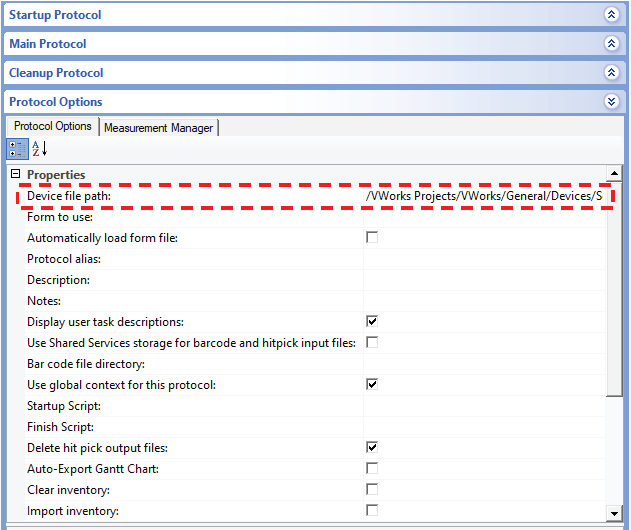 |
2 Click the field next to Device file path, and then click the  button that appears. The Open File dialog box opens.
button that appears. The Open File dialog box opens.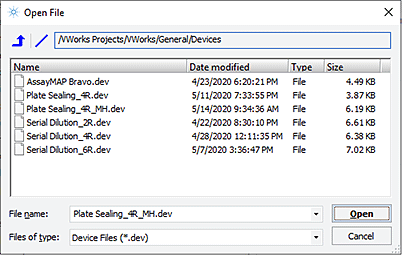 |
3 Select the correct device file (.dev), and then click Open. The path of the device file appears in the Device file path box.
Adding information about the protocol
You can add information about your protocol. For example, you can provide a description and some notes about the protocol.
To add information about the protocol:
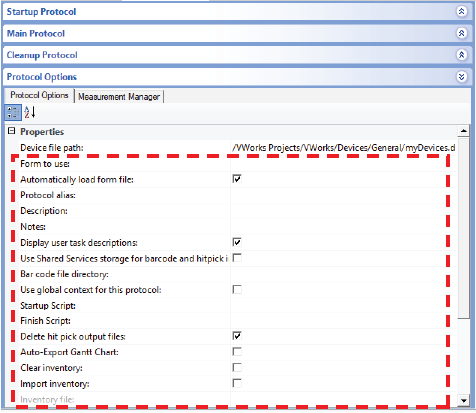
In the Protocol Options area, enter the following information:
 |
Optional protocol information | Description |
|---|---|
Form to use | The option that specifies a VWorks form for operators to use as the graphical interface to run a protocol. For details on how to create forms and specify which form to use, see Creating forms for protocol operators. |
Automatically load form file | The option that opens the form that is specified in the Form to use field anytime the corresponding protocol is opened. |
Protocol alias | Another name for the protocol. The alias is displayed in the software, but the protocol file name is not changed. |
Description | A brief description of the protocol. |
Notes | Special notes about the protocol. |
Display user task descriptions | The option to display the task description (or task label) that you provide instead of the default task label. The label is displayed under the task icon in the protocol. |
Use Shared Services storage for barcode and hitpick input files | The option to specify the type of file browser dialog box that opens when selecting barcode and hitpick input files: • Select the check box to open the Shared Services storage file browser dialog box when selecting barcode and hitpick input files. • Clear the check box to open the standard Windows file browser dialog box when selecting barcode and hitpick input files. This file browser dialog box allows you to browse directories in the local file system. Note: Selecting this option does not change any previous selections of barcode or hitpick input files. |
Barcode file directory | The location of the files that contain the barcodes you want to track in the software. The files in this folder will be available in the list that appears in the plate properties area of the protocol, as the following figure shows. 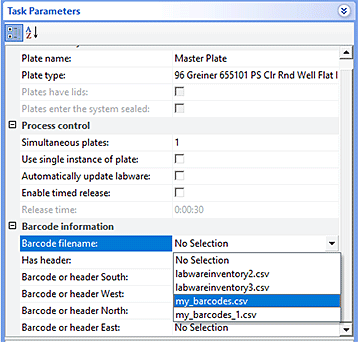 To import the barcode and hitpick input files into Shared Services storage, see Importing and exporting miscellaneous files. For instructions on barcode file format, see Setting plate parameters and Tracking barcodes. |
Use global context for this protocol | The option that permits variables to be available across all protocols that also use the global context for variables. |
Startup script | The JavaScript code you want to run before the Startup or Main Protocol begins. |
Finish script | The JavaScript code you want to run after the Main or Cleanup Protocol finishes. |
Delete hit pick output files | The option to delete hit-pick output files after the protocol run finishes. |
Auto-export Gantt Chart | The option to automatically export the Gantt Chart after the protocol run is finished. The Gantt Chart is exported to Shared Services storage. |
Clear inventory | The option to automatically clear the labware information from the inventory database at the start of the protocol run. Note: Plate and location group information are retained. |
Import inventory | The option to automatically import and use the specified inventory file when starting the protocol run. You specify the inventory file to import in the Inventory file box. |
Inventory file | Available only if you selected Import inventory. The inventory file you want to import and use when starting the protocol run. 1 Click the Inventory file box, and then click the browse button that appears. 2 Locate and select the desired inventory (SQL) file. |
Specifying protocol rules
You can specify certain actions to occur before or after the protocol run.
To specify the protocol rules:
In the Protocol Options area, specify the following rules:
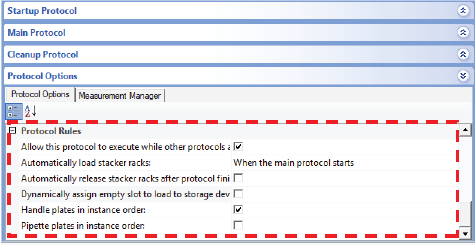 |
Allow this protocol to execute while other protocols are running
This rule allows you to specify the following:
• Select the check box (default). Enables the Runset Manager to run the protocol simultaneously with another protocol.
• Clear the check box. Prevents the protocol from running simultaneously with another protocol.
Automatically load stacker racks
Select the Automatically load stacker racks rule to require that all racks on stacking devices, such as the BenchCel Microplate Handler, be automatically loaded before either one of the following starts:
• Startup Protocol
• Main Protocol
Automatically release stacker racks after protocol finishes
Select the Automatically release stacker racks rule to require that all racks on stacking devices, such as the BenchCel Microplate Handler, be automatically released after the protocol finishes.
Dynamically assign empty slot to load to storage device
Select the rule to have the software assign slots in the storage device according to what is available at that moment. Under this rule, labware can be placed in different locations (not grouped together).
Clear the check box if you want to store labware consecutively in the same carousel or stacker.
Handle plates in instance order
Select the Handle plates in instance order rule to require that microplates be processed in the order as they enter the system.
For example:
Two PlateLoc Sealers are used in a system to seal microplates. One of the PlateLoc Sealers runs out of seal material and stops on a microplate.
If this rule is selected, the second sealer would also stop until you load a new roll of seal, start the first sealer, and the microplate at the first sealer is upstacked to its position in the expected order.
If this rule is not selected, the second sealer would continue sealing and upstacking microplates. The microplate at the stopped sealer would be omitted, thus the sequence of microplates will be out of order.
Pipette plates in instance order
Select the Pipette plate in instance order rule to require that microplates be processed at pipetting devices in the order as they enter the system.
Select the check box if time-sensitive assays require that each microplate be processed the same way within the same length of time. Doing so ensures the data are comparable across the microplates.
Clear the check box if:
• The protocol has more than one pipette process that uses the same liquid-handling device.
• The duration of one of the pipetting operations is much longer than another.
For example:
A protocol has two processes and both have a pipetting operation that uses the same Bravo Platform.
If the rule is selected, the pipetting operations for one process are completed before the pipetting operations begin for the other process. The first pipetting operation takes significantly longer to complete than the second operation, and the protocol is run several times in succession. The overall time taken for the protocol to complete is much greater than it needs to be because during each cycle the system had to wait for the slower pipetting operations to complete for all the microplates in the process before it could continue.
If the rule is not selected, a microplate from the fast pipetting process can be delivered to the Bravo Platform after a microplate from the slow pipetting process, followed by another microplate from the slow pipette process, and so on. This reduces the bottleneck at the Bravo Platform because it allows the faster process to continue, and its second cycle in the series to start before the first cycle is complete.
Related information
For information about... | See... |
|---|---|
Specifying a device file for the protocol | |
Importing files created in other software, such as barcode and JavaScript files |