Running the Digestion protocol

The In-Solution Digestion: Multi-Plate default protocol does the following:
• Denaturant mixture is added to the samples.
• Samples are denatured and reduced at elevated temperature.
• The samples are alkylated.
• The samples are diluted with Dilution mixture.
• Protease is added to the samples.
Experiment ID and method requirements
Each workbench application and utility has an Experiment Settings section that allows you to select an experiment ID and a method.
• An experiment ID is a database record that captures the steps executed and the settings used during each run of an application or utility. Any errors that may have occurred during a run are also recorded.
To create an experiment ID, you open the Experiments Editor by clicking  in any Workbench app or utility. For details, go to the Literature Library and open Using the Protein Sample Prep Workbench. In the browser that opens, click Using Experiment IDs.
in any Workbench app or utility. For details, go to the Literature Library and open Using the Protein Sample Prep Workbench. In the browser that opens, click Using Experiment IDs.• A method is a comprehensive collection of saved settings for an application or utility, which you can use to run the application or utility.
Experiment IDs and methods are required for compliance-enabled VWorks editions and optional for noncompliance-enabled VWorks editions.
VWorks edition | Experiment ID and method selection |
|---|---|
VWorks Plus | Required |
VWorks Standard | Optional |
Before you start
Ensure that you:
• Prepare the reagents, including the plates for stacking. See Preparing the solutions.
• Prepare the samples. See Preparing the samples.
• If applicable, make sure that you know which experiment ID to use to record the steps executed during the utility and app runs.
• Run the Startup utility to prepare the AssayMAP Bravo Platform for the run. See System Startup/Shutdown v3.0 User Guide.
Stacking the wash plates and the lid for the protease plate
The In-Solution Digestion: Multi-Plate protocol requires a stack of five 96-well Greiner 650207 U‑Bottom plates at deck location 2, regardless of the number of sample plates being used. Ensure that you have prepared the plates for stacking. For details, see Preparing plates for stacking.
To stack the prepared wash and lid plates:
1 Open the In-Solution Digestion: Multi-Plate app:
If the Reagent Plate Setup for In-Solution Digestion: Multi-Plate form is already open, click  in the navigation pane.
in the navigation pane.Otherwise, locate In-Solution Digestion: Multi-Plate in the App Library, and then click App.
 |
The In-Solution Digestion: Multi-Plate application opens.
 |
2 Click  in the navigation pane.
in the navigation pane. Follow the instructions that appear on the screen after the run starts.
Setting up the Digestion protocol
To set up the Digestion protocol:
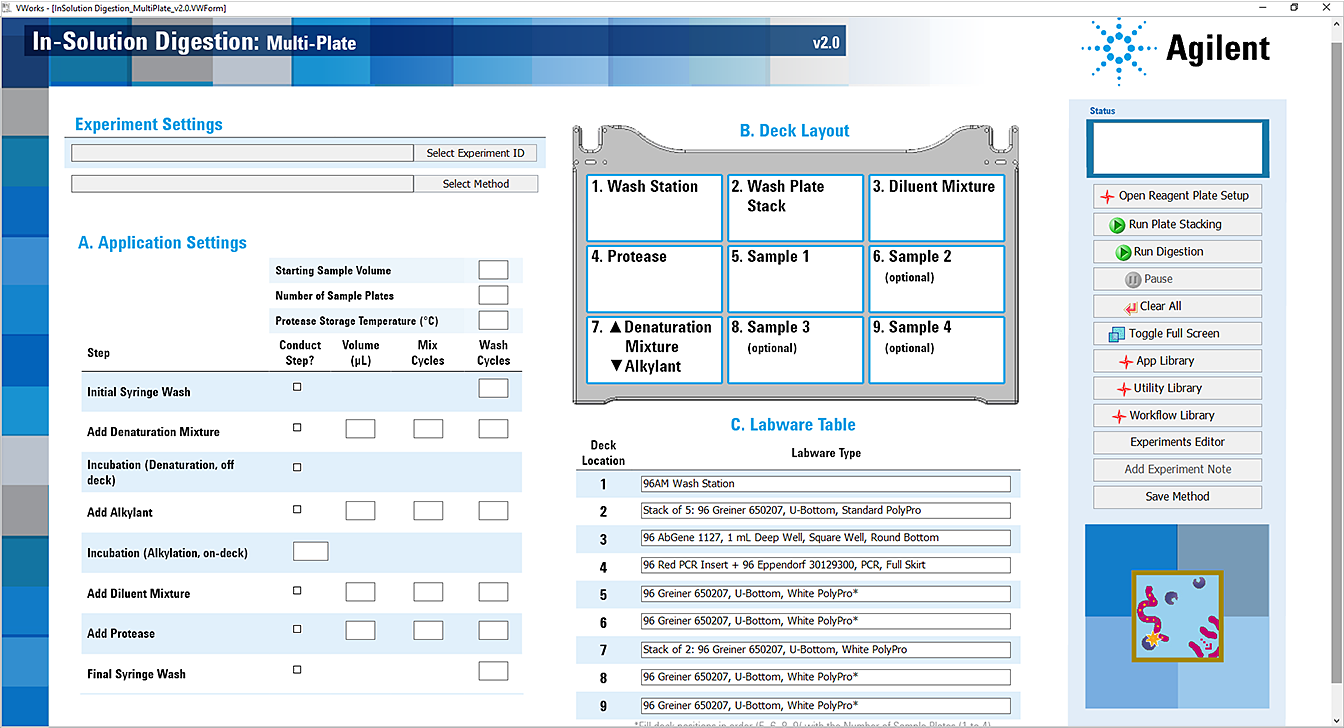
1 Ensure that the In-Solution Digestion: Multi-Plate form is open.
2 If applicable, click Select Experiment ID.
 |
The Experiments Editor opens.
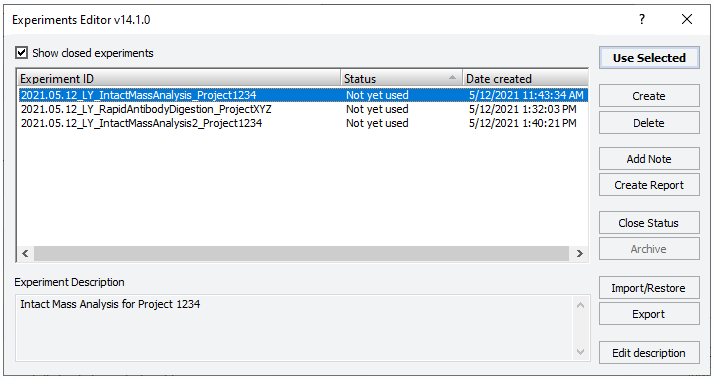 |
3 Select the Experiment ID that you want to use to record the steps performed during this application run, and then click Use Selected.
The Experiments Editor closes.
4 In the form, click Select Method to locate and select a method.
In the Open File dialog box, select the method, and click Open.
• To run the selected method, go to Starting the Digestion protocol run.
• To modify or create a method, proceed to step 5.
VWorks Plus. Administrator or technician privileges are required to create and modify methods.
5 In the Application Settings area, do the following:
a Specify the sample information and protease storage temperature. See Application Settings for In-Solution Digestion protocol for details.
b Select the Conduct Step? check box of each step you want to perform, and then specify the settings for the selected steps. For details, see, Application Settings for In-Solution Digestion protocol.
c Click  .
.
.In the Save File As dialog box, type the file name and click Save.
VWorks Plus. You must save the method before you can run it.
Application Settings for In-Solution Digestion protocol
The following tables give a brief description of each setting. For details, including the full and practical ranges of values for a given setting, see the Assay development guidelines and protocol notes.
Table In-Solution Digestion sample and protease settings overview
Setting or Step* | Description | Value | |
|---|---|---|---|
Starting Sample Volume | The volume of sample in each well in the sample plate. | Default: | 15 µL |
Range: | 0–300 µL | ||
Number of Sample Plates | The number of sample plates on the AssayMAP Bravo deck. | Default: | 1 |
Range: | 1–4 | ||
Protease Storage Temperature | The temperature set-point for the Protease plate (deck location 4) for the duration of the run. The temperature controller will turn off after completion of the In-Solution Digestion run. Note: The temperature of the wells will be slightly different than the Peltier set point. | Default: | 10 °C |
Range: | 4–37 °C | ||
Table In-Solution Digestion Step settings
Setting or Step* | Description | Volume in µL | Mix Cycles | Wash Cycles | |
|---|---|---|---|---|---|
Initial Syringe Wash | Washes syringes at the wash station (deck location 1). | Default: | – | – | 3 |
Range: | – | – | 1–10 | ||
Add Denaturation Mixture | Aspirates the Denaturation Mixture (deck location 7) into the syringes, and then dispenses it into Sample plate 1 (deck location 5). The solutions in Sample plate 1 are mixed based on the Mix Cycles value, and then the syringes are washed at the wash station (deck location 1) and in the Syringe Wash Buffer plate. This step repeats for each sample plate that is on the deck (locations 6, 8, and 9). | Default: | 30 | 15 | 3 |
Range: | 1–250 | 0–30 | 0–10 | ||
Incubation (Denaturation, off-deck) | Pauses the run after the Add Denaturation Mixture step so that you can manually move the sample plates off deck for incubation, if required, for denaturation and/or reduction. After incubation, you manually place the sample plates back onto the Bravo deck and resume the protocol run. | ||||
Add Alkylant | Moves the Denaturation Mixture plate from deck location 7 to 3, aspirates the Alkylant (deck location 7) into the syringes, and then dispenses it into Sample plate 1 (deck location 5). The solutions in Sample plate 1 are mixed based on the Mix Cycles value, and then the syringes are washed at the wash station (deck location 1) and in the Syringe Wash Buffer plate. This step repeats for each sample plate that is on the deck (locations 6, 8, and 9). | Default: | 6 | 15 | 3 |
Range: | 1–250 | 0–30 | 0–10 | ||
Incubation (Alkylation, on-deck) | Incubates the sample plates for the specified period (in minutes) on the deck. | Default: | Time: 45 minutes | ||
Range: | 0–180 minutes | ||||
Add Diluent Mixture | Moves the Denaturation Mixture plate from deck location 3 to 7, aspirates the Diluent Mixture (deck location 3) into the syringes, and then dispenses it into Sample plate 1 (deck location 5). The solutions in Sample plate 1 are mixed based on the Mix Cycles value, and then the syringes are washed at the wash station (deck location 1) and in the Syringe Wash Buffer plate. This step repeats for each sample plate that is on the deck (locations 6, 8, and 9). | Default: | 210 | 15 | 3 |
Range: | 1–250 | 0–30 | 0–10 | ||
Add Protease | Aspirates Protease (deck location 4) into the syringes, and then dispenses it into Sample plate 1 (deck location 5). The solutions in Sample plate 1 are mixed based on the Mix Cycles value, and then the syringes are washed at the wash station (deck location 1) and in the Syringe Wash Buffer plate. This step repeats for each sample plate that is on the deck (locations 6, 8, and 9). | Default: | 9 | 15 | 3 |
Range: | 1–250 | 0–30 | 0–10 | ||
Final Syringe Wash | Washes the syringes at the wash station (deck location 1). | Default: | – | – | 3 |
Range: | – | – | 1–10 | ||
*For additional protocol guidelines, see Protocol stepwise guidelines. For a complete list of the robotic movements executed during a run, see Automation movements during Reagent Plate Setup protocol. | |||||
About performing a mock run (optional)
If you are unfamiliar with the protocol and would like to see how it operates before running it with valuable samples and reagents, you can perform a mock run. A mock run uses empty or water-filled labware and source bottles.
You prepare for a mock run the same way you would prepare for a real protocol run, except that you use empty labware for a totally dry run or labware containing water for a wet run. To decrease the run time, you can decrease the volumes.
Starting the Digestion protocol run
protoc
To start the Digestion protocol run:
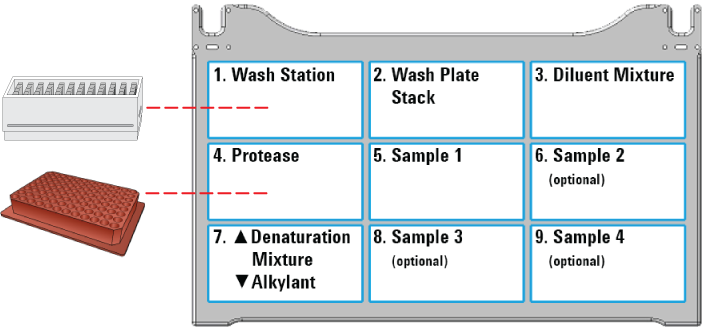
1 Ensure that the accessories and labware are at the assigned deck locations, as shown in the Deck Layout image of the form.
 |
At deck location 7, ensure the Denaturation Mixture plate is stacked atop the Alkylant plate.
Note: The Reagent Plate Setup protocol stacks the labware at deck location 7 automatically. If you prepared the reagent plates manually, you must stack the plates manually at deck location 7.
2 Click  to start the run.
to start the run.To monitor the progress of the run, check the Status box.
 |
To pause the run, click Pause. The task currently in progress finishes before the protocol pauses. The Scheduler Paused dialog box opens. For details, see Emergency stops and pauses.
To troubleshoot errors, see the Error Recovery Guide and the Bravo Platform User Guide in the Literature Library page of the Protein Sample Prep Workbench.
Adding an experiment ID note after the run
After the protocol run ends or during a pause, you can add a note to the experiment ID. For example, a note can describe any observations during the run or any offline steps that are being executed. The notes that you add will appear in any reports generated for the experiment ID.
To add a note to an open experiment ID:
1 While the experiment ID is still selected in the Experiment Settings area, click  . The Add Note dialog box opens.
. The Add Note dialog box opens.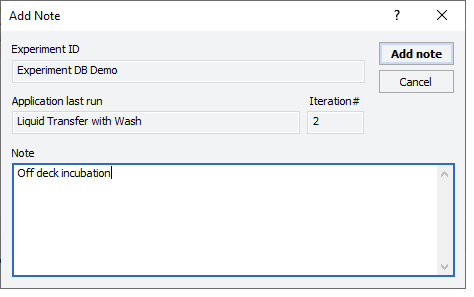 |
2 In the Note area, type the note, and then click OK.
For detailed instructions on working with Experiment IDs, see Using Experiment IDs.
Cleaning up
To clean up after a run:
1 Remove used labware from the deck.
2 Discard leftover reagents appropriately.
3 Optional. Conduct stringent washing of the syringes:
a Open the Syringe Wash utility  .
.
.b If applicable, click Select Experiment ID to open the Experiments Editor.
|
c In the Experiments Editor, select the Experiment ID that you want to use to capture the steps performed during this utility run, and then click Use Selected.
d Click Select Method to select and load the method for this utility.
e Confirm that the labware and accessories on the AssayMAP Bravo deck match the display in the Deck Layout area of the form.
f Click  to start the run.
to start the run.To shut down at the end of the day:
Run the System Shutdown utility. See System Startup/Shutdown v3.0 User Guide.