Changing the Bravo head
About this topic
This topic describes how to uninstall and install a liquid-handling head, other than the Bravo 96AM Head, and how to adjust the corresponding settings in the VWorks software.
Before you start
If disposable tips are loaded on the currently installed head, use Diagnostics to dispense any liquid and remove the tips before removing the head. For instructions, see Performing a task using Bravo Diagnostics.
Make sure that the head mount is in its home position above deck location 5. If necessary, click the Jog/Teach tab in Diagnostics, and then click Home XYZ to reposition the head mount.
Uninstalling the liquid-handling head
To uninstall the liquid-handling head:
1 Ensure that the Bravo Platform is turned off. Check that the power switch located on the right side is set to off (o) and the status lights on the device front are not lit.
Figure Bravo status lights (front) and power switch (right side)
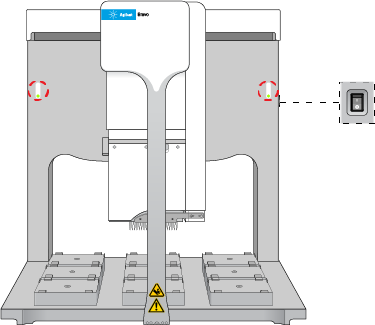 |
2 Make sure that the head mount is at its home position above deck location 5, as shown in the preceding figure.
If necessary, manually move the head to the center of the deck.
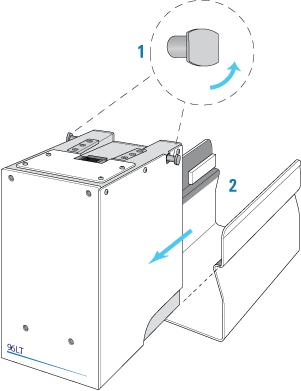
3 To unlock the mounted head, refer to the following figure:
a Pull out and twist the (1) two head-retainer pins one-quarter turn (90°) so that they remain retracted.
Note: The straight edge of the retainer pins should be horizontal.
b Turn the (2) head lock counterclockwise until it clicks into position.
Figure Installed Bravo head: (1) retainer pin and (2) head lock
 |
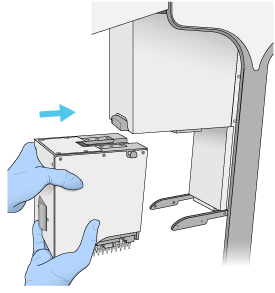
4 Reaching from the left side of the Bravo tie bar, grasp the head firmly as the following figure shows:
a With your left hand firmly grip the left side of the head.
b Place your right hand under the flat area just to the left of the barrel or syringe array to support the weight of the head.
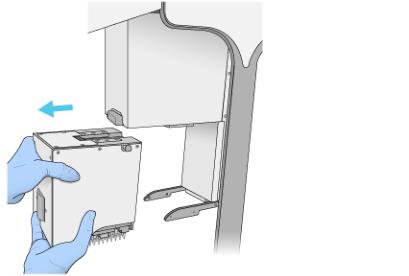 |
5 While supporting the head with your hands, slide the head to the left and out of the Bravo head mount.
6 Carefully place the head into the storage stand to protect the barrels, probes, as follows:
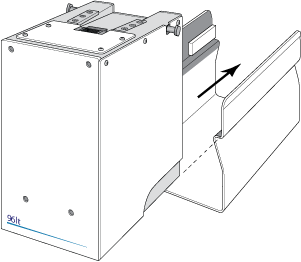
• Disposable-tip heads. Rest the bottom of the stand on a clean, dry surface. Slide the head into the stand, with the barrels facing down, as the following figure shows.
Figure Series III disposable-tip head and storage stand
 |
• Pin Tools. Rest the top of the head on a clean, dry surface with the pins facing up. Slide the stand onto the head
Store the head top-side up and resting in the head stand.
Installing the liquid-handling head
To install a Bravo liquid-handling head:
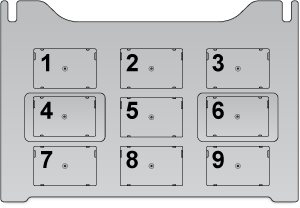
1 Make sure that the Bravo Platform is turned off and that the Bravo head mount is in its home position, which is centered above deck location 5.
Note: If the device is off, you can use your hands to move the head mount gently into position.
Figure Bravo deck locations (top view)
 |
2 Carefully remove the liquid-handling head and protective stand from the packaging. While the head remains seated in the stand, pull out and twist the two head-retainer pins one-quarter turn so that they remain retracted.
3 Remove the head from the stand as follows:
• Disposable-tip heads. Rest the bottom of the stand on a clean, dry surface. Slide the head out of the stand as the following figure shows, so that the barrels are facing down.
 |
• Pin Tools. Ensure that the top of the head is resting on a clean, stable surface so that the pins are facing up. Slide the stand off of the head.
4 With your left hand, firmly grip the left side of the head. Place your right hand under the flat area just to the left of the array to support the weight of the head.
5 While supporting the head with your hands, slide the head onto the Bravo head mount. Press the head firmly into place to ensure the head is plugged into the connector receptacle on the head mount. You should hear the click when the retaining pins snap into place.
Figure Installing a head in the Bravo head mount
 |
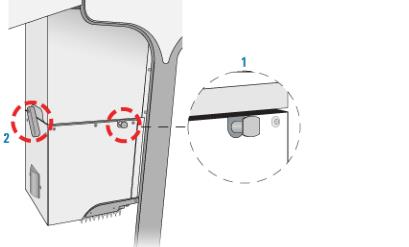
Note: If you do not hear the pins snap into place, check that the straight edges of the retainer pins are in the vertical position, as the following figure shows. Attempt to rotate the pins to ensure that they are in the locked position. The pins should not rotate freely.
Figure Installed head: (1) retainer pin and (2) head lock
 |
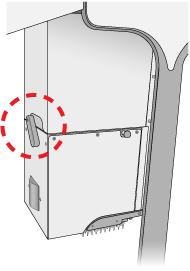
6 To lock the head, rotate the head lock clockwise until it reaches its hard stop. This ensures that the head is fully seated and does not shift position during operation.
 |
Adjusting VWorks settings
After installing a different Bravo head type, you must ensure that the Bravo device in the VWorks software is linked to the correct profile.
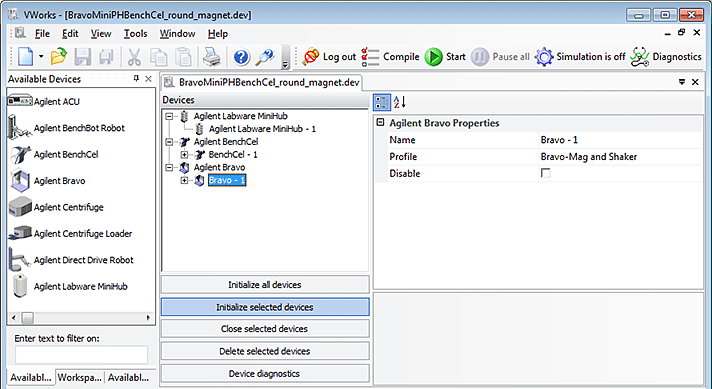
To adjust the VWorks settings for a different Bravo head:
1 In the VWorks window, ensure the correct device file is open for this Bravo device, and then ensure that the profile selected under Bravo Properties is correct.
2 On the side of the Bravo Platform, press the power switch to the on (I) position.
3 To initialize the Bravo Platform, click Initialize selected devices in the device file.
 |
4 Open Diagnostics, and in the Jog/Teach tab, make sure that a value is displayed for each axis.
This confirms communication between the Bravo Platform and VWorks software.
5 If you opened an existing device file in step 1, go to the Configuration tab in Diagnostics and verify that the location configuration graphic matches what you actually have on the Bravo deck.
Related information
For information about... | See... |
|---|---|
Tips Off task in Bravo Diagnostics | |
Initializing the Bravo Platform | |
Homing the Bravo head | |
Available Bravo heads | |
Changing the profile |