Creating and managing profiles
About this topic
VWorks users with Administrator or Technician privileges (advanced users) can create and manage profiles for the Bravo Platform.
Profiles defined
A device profile is a collection of settings that manage how you connect to a device. A Bravo profile does the following:
• Specifies the IP address used to establish communication between the device and the controlling computer.
• Specifies which liquid-handling head is being used
• Specifies the configuration of deck platepads and accessories
• Stores teachpoints for the liquid-handling head
• Stores the gripper y-axis offset
• Identifies deck locations to be accessed by external robots and specifies whether concurrent operation is allowed
Each combination of Bravo instrument, liquid-handling head, gripper, and deck layout requires a profile that defines the specific configuration. If the configuration changes, a modified profile or a new profile is required. For example, if you add an accessory such as a Orbital Shaking Station to the Bravo deck, you must modify the profile or create a new profile that includes the new deck layout and the teachpoint for the accessory.
If you have more than one Bravo Platform of the same configuration and you may copy the profile, but you must verify that the teachpoints are correct for each of the platforms.
Note: VWorks software v14.0 and later versions store the profile in an XML file. VWorks software v13.1.x stores the profile in the Windows Registry.
VWorks Plus. The software logs audit trails for device profiles, which are records of interest.
Before you start
The profile is referenced by a VWorks device file. The device file must be open before you can create or modify a profile.
For information about device files, see Creating or adding a Bravo device. For a detailed description of the relationships between the device file, profile, and teachpoints, see the VWorks Automation Control User Guide.
About managing profiles
You use the Profiles tab in Bravo Diagnostics to manage the Bravo device profiles.
Figure Bravo Diagnostics Profiles tab
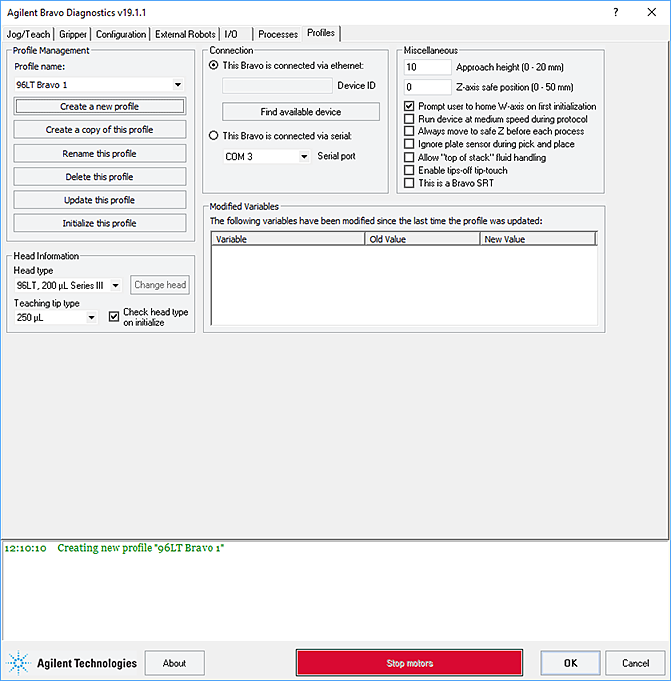 |
The Profiles tab enables you to:
• Create a new profile
• Copy a profile to use for creating a profile
• Rename, update, or delete a profile
• Initialize a profile
A log of these events appears in the box at the bottom of the Bravo Diagnostics window. The VWorks software records these events and stores the information in the Main log.
Creating a profile
A Bravo profile consists of a combination of parameters that you set in the Profiles tab, Configuration tab, Jog/Teach tab, Gripper tab, and the External Robots tab of Bravo Diagnostics.
To create a new profile:
1 In Bravo Diagnostics, click the Profiles tab.
2 Click Create a new profile.
 |
3 In the Create Profile dialog box, type a name for the new profile, and click OK.
Use a profile name that identifies the specific configuration. For example, include the liquid-handling head type and serial number in the profile name. If this computer controls multiple Bravo Platforms, also identify the device, for example, the device serial number.
VWorks Plus only. If an audit trail is being logged, the Audit Comment dialog box opens. Select or type the audit comment, and then click OK.
4 Under Connection, select This Bravo is connected via ethernet, and then click Find available devices.
Note: If you have an earlier model, you may select This Bravo is connected via serial, and then select which COM port on the computer you are using.
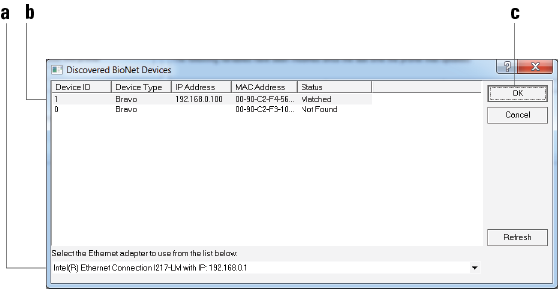
5 In the Discovered BioNet Devices dialog box that appears:
a Click the Select the Ethernet adapter to use from the list below, and select the correct adapter for the device connection.
b In the list of devices that appear, select the Bravo device. If multiple Bravo devices are on the network, use the MAC Address to identify the Bravo device for this profile. To successfully communicate with the Bravo device, the Status column must display New or Matched.
c Click OK.
 |
6 Under Head Information, configure the following:
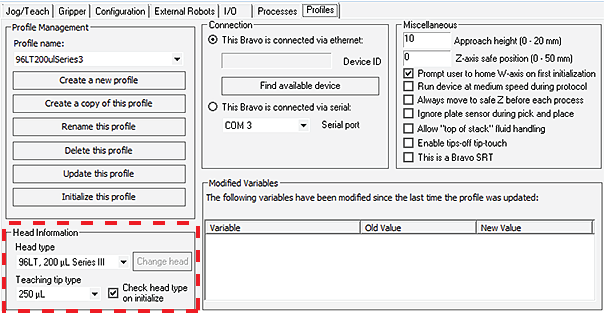 |
a Select the Head type from the list.
b Select the Teaching tip type from the list.
c Ensure that the Check head type on initialize check box is selected.
Note: If the Check head type on initialize check box is cleared, the w-axis controls in the Jog/Teach tab will be disabled even when the device is initialized.
7 Optional. In the Miscellaneous area, verify the settings to be applied during a protocol run. If you are unsure of which values to set, start with the default values. You can change them later if necessary.
For more details, see Miscellaneous area.
8 Verify the list of changes in the Modified Variables area, and then click Update this profile to save the current selections and settings.
VWorks Plus only. If an audit trail is being logged, the Audit Comment dialog box opens. Select or type the audit comment, and then click OK.
The Modified Variables area clears, and the update is logged in the box at the bottom of the Bravo Diagnostics window and in the VWorks Main Log.
9 To initiate communication with the Bravo Platform using the new profile, click Initialize this profile.
Steps to finish creating the profile
Verify the following settings, which are saved with the given profile.
Step | Task | See... |
|---|---|---|
1 | In the Configuration tab, verify that the deck configuration matches the physical deck layout of platepads and accessories. | |
2 | Use the Jog/Teach tab to set and verify teachpoints. | |
3 | If applicable. Use the Gripper tab to verify the gripper y‑axis offset. | |
4 | If applicable. Use the External Robots tab to specify the deck locations that the external robots can access. |
Related information
For information about... | See... |
|---|---|
Relationship of VWorks components, such as device files, profiles, teachpoints, and labware | VWorks Automation Control User Guide |
What to do if the Bravo Platform device does not appear in step 5 | |
Concurrent motion settings for an integrated Bravo Platform | |
Profiles tab in Bravo Diagnostics | |
Opening Bravo Diagnostics | |
Audit trails and records of interest |