Connecting the air tubing: metric
About this topic
This topic explains how to connect the air tubing to the Microplate Labeler for metric-based installations.
To make the Microplate Labeler compatible with your lab’s air system, you connect the supplied 6-mm air tubing to the Microplate Labeler air supply port. This topic describes how to make this connection.
Figure Connection panel: orange air-supply port (left) and pressure gauge (right)
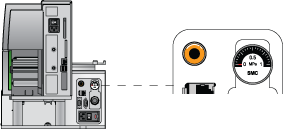 |
Before you start
Locate the air connection kit (metric), including tubing and fittings, provided with your device.
Connection assembly
The metric fittings kit contains an adapter.
Figure Connection to Microplate Labeler using adapter
 |
Procedure
The following procedure is used to set up a direct connection. If you have another instrument connected to the house air supply, you can use the supplied T-connector to connect into the existing air tubing.
To connect the metric fittings adapter:
1 Push one end of the nipple (white plastic tube) into the 1/4-inch side (red side) of the adapter.
2 Push the other end of the nipple into the air input port on the Microplate Labeler.
3 Push the 6-mm tubing into the blue side of the adapter.
4 Gently pull on the air tubing to ensure that the assembly is connected properly.
Related topics
For information about... | See... |
|---|---|
How to install the device | |
Site requirements for installation | |
How to connect air tubing for North America | |
Setting the air pressure | |
Disconnecting air supply | |
Safety | |
How to report a problem |