Loading labels and ribbon
About this topic
This topic describes how to load labels and ribbon in the Microplate Labeler printer.
After you load the labels and ribbon, perform several print-and-apply tests to ensure that the labels are printing correctly and that the vacuum pads on the applicator head can pick the labels off of the label backing.
Note: If the Microplate Labeler is fitted with a cab SQUIX printer, you can go to the printer touchscreen Help menu to view videos showing how to load labels and ribbon.
Before you begin
Ensure that you have the Microplate Labeler Media Kit from Agilent Technologies. The kit contains a one-to-one quantity of ribbon and labels so that you can replace them at the same time. The kit contents are:
• Roll of labels (6,500)
• Thermal transfer ribbon
• Empty ribbon core (functions as a spool to rewind the used ribbon)
• Cleaning pen
Open the printer cover to gain access for loading the labels and ribbon.
Figure Printer (side view) showing the feed paths of the ribbon (red) and labels (blue)
 |
Removing the used ribbon
See the following figure for the component locations referenced in the procedure.
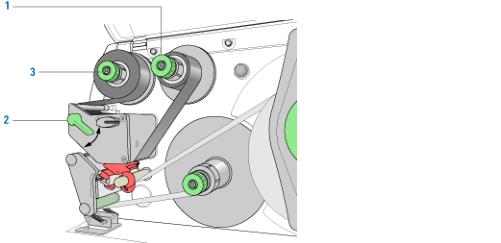 |
To remove the used ribbon:
1 While firmly grasping the ribbon supply hub (1), turn the green knob clockwise  to contract the hub and loosen the empty roll. Slide the roll off of the hub.
to contract the hub and loosen the empty roll. Slide the roll off of the hub.2 Lift the printhead lever (2) counterclockwise to lift the printhead.
3 While firmly grasping the take-up hub (3), turn the green take-up knob clockwise to contract the hub and loosen the used roll of ribbon. Slide the used roll off of the take-up hub.
to contract the hub and loosen the used roll of ribbon. Slide the used roll off of the take-up hub.4 Lift the remaining ribbon out of the printer.
Loading the new ribbon
See the following figure for the component locations referenced in the procedure.
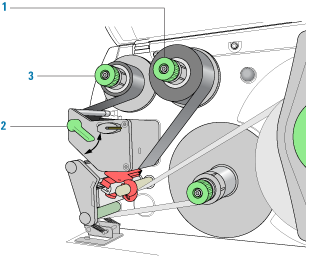 |
To load new ribbon:
1 Install the new ribbon roll on the supply hub (1) as follows:
a While firmly holding the supply hub, turn the green knob clockwise to contract the hub. Slide the new ribbon roll onto the hub until it is flush against the printer. Ensure the ribbon feeds clockwise with the coating facing downward when being unwound.
to contract the hub. Slide the new ribbon roll onto the hub until it is flush against the printer. Ensure the ribbon feeds clockwise with the coating facing downward when being unwound.b While firmly holding the hub, turn the green knob counterclockwise  to expand the hub and secure the ribbon roll.
to expand the hub and secure the ribbon roll.2 Ensure the printhead lever (2) is up to lift the printhead, and then guide the ribbon under and around the printhead.
3 Feed the ribbon onto an empty core on the take-up hub (3) as follows:
a While firmly holding the take-up hub, turn the green knob clockwise to contract the hub. Slide an empty ribbon core onto the hub until it is flush against the printer.
to contract the hub. Slide an empty ribbon core onto the hub until it is flush against the printer. b While firmly holding the hub, turn the green knob counterclockwise to expand the hub and secure the ribbon core.
to expand the hub and secure the ribbon core.c Guide the ribbon under and then over the take-up hub so that it winds counterclockwise. Use adhesive tape to secure the end of the ribbon to the ribbon core. Make sure the edge of the ribbon is flush with the core against the printer.
4 Turn the ribbon take-up hub (3) counterclockwise to smooth out the ribbon slack.
If you are also loading labels, continue to the next procedure. If you are finished loading all media, turn the printhead lever (2) clockwise to lower the printhead.
Removing a used label roll
See the following figure for the component locations referenced in the procedure.
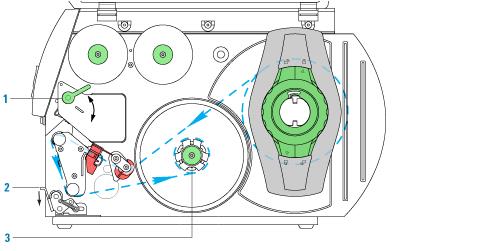 |
To remove a used label roll:
1 If the printhead is not already in the up position, lift the printhead lever (1) counterclockwise to lift the printhead.
2 Push down on the pinch-roller lever (2) to release the label strip.
3 Cut the used label strip, and wind it fully around the rewinder (3).
4 While firmly holding the rewinder (3), turn the green knob clockwise to contract the rewinder and release the wound roll.
to contract the rewinder and release the wound roll. 5 Remove the wound roll.
Note: You will remove the empty label core when you install the new label roll in the following procedure.
Loading the new labels
You install the labels in three basic steps:
Step | For this task... |
|---|---|
1 | Install the label roll on the roll retainer. |
2 | Feed the label strip under the printhead. |
3 | Secure the label strip to the rewinder. |
Step 1. Installing the label roll on the roll retainer
 |
To install the label roll on the roll retainer:
1 Turn the green locking ring (1) counterclockwise, so that the arrow points to  .
.
.2 Remove the margin stop (2).
3 On the roll retainer (3), load the new label roll so that it feeds counterclockwise with the label side up.
4 Reposition the margin stop (2) on the roll retainer (3).
5 While firmly pushing the margin stop against the label roll (4), turn the green locking ring (1) clockwise, so that the arrow points to  , securing the label roll in position.
, securing the label roll in position.Step 2. Feeding the label strip under the printhead
 |
To feed the label strip through the printhead:
1 Turn the printhead lever (5) counterclockwise to lift the printhead.
2 Slide the red guide ring (8) to the end of the axis bar.
3 Guide the label strip below the axis bar and through the label sensor (7) so that the label strip exits the print unit between the printhead and the print roller (6).
4 Push the guide ring (8) on the axis bar against the outer edge of the label strip.
Step 3. Securing the label strip to the rewinder
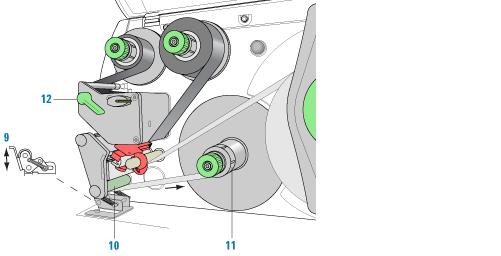 |
To secure the label strip to the rewinder:
1 Push down on the pinch-roller lever (9) to lift the pinch roller off the rewind assist roller.
2 Guide the label strip down and under the rewind assist roller (10) toward the rewinder (11).
3 While holding the rewinder (11) firmly, turn the green knob clockwise until it stops.
until it stops.4 Insert the label strip under the three brackets on the rewinder (11), and turn the green knob counterclockwise until it stops. The rewinder is fully expanded, gripping the label strip firmly.
until it stops. The rewinder is fully expanded, gripping the label strip firmly. The inside edge of the label strip should be flush against the printer.
5 Turn the rewinder (11) counterclockwise to tighten the label strip.
6 Push up on the pinch-roller lever (9) to position the pinch roller into position on the rewind assist roller.
7 Turn the printhead lever (12) clockwise to lower the printhead into position.
After you finish loading new ribbon and labels
Use Microplate Labeler Diagnostics to run a print-and-apply test and verify that the labels print correctly and the applicator head can pick up the labels from the printer.
Optionally, you can reset the label counter in the I/O Functions tab to track the number of labels used.
Related topics
For information about... | See... |
|---|---|
Performing a print-and-apply test | |
Resetting the label counter | |
Cleaning the printhead and print roller using the cleaning pen | |
Routine printer maintenance | |
Reporting problems |