Checking the basic applicator functions
About this topic
This topic describes how to use Microplate Labeler Diagnostics to verify the performance of basic applicator functions. You can perform this procedure at any time to double-check the applicator functions or to help troubleshoot problems.
Before you start
The following procedure assumes that:
• The profile for your device is initialized. For details, see Initializing the device in diagnostics.
Procedure
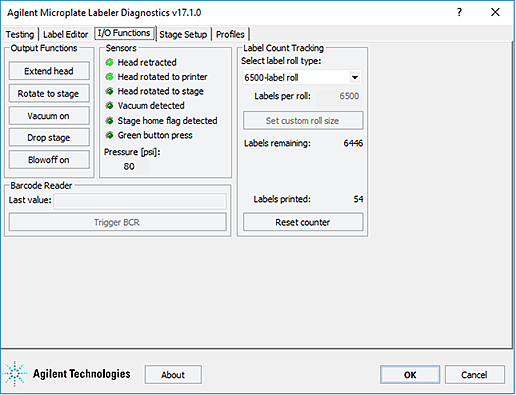
You can use the I/O Functions tab in Microplate Labeler Diagnostics to test basic applicator functions.
 |
To test basic applicator functions:
1 In the Microplate Labeler Diagnostics window, click the I/O Functions tab.
2 Under Output Functions, click a toggle button to perform the corresponding task and verify that the corresponding indicator lights in the Sensors area.
Click the toggle button again to return to the original position.
Button | Description |
|---|---|
Extend head/Retract head | Extends or retracts the applicator head. In the Sensors area, the Head retracted light turns on when the applicator head is retracted. |
Rotate to stage/Rotate to printer | The applicator head rotates to the plate stage or the printer. In the Sensors area, the Head rotated to printer or the Head rotated to stage light turns on to indicate the current position of the applicator head. |
Vacuum on/Vacuum off | Turns on or off the vacuum for the vacuum pads on the applicator head. If the vacuum is turned off when a label is attached to the vacuum pads, the label can drop. If the vacuum pads are pressed against a surface, such as a label, while the vacuum is on, the Vacuum detected light turns on. |
Drop stage/Raise stage | Raises or lowers the plate stage. |
Blowoff on/Blowoff off | Starts or stops a stream of air through the vacuum pads on the applicator head. If the air flow is on when a label is attached to the vacuum pads, the label is pushed off. |
3 While observing the Green button press indicator in the Sensors area, press and hold the green button on top of the device. The Green button press light should turn on.
Note: If a print job has been created, pressing the green button will start the labeling operation.
4 Under Pressure (psi), verify that the air pressure readout is correct: 80 psi (0.55 MPa), minimum.
• If the readout is <80 psi. Verify that the air source is supplying 80 psi (0.55 MPa), minimum. If the source is above 80 psi and the readout is below 80 psi, use the pressure regulator knob on the back of the applicator to increase the pressure.
• If the readout is >87 psi. Use the pressure regulator knob on the back of the applicator to lower the pressure to 85 psi (0.58 MPa), maximum.
Related topics
For information about... | See... |
|---|---|
Resetting the air pressure | |
Rotating the plate stage | |
Plate stage and applicator head | |
Raising or lowering the plate stage | |
Microplate Labeler Diagnostics controls and indicators | |
Troubleshooting problems | |
Reporting problems |