Starting up and shutting down
About this topic
This topic describes how to start up and shut down the Microplate Labeler.
Starting up the device
To start up a Microplate Labeler
1 Turn on the air supply.
2 On the Microplate Labeler connection panel, check the air pressure gauge (see figure, 1). Verify the air pressure is set within the following range:
0.55 MPa (80 psi) to 0.58 MPa (85 psi)
Figure Connection panel showing Ethernet connection
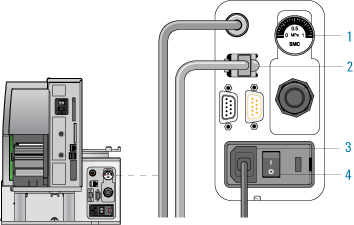 |
3 Verify that the communication cable (2) and power cord (3) are connected, but do not turn on the power yet.
Note: The figure shows an Ethernet connection. If you are using serial communication, the serial cable connects to the serial port. For more details, see Connecting the device to the computer.
4 If you are using an Ethernet switch, turn on the power to the Ethernet switch.
5 Turn on the computer and the monitor, and wait for the Microsoft Windows operating system to start.
6 On the connection panel, press the power switch (4) to the on (|) position.
7 Start the automation control software, for example, start the VWorks software.
8 Initialize the device. For details, see Initializing the device.
Shutting down the device
Shut down the Microplate Labeler before you:
• Install a barcode reader
• Perform maintenance on or clean the Microplate Labeler
• Move the Microplate Labeler
To shut down the Microplate Labeler:
1 Exit the automation control software.
2 Shut down the computer and turn off the monitor.
3 On the Microplate Labeler connector panel, press the power switch to the off (o) position.
4 Turn off the air supply.
Related topics
For information about... | See... |
|---|---|
Hardware components | |
Establishing communication with the Microplate Labeler | |
Designing the label formats | |
Setting up and running a labeling protocol in the VWorks software | VWorks Automation Control User Guide |
Troubleshooting problems | |
Reporting problems |