Installing MySQL for Inventory database
If the computer was provided by Agilent Technologies, the MySQL software may already be installed, and the Inventory database may be configured already. In this case, see Connecting to the Inventory database.
Before you start
Required installation files
Ensure you have the following installation files:
• VC_redist.x64.exe
• VC_redist.x86.exe
• mysql-installer-community-8.0.18.0.msi
• vworks_mysql_8.0.sql
This file is installed with the VWorks software at C:\\Program Files (x86)\Agilent Technologies\VWorks\Schema\.
For assistance, contact Agilent Technical Support.
Required computer settings
Before you install the software:
• Log on to the computer as an administrator with full rights.
• In Microsoft Windows Explorer, select the following View > Show settings:
– Select Hidden items.
– Select File name extensions.
For detailed instructions, see the Microsoft Windows user documentation.
Installation and setup workflow
Step | For this task... | See... |
|---|---|---|
1 | Uninstall any existing MySQL versions, and then restart the computer. | |
2 | Install MySQL Server 8.0.18 | |
3 | Install MySQL ODBC and set up the data sources. | |
4 | Connect to the VWorks databases. |
Uninstalling previous versions of MySQL
Before you uninstall:
Make a backup copy of your existing database before uninstalling it. To back up the:
• Inventory database (velocity11) only, see Exporting and importing the inventory data.
• Inventory database (velocity11), labware definitions, liquid classes, and pipetting techniques, see Backing up and restoring VWorks files.
To uninstall MySQL:
1 Log on to the computer as an administrator.
2 In the Microsoft Windows desktop, go to Settings > Apps & features, and uninstall the following:
a MySQL Server
b MySQL Connector/ODBC
3 Restart the computer.
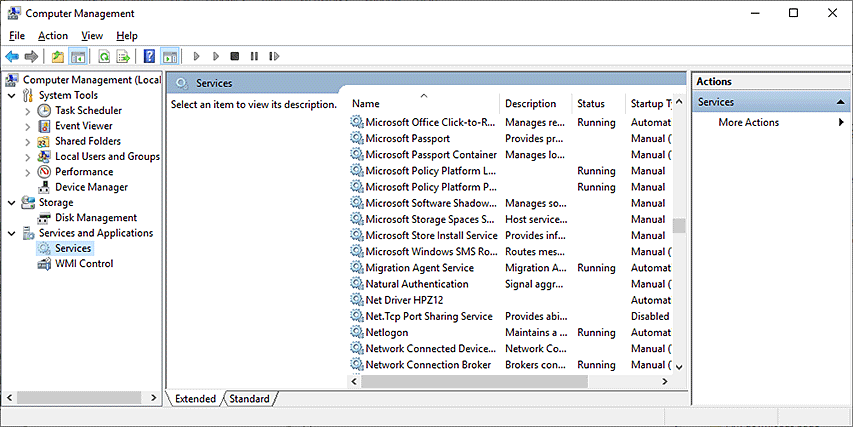
4 Verify that the MySQL service is completely removed:
a In Microsoft Windows Explorer, right-click the This PC icon. In the shortcut menu, click Manage. The Computer Management window opens.
b In the Computer Management window, click Services and Applications > Services.
c In the list of Services, ensure MySQL does not appear:
• If MySQL does not appear, go to step 8.
• If MySQL appears in the list, continue to step 5.
 |
5 In the list of Services, right-click MySQL and click Stop.
Note: If an error message appears and states that it is unable to stop, ignore the message.
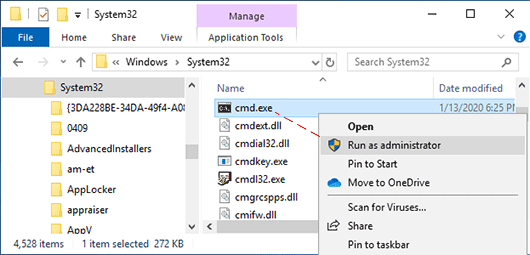
6 Open the Command Prompt window, as follows:
a In the C:\Windows\System32 folder, right-click cmd.exe, and then select Run as administrator.
b Click Yes in the User Account Control dialog box that opens.
 |
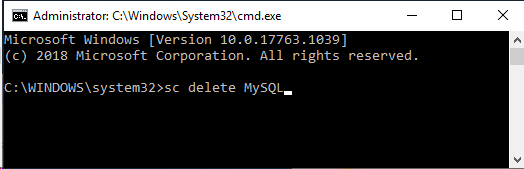
c Execute the following line in the Command Prompt window:
sc delete MySQL <enter>
 |
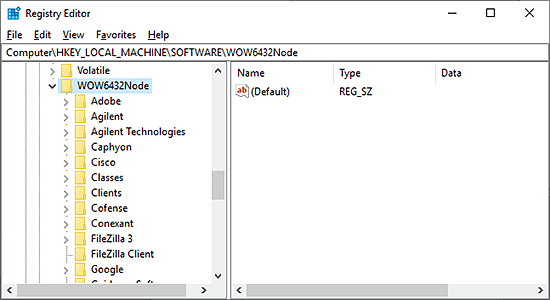
7 Check the registry keys for any references to old versions of MySQL as follows:
a Open the Registry Editor.
b Navigate to HKEY_LOCAL_MACHINE\SOFTWARE\WOW6432Node\MySQL AB\
c If present, delete MySQL Server 5.1 or MySQL Server 5.0.
 |
8 Restart the computer.
Installing MySQL 8.0.18
Before installing MySQL 8.0.18, install the Microsoft Visual C++ redistributable package.
To install the Microsoft Visual C++ redistributable package:
1 Run the vc_redist.x64.exe file.
2 Follow the Setup Wizard instructions.
3 Run the vc_redist.x86.exe file.
4 Follow the Setup Wizard instructions.
Note: If the computer already has Microsoft Visual Studio 2017 or Microsoft Visual C++ 2017 Redistributable installed, the MySQL installer might not recognize that the VC 2015 Redistributable is installed even if it is. To fix this issue, go to Settings > Apps. In the Apps & features window, locate Microsoft Visual C++ 201, right-click, and then choose Modify, Click Repair when the installer window opens.
To install MySQL 8.0.18:
1 Run the mysql-installer-community-8.0.18.0.msi. The MySQL Installer setup wizard opens.
Note: If Visual Studio 2017 or the Visual C++ 2017 redistributable package is installed on the computer, the MySQL installer might display an error message stating that Visual C++ redistributable is not installed even if it is. To fix this, go to Apps and Features, select Microsoft C++ Redistributable, right-click and then select Modify. In the Microsoft C++ Redistributable Setup screen, click Repair.
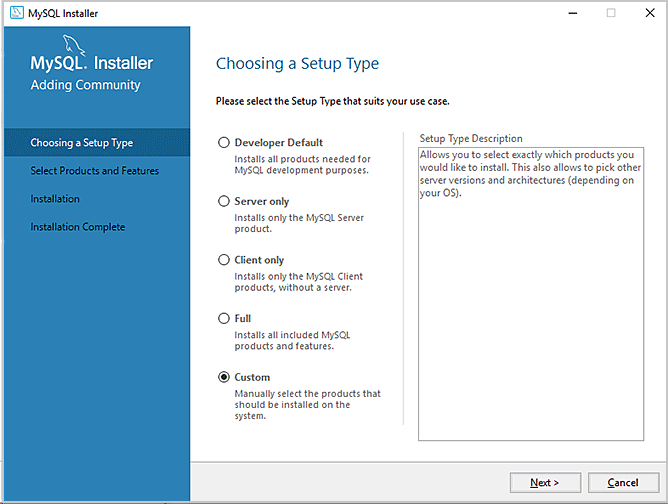
2 In the Choosing a Setup Type page, select Custom, and then click Next.
 |
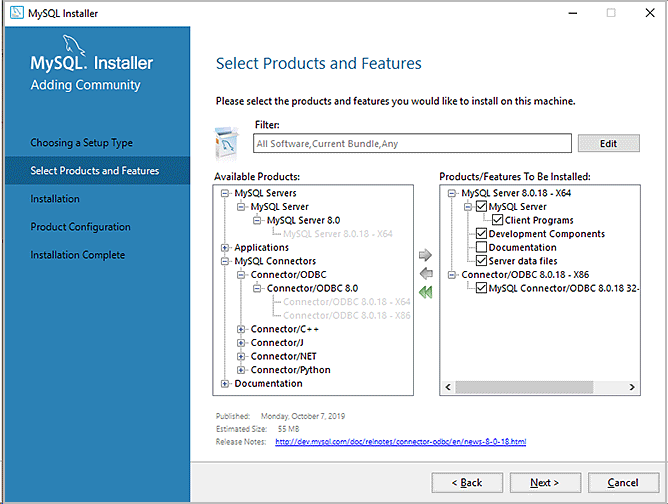
3 In the Select Products and Features page, select the following Available Products and then click the right arrow to move each selection to Products/Features To Be Installed:
MySQL Servers > MySQL Server > MySQL Server 8.0 > MySQL Server 8.0.0.1.8- X64
MySQL Connectors > Connector/ODBC > Connector ODBC 8.0.18 -X86
Click Next.
 |
4 In the Installation page:
a Make sure that MySQL Server 8.0.18 and Connector/ODBC 8.0.18 are Ready to Install, and then click Execute.
b When the installation is finished, click Next.
 |
5 In the Product Configuration page, click Next.
 |
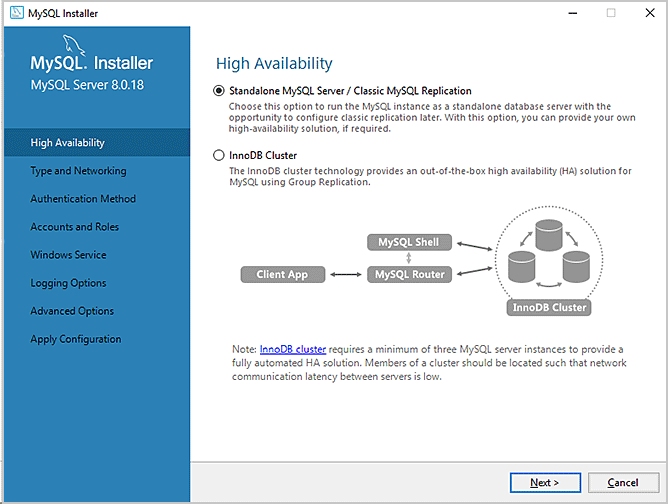
6 In the High Availability page, select Standalone MySQL Server / Classic MYSQL Replication, and then click Next.
 |
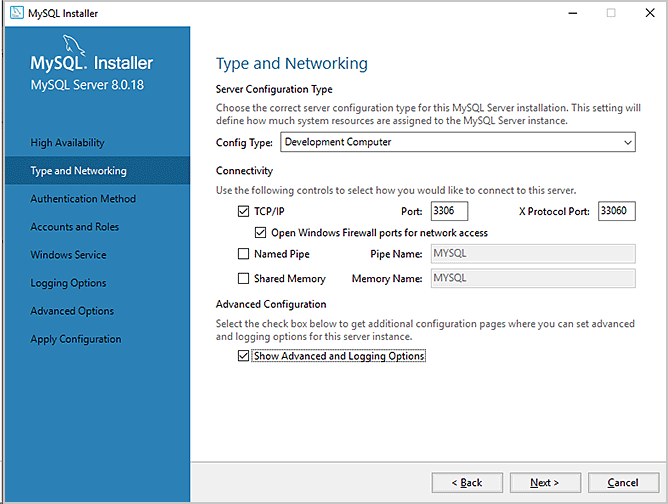
7 In the Type and Networking page, specify the following:
• Config Type > Development Computer
• TCIP/IP > Open Windows Firewall ports for network access
• Show Advanced and Logging Options
Click Next.
 |
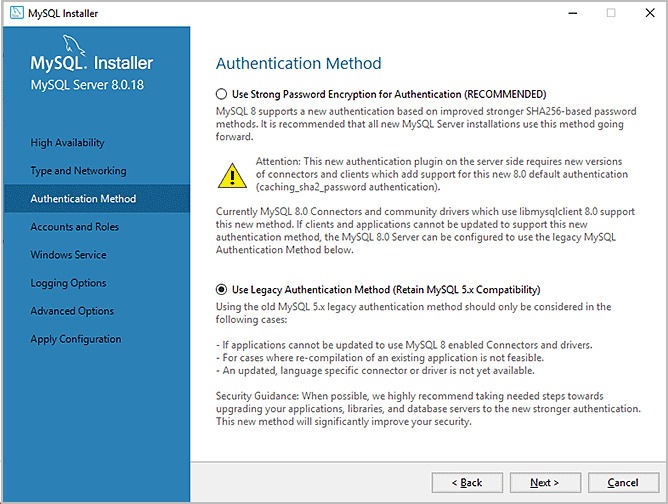
8 In the Authentication Method page, select Use Legacy Authentication Method (Retain MySQL 5.x Compatibility).
Click Next.
 |
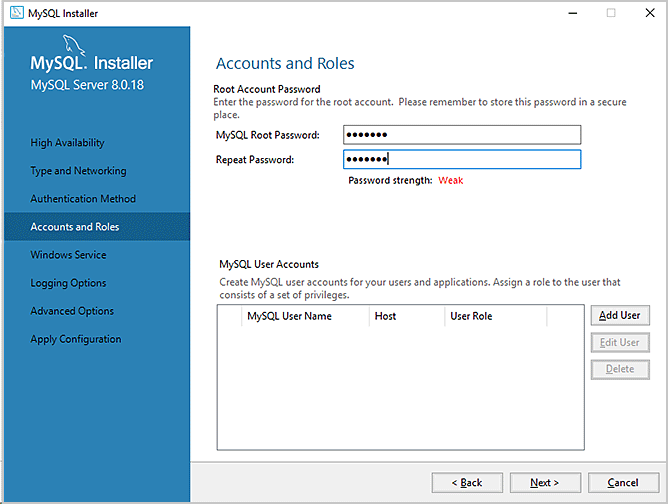
9 In the Accounts and Roles page, type agilent for MySQL Root Password and Repeat Password fields.
Click Next.
 |
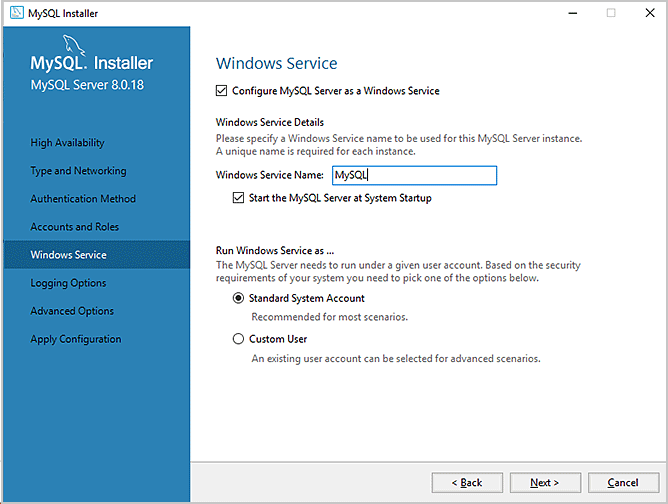
10 In the Windows Service page, specify the following:
• Configure MySQL Server as a Windows Service
• Make sure you specify .the following:
– Windows Service Name > MySQL
– Start the MySQL server at System Startup
– Run Windows Service as > Standard System Account
Click Next.
 |
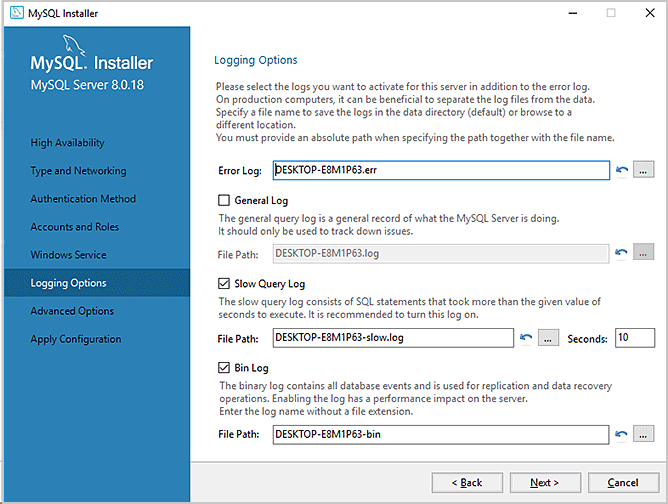
11 In the Logging Options page, accept the default settings. Click Next.
Note: The file paths are based on the computer name.
 |
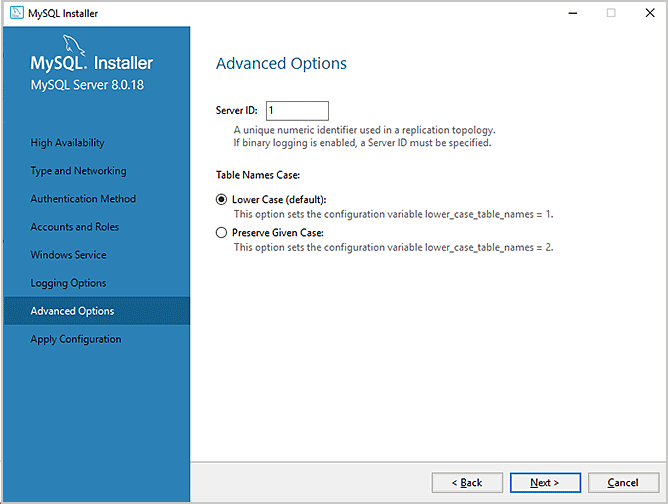
12 In the Advanced Options page, accept the default settings. Click Next.
 |
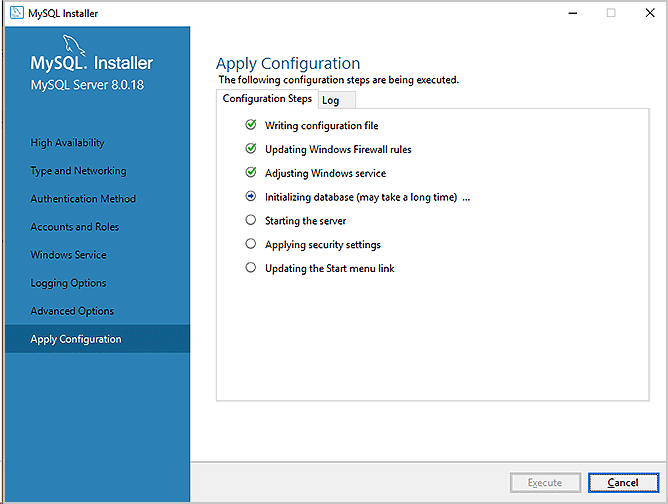
13 In the Apply Configuration page, click Execute.
 |
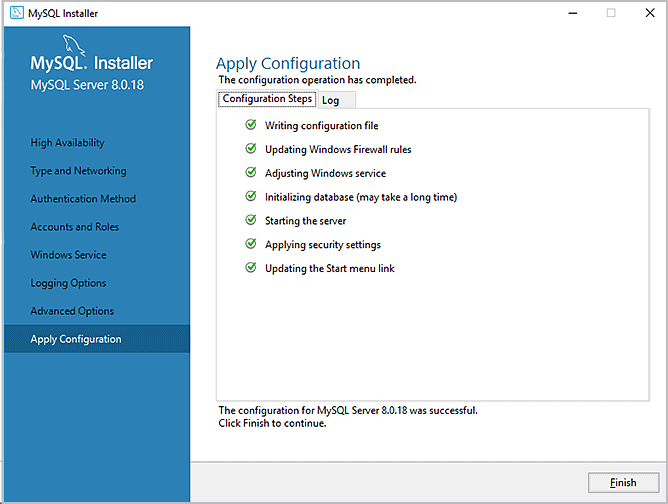
14 When the screen displays the configuration was successful text, click Finish.
 |
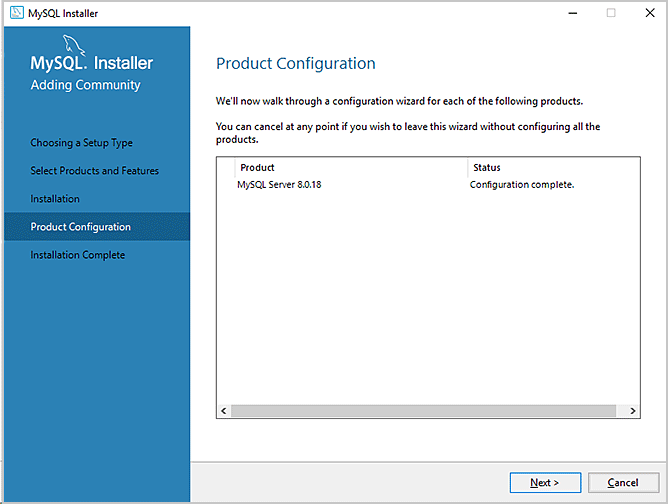
15 In the Product Configuration page, click Next.
 |
16 Click Finish in the Installation Complete page.
Related information
For information about... | See... |
|---|---|
Setting up the ODBC data source | |
Establishing a connection to the Inventory database | |
VWorks Inventory Editor |