Assemble Vacuum (Agilent Bravo)
Description
The Assemble Vacuum task ( ) directs the robot to pick up the Vacuum Filtration Station components from designated deck locations and stack them in the order you specify.
) directs the robot to pick up the Vacuum Filtration Station components from designated deck locations and stack them in the order you specify.The task is used in conjunction with the following tasks:
• Disassemble Vacuum
• Move and Filter Plate
• Pipette Under Vacuum Collar
• Toggle Vacuum
Task is available for... | Task is available in... |
|---|---|
Bravo Platform | Main Protocol, Bravo Subprocess |
Supported configurations
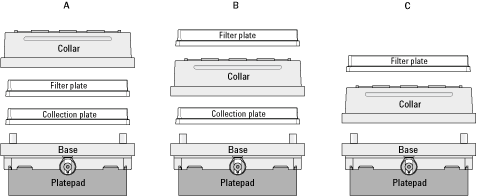
To accommodate different assay types, the Bravo Platform supports the Vacuum Filtration Station configurations shown in the following figure. Note the following:
• Configuration A. The filter plate is part of the station assembly. The assembly process can be automated during the protocol run. The filtrate in the collection plate is retained.
Note: To perform pipetting in the configuration A filter plate, the pipetting task must be enclosed with a pair of Pipette Under Vacuum Collar tasks. For details, see Pipette Under Collar Begin and End (Agilent Bravo).
Note: Double-filtration is possible in configuration A by including one filter plate as part of the station assembly and then moving a second filter plate on top of the vacuum collar after the assembly is finished.
• Configuration B. The filter plate is not part of the station assembly. The assembly process can be automated during the protocol run. The robot will move the filter plate to the station after the assembly process is finished. The filtrate in the collection plate is retained.
• Configuration C. The filter plate is not part of the station assembly. The assembly process can be automated during the protocol run. The robot will move the filter plate to the station after the assembly process is finished. The filtrate is discarded.
 |
If the type of filter plate cannot be seated in the clear frame support that sits in the blue gasket of the collar (configuration B or C), you may use black gaskets in the collar instead of the blue gasket and frame support. In this case, ensure one black gasket adheres to the top and one black gasket adheres to the underside of the collar.
Figure Collar options: blue gasket and gasket frame support or black gaskets
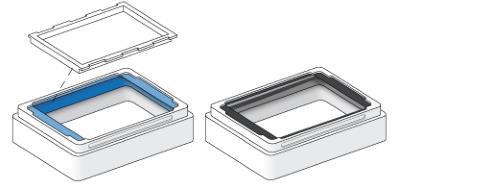 |
Note: If you use the black gasket to accommodate a filter plate, but the filter plate nozzles are too short to reach the wells in the collection plate underneath the collar, you may omit the black gasket on the underside of the collar. In this case, the Bravo device profile must specify the configuration as Black gasket on top side only.
Requirements
To use the Assemble Vacuum (Bravo) task, you must first:
• Install the Vacuum Filtration Station, and then configure the accessory in Bravo Diagnostics as described in the Bravo Platform User Guide.
• In the VWorks Labware Editor, do the following:
– Set the Robot gripper offset parameter for labware that will be placed on the Vacuum Filtration Station during a protocol run.
– Define the filter plate parameters for length of filter tip and the filter-channel resting depth.
Task parameters
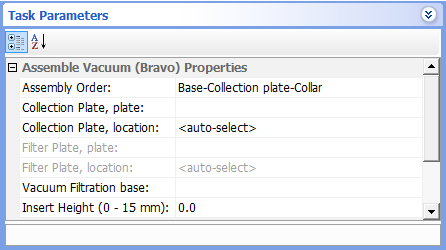
After adding the Assemble Vacuum (Bravo) task at the desired point in the protocol, set the following parameters in the Task Parameters area:
 |
Parameter | Description |
|---|---|
Assembly order | The order, from bottom to top, in which to stack the station components. The selections are: • Base–Collection plate–Filter plate–Collar (configuration A) • Base–Collection plate–Collar (configuration B) • Base–Collar (configuration C) |
Collection Plate, plate | Available for configurations A and B only. The process lane in the protocol for collecting the filtrate. Select the collection plate from the list. Depending on how the protocol is authored, the collection plate could be a plate process or configured labware. |
Collection Plate, location | Available for configurations A and B only. The location of the collection plate. Select the deck location of the collection plate. Select <auto-select> only if the software knows of the collection plate location (for example, if you used a Place Plate task earlier in the protocol to specify its location). |
Filter Plate, plate | Available for configuration A only. The labware to use as the filter plate. Select the filter plate from the list. Depending on how the protocol is authored, the collection plate could be a plate process or configured labware. |
Filter Plate, location | Available for configuration A only. The location of the filter plate. Select the deck location of the filter plate. Select <auto-select> only if the software knows of the filter plate location (for example, if you used a Place Plate task earlier in the protocol to specify its location). |
Vacuum Filtration base | The deck location of the Vacuum Filtration Station base. |
Insert height (0–15 mm) | The height of the white plastic spacer, if present, that can be placed in the base manually before starting the protocol. The insert is used to raise the height of the collection plate and reduce the spacing between the filter plate nozzles and the collection plate underneath. Measure the height (mm) from the bottom edge to the top edge of the insert. If you are using multiple inserts, measure the combined height of the stack of inserts. 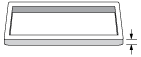 If no insert is in the base, use a value of 0.0 mm (default). |
Examples:
See the example in:
Related information
For information about... | See... |
|---|---|
Adding devices | • Bravo Platform User Guide |
Adding tasks in a protocol | |
Configuring the Vacuum Filtration Station | Bravo Platform User Guide |
Setting the robot gripper offset in the Labware Editor | |
Move and Filter Plate task | |
Pipetting in a filter plate that sits under the collar | |
Toggle task | |
Disassemble Vacuum (Bravo) task | |
Microplate-handling tasks | |
Microplate-storage tasks | |
Scheduling tasks |