Setting robot teachpoints
About setting robot teachpoints
After setting the Labware MiniHub home position, you set the robot teachpoints at each shelf in cassette 1. To set, edit, and verify robot teachpoints, see the robot user guide, for example, the BenchCel Microplate Handler User Guide.
Note: You only need to set teachpoints at all of the shelves in cassette 1. The software will reference these teachpoints when accessing shelves in cassettes 2, 3, and 4.
BenchCel Configuration only. Ensure that the labware definitions specify that the Stack holding method is set to Hold with stacker grippers to ensure precision performance.
If you used shelf 1 to set the home position, you can go ahead and set the robot teachpoint at shelf 1 while you have the robot and microplate in position.
About the approach height
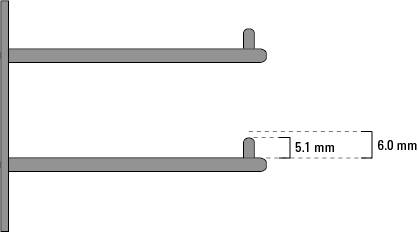
Figure Approach height considerations at each shelf (side view)
 |
About verifying teachpoints
Ensure that you verify the robot teachpoints at the Labware MiniHub before you use the Labware MiniHub. For instructions, see the applicable robot user guide, for example, the BenchCel Microplate Handler User Guide.
Related information
For information about... | See... |
|---|---|
Labware specifications | G5584A Labware MiniHub Safety and Installation Guide |
Creating profiles | |
Editing and managing profiles | |
Setting the home position | |
Configuring the MiniHub |