Cleaning and replacing the vacuum pads
About this topic
The applicator head on the Microplate Labeler uses vacuum pads to pick up the printed labels from the printer and place the printed labels on the labware. This topic describes how to clean and, if necessary, replace the vacuum pads.
When to do this procedure
To maintain proper function, the vacuum pads must be clean and undamaged. A sticky residue from the label adhesive can build up on the vacuum pads. You should routinely clean the vacuum pads when you change the printer ribbon and labels.
If the Microplate Labeler is not picking up or placing the labels correctly and the air pressure setting is correct, try cleaning the vacuum pads.
If the vacuum pads are cracked, replace the vacuum pads.
Before you begin
Make sure you have the following items:
• Cotton swabs
• Mild soap and water solution
• Replacement vacuum pads, if required
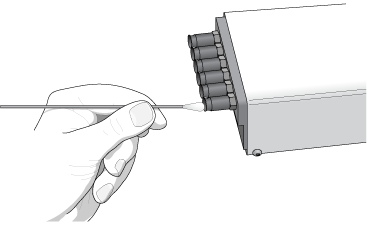
Cleaning the vacuum pads
Figure Cleaning the vacuum pads on the applicator head
 |
To clean the vacuum pads on the Microplate Labeler applicator head:
1 Open Microplate Labeler Diagnostics, click the Profile tab, and initialize the profile for the device.
2 To ensure the plate stage is out of the path of the applicator head:
a In the Stage Setup tab, select the Disable stage auto-repositioning check box.
b Gently rotate the plate stage manually so that it is out of the path of the applicator head.
3 To ensure that the applicator head is retracted and rotated away from the printer for easier access:
a In the I/O Functions tab, click Retract head.
b Click Rotate to stage.
4 Use soapy water and a cotton swab to wipe the surface of the vacuum pads that contacts the labels. Remove any dust and grease from each pad.
Note: The pads can develop a sticky residue from the label adhesive, which may require more effort to remove.
5 Wait for the vacuum pads to dry.
6 Run a print-and-apply test to verify that the vacuum pads are functioning properly. For details, see Performing a print-and-apply test.
If the vacuum pads are functioning properly, ensure that the applicator head is clear of the path of the plate stage. In the Stage Setup tab, clear the Disable stage auto-repositioning check box.
If problems persist, replace the vacuum pads using the following procedure or contact Agilent Automation Solutions Technical Support.
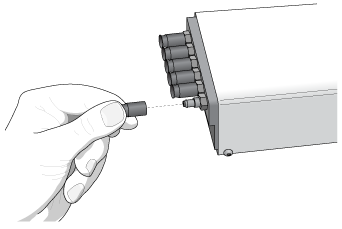
Inspecting and replacing the vacuum pads
Before removing the vacuum pads, try cleaning them, and then run a print-and-apply test to see if the problem persists.
Figure Replacing the vacuum pads on the applicator head
 |
To inspect and replace the vacuum pads:
1 To gain access to the vacuum pads:
a Ensure that the plate stage is rotated out of the path of the applicator head.
b Rotate the applicator head towards the plate stage.
2 Grab the vacuum pad firmly with your fingers, and pull the pad off of the applicator head.
3 Roll the vacuum pad between your fingers and look for cracks or splits along the length of the pad.
If a vacuum pad seems worn or has cracks or splits, replace all six vacuum pads.
4 Install new vacuum pads by pressing them onto the applicator head with your fingers.
Related topics
For information about... | See... |
|---|---|
Shutting down the Microplate Labeler | |
Hardware overview | |
Opening Microplate Labeler Diagnostics | |
Cleaning the Microplate Labeler exterior | |
Cleaning the printhead and the print roller | |
Troubleshooting hardware problems | |
Reporting problems |