Adding labware information in the inventory database
About this topic
You can add labware information in the inventory database in one of many ways.
If you want to... | See... |
|---|---|
• Load a batch of labware into storage devices. • Add the labware information in the database. | |
Add the information for a batch of labware in the database. Note: The labware are already in the storage devices. | |
• Load a few labware into storage devices. • Add the labware information in the database. | |
Add the information for a few labware in the database. Note: The labware are already in the storage devices. |
You can also use the plateDB and InventoryLabware JavaScript functions to add labware information in the database. For more information, see plateDB object and InventoryLabware object.
Running a protocol to load labware into a storage device
You can run a protocol to load a batch of labware into storage devices. During the run, the system will update the inventory database.
• If the labware has barcode labels and the system has a barcode reader, see Loading labware into storage devices and updating the inventory database.
• If the labware does not have barcode labels, or if the system does not have a barcode reader, see Updating the inventory database without barcode readers.
Loading labware into storage devices and updating the inventory database
To run a protocol to load labware into a storage device:
1 Load the labware in a BenchCel labware rack by hand before running the protocol.
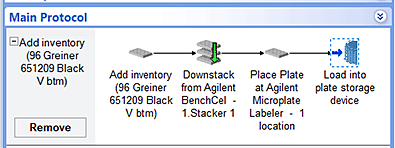
2 Write a protocol that contains the following:
– Downstack task to move the labware from the BenchCel stacker.
– A task that reads the barcode on the labware.
For example, if the barcode reader is on a device with a plate stage, add the Place Plate task. Make sure the process labware parameter specifies the side on which the barcode label resides. The side that you select must match the side on which the barcode reader is installed. In addition, select Barcode not in file from the Barcode or header list.
If the storage device has an integrated barcode reader, you might not need to add this task.
– Load task to move the labware into the storage device.
 |
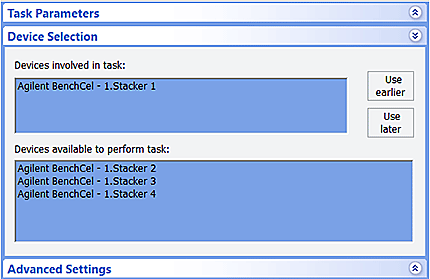
3 Make sure that the Downstack task is configured to use the stacker.
 |
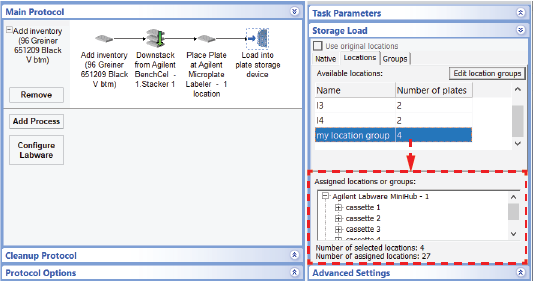
4 When adding the Load task, create a location group:
a Select the Load task.
b Click Storage Load.
c Click the Locations tab.
d Click Edit location groups.
e See Creating and managing location groups for instructions.
f Make sure that the location group is listed in the Available locations area of the Load Task Parameters area.
 |
5 Drag the group into the Assigned locations or groups area.
 |
6 Compile the protocol and resolve any error messages.
7 Run the protocol (click Start).
8 In the Run Configuration dialog box that appears, specify the number of times to run the protocol. Type a number that is equal to or less than the number of labware you want to load into the storage device.
9 Click Finish. The protocol run starts.
10 To confirm that the labware are in the inventory database, open the Inventory Editor. See Opening the Inventory Editor.
Updating the inventory database without barcode readers
If the labware do not have barcode labels, or if the system does not have a barcode reader:
1 Load the labware in a BenchCel labware rack by hand before running the protocol.
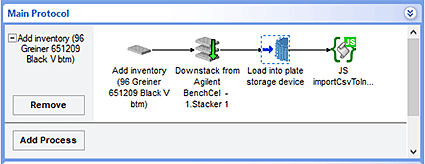
2 Write the protocol described in Loading labware into storage devices and updating the inventory database. You do not need to include the barcode-reading task.
3 Add the importCsvToInventory task at the end of the protocol. For instructions on setting the task parameters, see importCsvToInventory.
 |
4 Compile the protocol and resolve any error messages.
5 Run the protocol (click Start).
6 In the Run Configuration dialog box that appears, specify the number of times to run the protocol. Type a number that is equal to or less than the number of labware you want to load into the storage device.
7 Click Finish. The protocol run starts.
8 To confirm that the labware are in the inventory database, open the Inventory Editor. See Opening the Inventory Editor.
Adding multiple labware by importing a CSV file
You can add the information for a batch of labware by importing a CSV file in the Inventory Editor. Use this method if a large number of labware physically exist in the storage device, and you want to enter the labware information in the inventory database.
CSV file format requirements
The CSV file must be a text file, created in Notepad or equivalent editor, and have the .csv file name extension. The file can be stored anywhere on the computer that runs the VWorks software. However, if you want to store the file in Shared Services storage, make sure that you import the file using the File > Import Misc File command.
Make sure the CSV file meets the following requirements:
• The accepted delimiters are comma, tab, colon, and semicolon.
• The first row contains the header.
• The columns must consist of the following, in the order shown:
Property | Description |
|---|---|
DeviceName | Required column. The name of the device in which the labware resides. Make sure the device name in this column matches the name in the device file. Be sure to include any spaces, underscores, dashes, and capitalization in the name. |
Cassette | Required column. The cassette in which the labware resides. Make sure the cassette number in this column is valid. For example, if the device only has four cassettes, the valid values are 1, 2, 3, and 4. |
Slot | Required column. The slot in which the labware resides. Make sure the slot number in this column is valid. For example, if the cassette only has 5 slots, the valid values are 1, 2, 3, 4, and 5. |
Type | Required column. The type of labware. Make sure the labware type in this column matches the name in the Labware Editor. |
Name | The name of the labware. |
WestBC | The barcode that is on the west side of the labware. |
EastBC | The barcode that is on the east side of the labware. |
SouthBC | The barcode that is on the south side of the labware. |
NorthBC | The barcode that is on the north side of the labware. |
PlateGroup | The plate group to which the labware belongs. |
LocationGroup | The location group to which the labware belongs. |
The following example shows that the columns in the file are separated by commas. In this example, all required and optional columns are specified in the file.
 |
Instead of commas, you can use one of the other delimiters. The following example shows the use of tabs instead of commas to separate the columns. In this example, only the required columns are included.
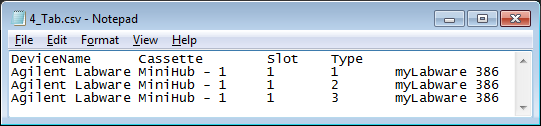 |
Procedure to batch add labware
To add multiple labware by importing a CSV file:
1 Physically load the cassettes of labware into the storage device.
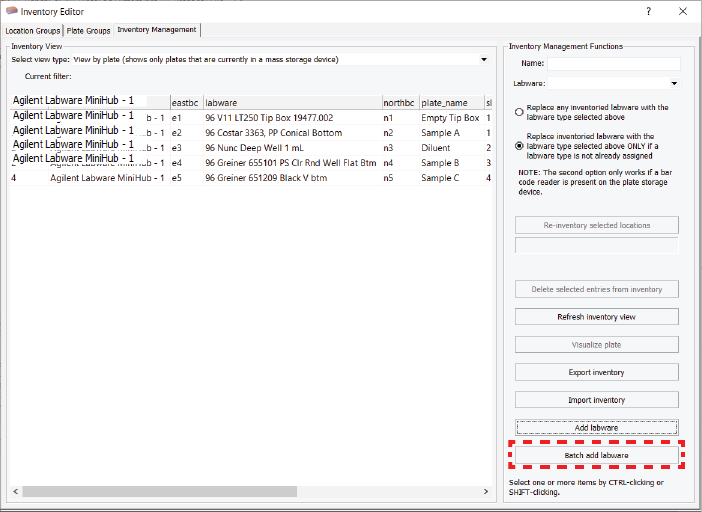
3 Click the Inventory Management tab.
4 Click Batch add labware.
 |
5 In the Batch add labware dialog box that opens, click the  button, and then click one of the following options:
• Browse local storage. The Open dialog box opens. Locate and select the CSV file in the local file system, and then click Open.
• Browse Shared Services storage. The Open File dialog box opens. Locate and select the CSV file in the Shared Services Repository, and then click Open.
 |
6 Select Overwrite all conflicts if an entry already exists in the database and you want to replace it with the data in the CSV file. If you do not select this option, the software will skip the current labware in the CSV file.
7 Click OK to start importing the labware data.
During the import process:
• The software will import each row of data in the CSV file.
• If one of the required columns is missing, the software will halt the import process and display an error message.
• If the storage location is already occupied by a labware:
– The software will overwrite the existing data if you selected Overwrite all conflicts, and record the incident in the Main log.
– The software will skip the current row in the CSV file if you cleared the Overwrite all conflicts check box.
• If a specified device in the CSV file does not exist in the device file, the software will proceed to add the labware information and record the error in the log file.
• If the west-side barcode is not unique, the system will skip the current row in the CSV file and record the incident in the main log.
n to abort.
Adding individual labware in the inventory database
You can add an individual labware entry in the inventory database. Use this method if you want to add a nominal number of labware entries in the inventory database. For example, instead of running a protocol, you can load the labware in the storage device by hand, and then use the Inventory Editor to update the inventory database.
To add an individual labware in the inventory database:
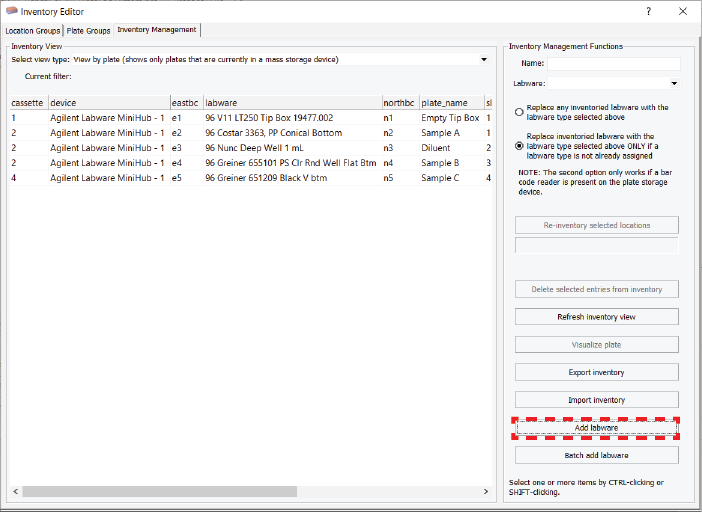
2 Click the Inventory Management tab.
3 Click Add labware.
 |
4 In the Add Labware to Inventory dialog box, set the labware properties:
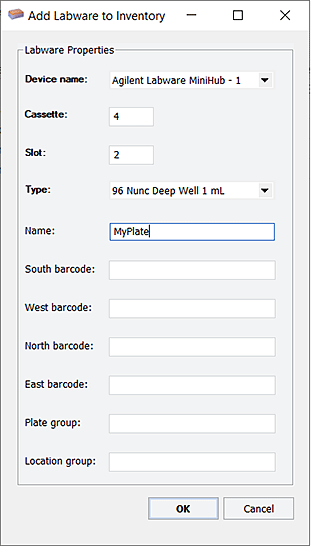 |
Property | Description |
|---|---|
Device name | Required field. The name of the device in which the labware resides. Select the device from the list. |
Cassette | Required field. The cassette in which the labware resides. Type the cassette number. |
Slot | Required field. The slot in which the labware resides. Type the slot number. |
Type | Required field. The type of labware. Select the labware type from the list. Note: During a protocol run, the labware type specified in the process plate parameters area will override the specification in the inventory database. |
Name | The name of the labware. Type a name that identifies the labware. |
South/West/North/East barcode | The barcode associated with the labware. Type or manually scan the barcode to enter it in the box. Be sure to enter the barcode in the appropriate box to indicate the location of the barcode label. For example, if the barcode label is on the south side of the labware, enter the barcode in the South barcode box. |
Plate group | The plate group to which the labware belongs. |
Location group | The location group to which the labware belongs. |
5 When you are finished, click OK to save the changes in the database. The new labware entry appears in the Inventory View.
6 If you have not done so, make sure you physically load the labware in the storage device so that its location matches the information in the database.
Related information
For information about... | See... |
|---|---|
Moving labware out of a storage device | |
Moving labware between storage devices | |
The Load and Unload tasks | |
Exporting the database data |