Configuring a run button and other specialized buttons
Procedure
Note: If you want one control to overlap another control on the form, select the control that you want on top, and then click Bring selected control to front.
To configure the specialized buttons:
1 If the desired button is not yet in the form, click Specialized buttons, and drag the button to the Form Canvas area.
Note: To turn off the autogrid, press ALT while dragging the control into position.
2 In the Form Canvas area, click the button that you are configuring. A resizing box appears around the button’s border. To resize the button, drag one of the sizing handles.
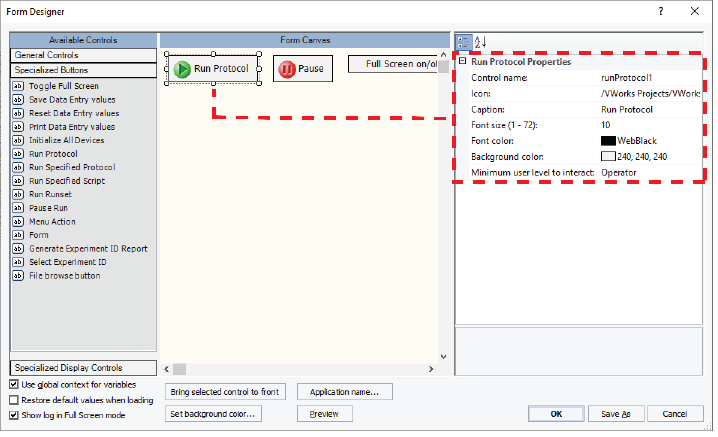
The corresponding properties appear for the selected button as the following figure shows.
Figure Form Designer window displaying properties for the selected button
 |
Note: Click Preview to display the image that the form user will see.
3 Edit the Properties of the button as required.
Note: For the File Browse button, see File browsing control and File Browse button properties.
Properties specialized buttons have in common
Property | Description |
|---|---|
Control name | The descriptive name associated with the control. The Control name does not appear on the form. Use a functionally descriptive name so that references to this control are recognizable in the Main Log and in audit trail reports. For details, see About the naming of form controls. |
Icon | Optional. You may select an image to use as an icon in addition to the button caption. Image files must be imported into the VWorks file storage system before they are available for use in the VWorks software. To use an image in the form: 1 If the image file is not yet in the VWorks file storage, import the image file. See Importing and exporting miscellaneous files. 2 Click the Icon field, and then click the  button that appears. button that appears.3 In the Open File dialog box, locate and select the image file (.jpg, .png, .bmp, or .ico), and then click Open. |
Caption | To change the label that appears on the button, type the new text in the field. |
Font size | Optional. To change the font size for the selected control and subsequently created controls, type a new number in the field. Default: 10 |
Font color, Background color (button) | Optional. To change the font or background color for the selected control and subsequently created controls: 1 Click the field, and then click the 2 In the palette list, select the color, or click Custom Color to open the Select Color dialog box and create a custom color. Default font color: Web Black Default background color: 240, 240, 240 |
Minimum user level to interact | Select the VWorks access level required for this form control. The options are Operator (default), Technician, or Administrator. For example, you would probably set this property to Operator for a Run Protocol button. But you might want to set this property to Technician for a Menu Action button. |
Form button properties
In addition to the properties common to specialized buttons, the Form button has the following properties:
Property | Description |
|---|---|
Form file | To select the form file that this button will open: 1 Click the field, and then click the button that appears.2 In the Open File dialog box, locate and select the .VWform file, and then click Open. |
Form switch | Select the check box if you want the currently open form to close when the user clicks the Form button. Clear the check box if you want both forms to remain open. |
Menu Action button properties
In addition to the properties common to specialized buttons, the Menu Action button has the following property:
Property | Description |
|---|---|
Action | Click the field, and then click the |
The following table lists the Action commands that you can select from.
Menu Action button commands | For details, see… |
|---|---|
• Display Gantt Charts • Labware Editor • Liquid Library Editor • Pipette Technique Editor • System State Editor • Tip State Editor • Configure Labware • Backup, Restore (Backup Manager) • Log Management • Error Library • Inventory Editor • Global Options (Tools > Options) | These commands are also available in the Tools menu of the VWorks window. For a description of the Tools menu commands, see Tools menu. |
• Export (exports the form and all associated files) | The Export command is also available in the File menu. For details on the Export command, see Exporting and importing protocols and associated records. |
• Hit Picking Format wizard–Bravo | This command is also available in the Tools menu of the VWorks window. For a description of the Tools menu commands, see Tools menu. |
• Toggle Watcher | This command is also available in the Tools menu as Watcher is OFF, Watcher is ON. For details, see Setting up and using the Watcher tool. |
• Diagnostics | Opens device diagnostics for the loaded device file. This command is also available in the Control toolbar. |
• Experiments Editor • Experiments Archive • Add Experiment Note | Experiments database only. See Menu Action buttons for the Experiments Editor. |
Run Protocol button properties
The Run Protocol button  opens the Run Configuration Wizard for the protocol. This button is available only if the protocol is open and no run is currently in progress.
opens the Run Configuration Wizard for the protocol. This button is available only if the protocol is open and no run is currently in progress.In addition to setting the properties common to specialized buttons, use the following procedure for the Run Protocol button  to link the form to the protocol.
to link the form to the protocol.To link the form to the protocol:
1 In the VWorks window, open the protocol, and click Protocol Options.
2 Under Properties, set the following properties.
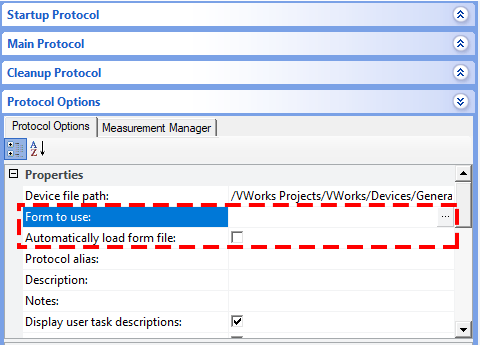 |
a Click the Form to use field, and then click the button that appears.
button that appears. b In the Open File dialog box, locate and select the form file that you are creating. (.VWForm), and then click Open.
c In the Automatically load form file field:
• Ensure the check box is selected (default) if the form should open automatically anytime the protocol is opened.
• Clear the check box if the form should not open automatically when the protocol is opened.
Run Runset button properties
The Run Runset button 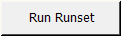 starts the specified runset. The Run Configuration Wizard does not appear in this case.
starts the specified runset. The Run Configuration Wizard does not appear in this case.In addition to the properties common to specialized buttons, the Run Runset button has the following property:
has the following property:Property | Description |
|---|---|
Runset file | To select the runset that this form will run: 1 Click the field, and then click the button that appears.2 In the Open File dialog box, locate and select the .rst file, and then click Open. |
When configuring the Run Runset button , make sure you select the Use global context for variables check box in the Form Designer window.
, make sure you select the Use global context for variables check box in the Form Designer window. If you want the JavaScript variables used by the form controls to interact with variables in the protocols, ensure that the Use global context for this protocol check box is selected in the Protocol Options for each protocol.
If one of the protocols uses its own private context (the Use global context for this protocol check box is not selected), you can include a getGlobalObject() JavaScript call in each case where a variable in the protocol must read from, or write to, one of the variables used by the form. For details, see VWorks-defined functions.
Run Specified Protocol button properties
The Run Specified Protocol button 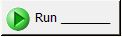 starts the run for the specified protocol immediately without displaying the Run Configuration Wizard, unless the button properties specify a script for prerun checks. If a script for prerun checks is specified, the checks are performed before the protocol runs. In this case, the button is grayed the instant it is pressed, and remains grayed until either the checks fail or the protocol completes.
starts the run for the specified protocol immediately without displaying the Run Configuration Wizard, unless the button properties specify a script for prerun checks. If a script for prerun checks is specified, the checks are performed before the protocol runs. In this case, the button is grayed the instant it is pressed, and remains grayed until either the checks fail or the protocol completes.In addition to the properties common to specialized buttons, the Run Specified Protocol button has the following properties:
has the following properties: Property | Description |
|---|---|
Protocol file | To select the protocol that this form will run: 1 Click the field, and then click the  button that appears. button that appears.2 In the Open File dialog box, locate and select the .pro file, and then click Open. |
Number of times to run | Type the number of times the protocol will run after the form user clicks the run button. |
Script for pre-run checks | Specify a script only if you want to perform prerun checks before the protocol starts. To enter the script that this button will run: 1 Click the field, and then click the button that appears.2 In the Input Text dialog box, type the JavaScript code in the box. Alternatively, click Browse. In the Open File dialog box, select a file that contains the JavaScript code, and then click Open. 3 Click OK to close the Input Text dialog box. 4 Specify the JavaScript variable for pre-run check property. |
JavaScript variable for pre-run check | Type the name of the variable that contains the result of the prerun checks specified in the Script for pre-run checks property. For example, if this variable name is goOrNoGo, the script might be as follows: \var goOrNoGo = false; if (all checks pass) goOrNoGo = true; else Notify user of failure. When the Run Specified Protocol button is pressed, the prerun checks would be performed. If the checks failed, the form’s user would be notified of the failure. If the checks passed, the protocol would start. |
Run Specified Script button properties
The Run Specified Script button  runs the specified JavaScript code.
runs the specified JavaScript code.Alternatively, you can specify a script for prerun checks in the Run Specified Protocol button properties.
properties.In addition to the properties common to specialized buttons, the Run Specified Script button has the following property:
Property | Description |
|---|---|
Script | To enter the script that this button will run: 1 Click the field, and then click the button that appears.2 In the Input Text dialog box, type the JavaScript code in the box. Alternatively, click Browse. In the Open File dialog box, select a file that contains the JavaScript code, and then click Open. 3 Click OK to close the Input Text dialog box. |
Related information
For information about... | See... |
|---|---|
Workflow for creating or editing a form | |
Forms and Form Designer overview | |
Controls under General Controls in the Form Designer window | |
Controls under Specialized Display Controls in the Form Designer window | |
Form properties in the Form Designer window | |
Creating a basic protocol |