Hit Pick Replication (Agilent Bravo)
Description
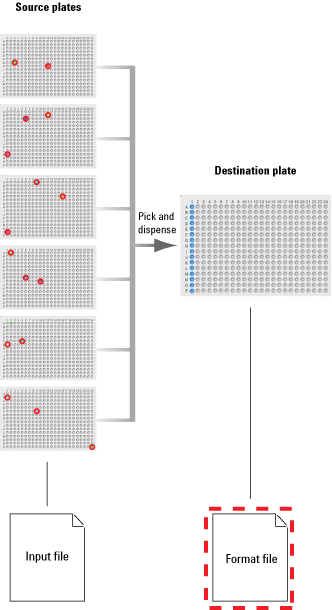
The Hit Pick Replication (Agilent Bravo) ( ) task allows you to:
) task allows you to:• Hit pick, or transfer contents, from selected wells in a source microplate to a destination microplate.
• Replicate a microplate by transferring contents from a source microplate into multiple destination microplates.
Task is available for... | Task is available in... |
|---|---|
Bravo Platform | Main Protocol, Bravo Subprocess |
Workflow
The following table presents the steps for using the Hit Pick Replication task.
Step | For this task... | See... |
|---|---|---|
1 | Set up labware on the Bravo deck. | |
2 | Create an input file. | |
3 | Optional. Import the input file. The input file can be stored in the local file system or imported into Shared Services storage. You specify the input file location in Protocol Options. | |
4 | Create the protocol. | |
5 | Add the Hit Pick Replication task, and select or create a format file. | |
6 | Verify source-destination transfers. |
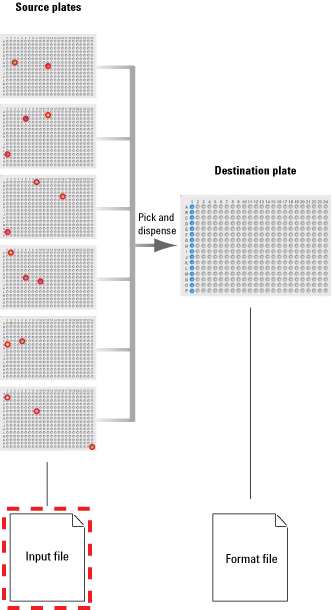
Setting up labware on the Bravo deck
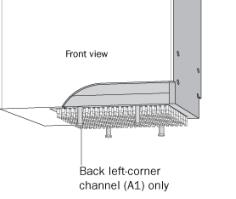
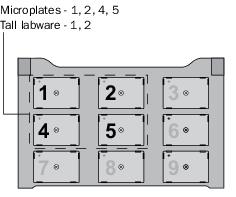
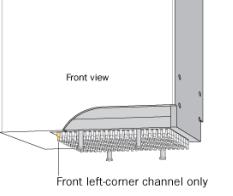
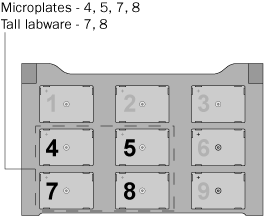
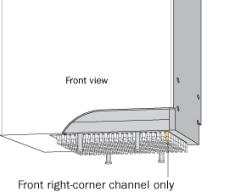
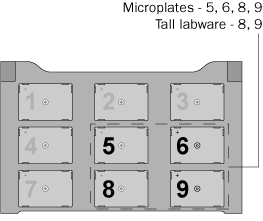
For hit-picking transfers, the deck locations you can access depends on the pipette head channel you select. In addition, because tip boxes and reservoirs are tall, you must consider the locations of the these labware relative to the source and destination microplates.
The following table shows the channel selection and corresponding deck location limits for both microplates and tall labware. Use this information when setting up labware for the hit-picking task.
For example, if you select the A1 channel, you can place microplates at locations 1, 2, 4, and 5. If you have tall labware, such as a tip box and a reservoir, place them at locations 1 and 2. Doing so permits the pipette head to access the microplates at locations 4 and 5 without colliding with the tall labware.
Pipette channel selection | Accessible deck locations |
|---|---|
 |  |
 |  |
 |  |
 |  |
Creating input files
Both the hit-picking and microplate replication tasks require an input file. An input file contains information about the source microplates.
 |
You must have the required input file before adding the Hit Pick Replication task or before you start the protocol run. The input file can be from a LIMS or created manually. The file must meet the following requirements:
• The file must be in the comma-separated value (CSV) format.
• The file can contain a heading in the first row, or the first few consecutive rows.
• Microplate replication. The input file must contain a column that lists source microplate barcodes or IDs.
• Hit picking. The input file must contain the following columns, in any order:
– Source microplate barcode or ID
– Well locations (in a single column or across two columns)
– Variable dilution factors (if dilution series will be created)
– Transfer-volume information (if variable-volume transfer is desired)
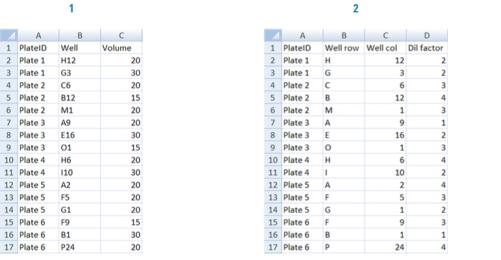
The following examples show two input files (1 and 2) displayed in Microsoft Excel. The heading is in the first row in both files. Microplate IDs are used instead of barcodes. Notice that the well locations are displayed differently in the two files. The file on the right (2) also contains dilution factor information.
 |
The input file can be stored in the local file system or you can import the file into Shared Services storage. To import the input file, see Importing and exporting miscellaneous files. To use Shared Services storage, ensure that you select the Use Shared Services storage property in Protocol Options. For details, see Setting protocol options.
Adding the Hit Pick Replication task
When you add the Hit Pick Replication (Agilent Bravo) task, the software automatically starts the Hit Pick Routine Wizard.
In the Hit Pick Routine Wizard:
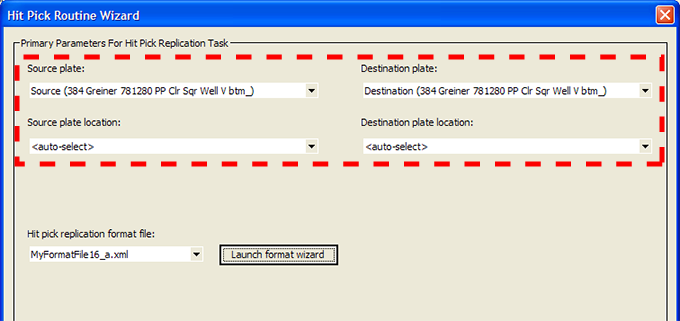
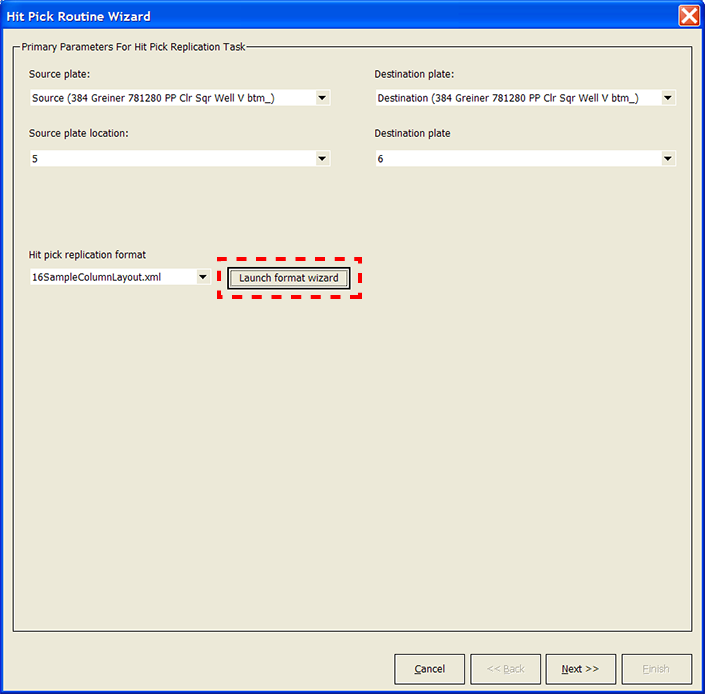
1 Select the source and destination microplates and their locations.
When setting up hit-picking transfers, make sure the source microplate and destination microplate are at one of the accessible deck locations. See Setting up labware on the Bravo deck.
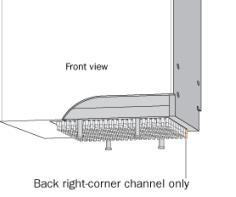
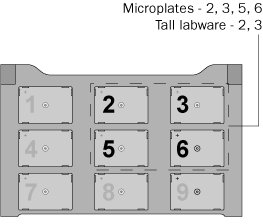
For example, if you are using the A24 (back right-corner channel) pipette-tip channel for hit picking, the accessible deck locations are 2, 3, 5, and 6. If the source microplate will be at deck location 5 and the destination microplate will be at deck location 6, you must provide this information on the first page of the Hit Pick Routine Wizard as shown.
 |
2 Do one of the following:
• Select an existing format file from the Hit pick replication format list.
• Click Launch format wizard to create a new format file. See Creating format files for detailed instructions.
 |
When you are finished, click Next.
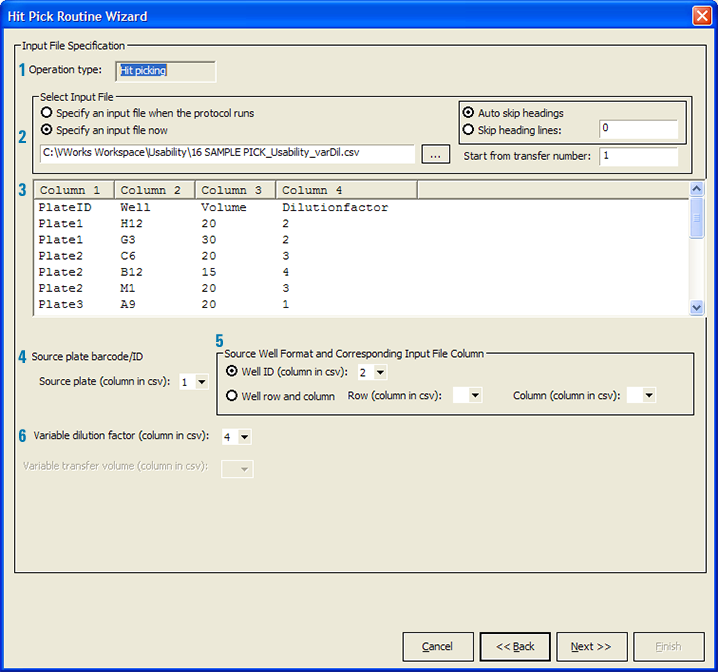
3 Supply the input file information. If you do not have an input file, see Creating input files.
 |
Item | Input file specification | Description |
|---|---|---|
1 | Operation type | Displays the type of operation: Hit picking, or replication. The selection is made in the format file and cannot be changed on this page. For information about the format file, see Creating format files. |
2 | Select input file | Allows you to select one of the following: • Specify an input file when the protocol runs • Specify an input file now If you select Specify an input file now, use the browse button to locate and select the desired input file. The list of available files includes only the files (.csv) in the local file system or only files in Shared Services storage depending on how you set the Use Shared Services storage property in Protocol Options. For details, see Setting protocol options. |
In either case, you can select one of the following: • Auto skip heading. Enables the software to automatically find and skip rows that contain heading information. • Skip heading lines. Skips the specified number of rows at the top of the input file. Select this option if you want to manually specify the number of heading rows. | ||
In addition, you can specify the row to start the transfer from in the Start from transfer number box. 1 indicates starting the first transfer from the first row after the heading rows. | ||
3 | Input file contents | Displays the contents of the input file. |
4 | Source plate barcode/ID | Allows you to select the column that contains the source plate barcode or ID. |
5 | Source well format and corresponding input file column | Hit-picking only. Allows you to indicate whether the well location is specified as: • Well ID. The well location is in a single column (for example, A24). Select the column that contains the well ID. • Well row and column. The well location is in two columns. Select the columns that contain the well row and well column information. The row information can be a letter or a number. |
6 | Variable dilution factor and Variable transfer volume | Hit-picking only. Allows you to select the column that contains the dilution factors and transfer volume. |
When you are finished, click Next.
7 Specify the Aspirate and Dispense task parameters. For detailed parameter descriptions, see Aspirate (Agilent Bravo) and Dispense (Agilent Bravo).
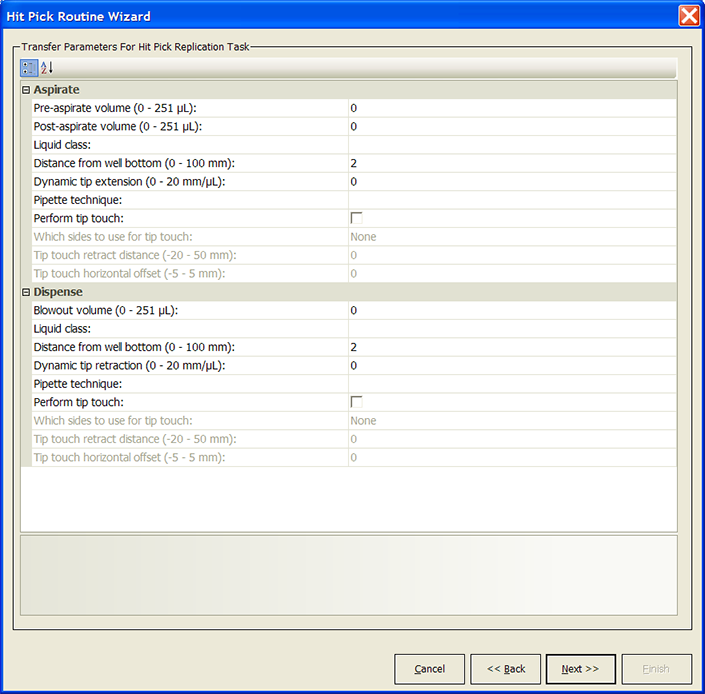 |
When you are finished, click Next.
8 Select additional operations, if applicable.
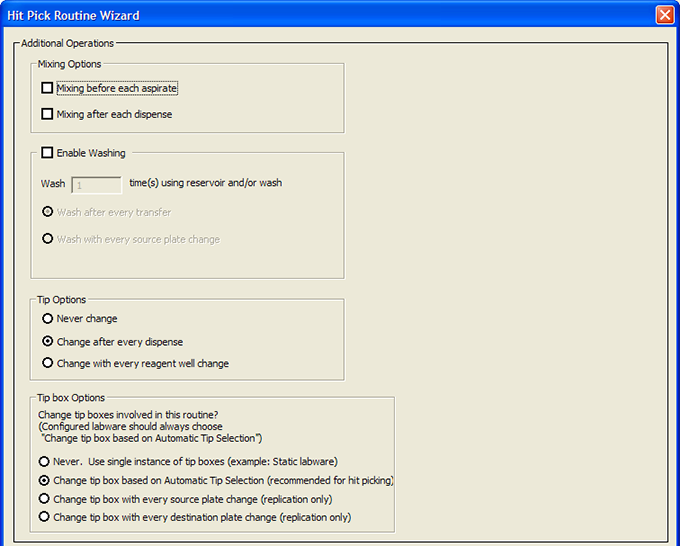 |
Additional operation | Description |
|---|---|
Mixing Options | Select where you want to add a Mix task: • Before each aspirate task • After each dispense task You will need to set the Mix parameters later in the wizard. If you do not want to mix, clear both check boxes. |
Enable Washing | Select the check box if you want to add one or more Wash Tips tasks. You can specify the number of tip washes and whether you want to: • Wash after every transfer • Wash with every source microplate change Note: This option only works with an autofilling wash station, for example, a microwash reservoir or tip wash station. You will need to set the Wash Tips parameters later in the wizard. Clear the check box if you do not want to add any Wash Tips tasks. |
Tip Options | Select the tip-change option: • Never change. Does not change the tips within the hit-picking routine. Note: If you select Never change, you must add the Set Head Mode, Tips On, and Tips Off tasks in the subprocess, outside of the hit-picking routine, after you are finished with the wizard. 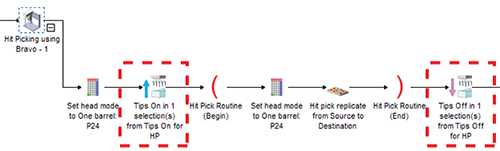 • Change after every dispense. Changes the tips after every dispense within the hit-picking routine. • Change with every source well change. Changes the tips after every source well change during the hit-picking routine. |
Tip Box Options | Select when to change the tip box: • Never. Use single instance of tip boxes (example: Static labware). Does not change the tip box within the hit-picking routine. • Change tip box based on Automatic Tip Selection (recommended for hit picking). Uses tip-tracking within the hit-picking routine, and changes the tip box when the box is fully used. Select this option if the tip boxes you are using for hit-picking are configured labware. Note: Tip-tracking continues in the Dilute to Final Volume routine. • Change tip box with every source plate change (replication only). Changes the tip box every time the source microplate changes. This option is available only when a replication format file is selected. • Change tip box with every destination plate change (replication only). Changes the tip box every time the destination microplate changes. This option is available only when a replication format file is selected. |
When you are finished, click Next.
9 Select the pipette channels to use. For a description of the selections, see Set Head Mode (Agilent Bravo).
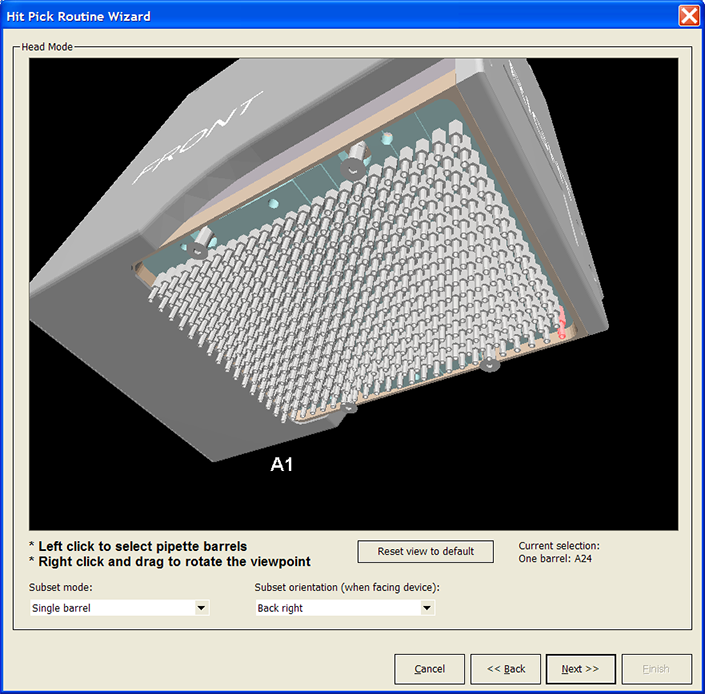 |
When you are finished, click Next.
10 If you selected mixing options in step 8. Set the mixing parameters. For a description of the parameters, see Mix (Agilent Bravo).
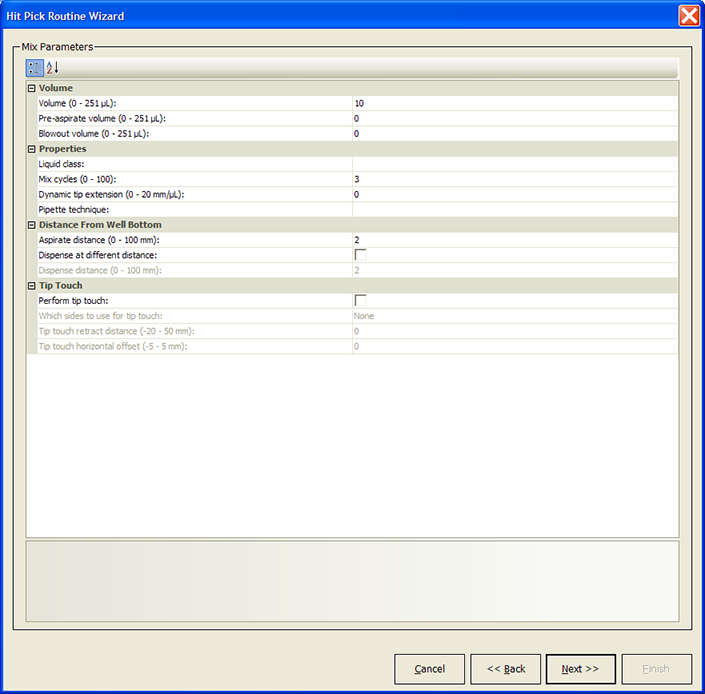 |
When you are finished, click Next.
a In the Wash In area, select the type of labware to be used for the wash task:
– MicroWash Reservoir (wash station). Adds Wash Tips tasks and will use either configured or static labware.
– A microplate or standard reservoir. Adds Mix tasks.
b In the Wash plate list, select the desired labware and location.
c Set wash-tip parameters. For a description of the parameters, see Wash Tips (Agilent Bravo).
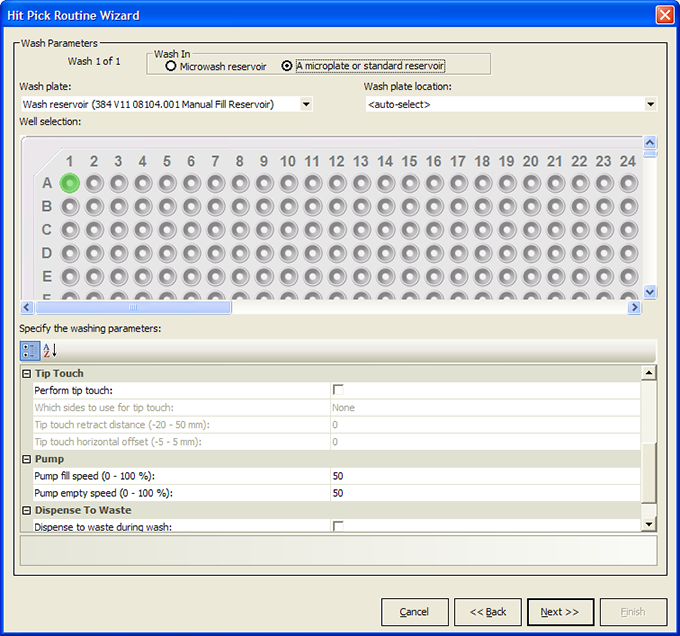 |
When you are finished, click Next.
a Select the tip boxes you want to use.
b Select the tip-tracking options you want to use:
– Allow automatic tracking of tip usage. Allows the software to track pipette tip usage during the protocol run or across different protocol runs. If you select the option in this task, you must also select the option in the Tips Off task. In general, use the default selections displayed.
– Mark tips as used. The option to use only new pipette tips during the protocol run. Select the option so that the software counts the number of tips used during the protocol run. The tips that have been used once are marked as used so that they cannot be reused. Clear the check box so that during the next Tips On task, the same tips can be reused. In general, use the default selections displayed.
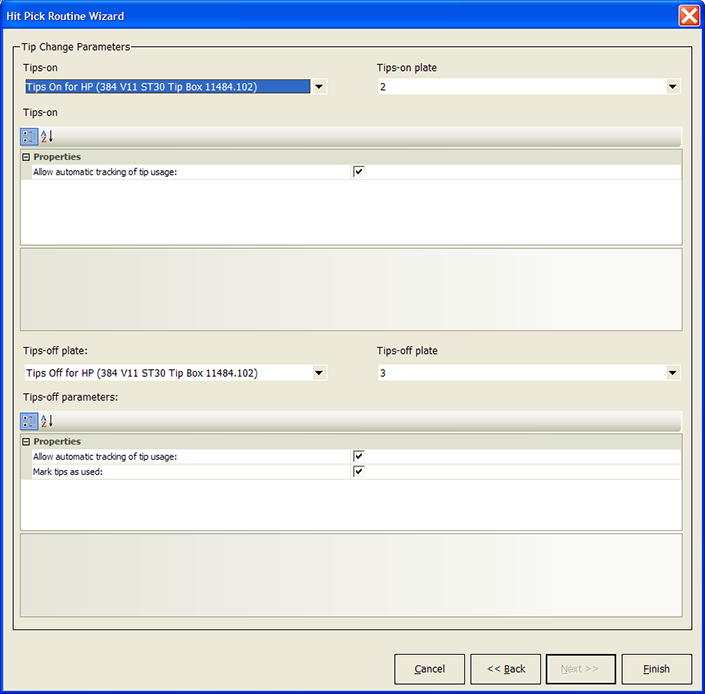 |
13 Click Finish.
Based on the information you provide in the wizard, the software adds the Aspirate, Dispense, Mix, Wash Tips, and other tasks that are necessary to produce the desired hit-picking or replication results.
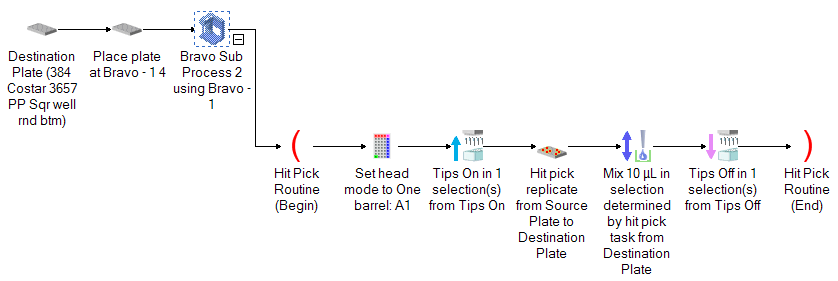 |
Notice the following:
• The Hit Pick Routine (Begin) and Hit Pick Routine (End) tasks mark the beginning and end of the microplate-replication or hit-picking tasks.
• You can modify any of the task parameters directly in the Task Parameters area.
• You can add more tasks to or delete tasks from the routine.
• You can return to the Hit Pick Routine Wizard. To do this, select either the Hit Pick Routine (Begin) or Hit Pick Routine (End) task. In the Task Parameters area, click Launch hit pick routine wizard.
Creating format files
About format files
For both microplate replication and hit picking, you are required to use a format file. The format file shows the dispense pattern in destination microplates.
 |
Workflow
You use the Hit Pick Replication Format Wizard to create the format file. You can access the wizard when you add the Hit Pick Replication task. The overall workflow for creating the format file is:
Step | For this task... | See... |
|---|---|---|
1 | Create the format file. | |
2 | Add contents to the format file for one of the following: • Hit picking, and dilution series (if desired) • Replication | One of the following: |
Creating new format files
To create a new format file:
1 On the first page of the Hit Pick Routine Wizard, click Launch format wizard.
 |
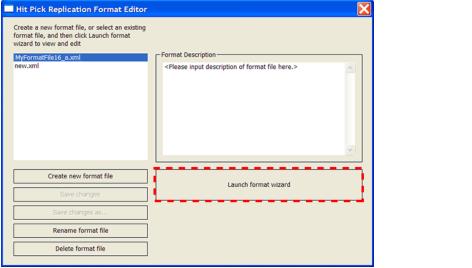
The Hit Pick Replication Format Editor opens.
2 Click Create new format file, type a name for the file in the prompt dialog box, and then click OK. The new format file name appears in the list.
 |
The software saves the format file in XML format in a folder path that is set when the software is installed, for example:
/VWorks Projects/VWorks/Pipetting/Hit Pick Format Files/
The file path of the storage location is displayed in the Options dialog box. For details, see Viewing and setting file directory paths.
Adding hit-picking information in the format file
To add hit picking information in the format file:
1 In the Hit Pick Replication Format Editor, make sure the format file name is selected, and then click Launch format wizard.
 |
The Hit Pick Replication Format Wizard opens.
2 On the first page of the wizard:
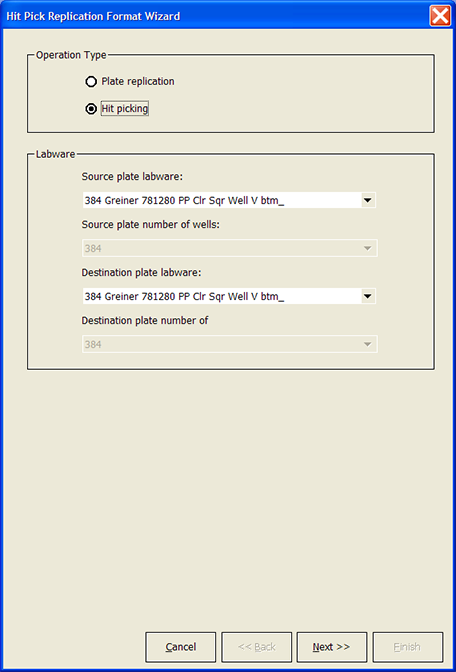 |
a In the Operation Type area, select Hit picking.
b In the Labware area, select the Source plate labware and the Destination plate labware.
c Click Next.
3 On the dispense information page:
 |
a In the Dispense Pattern area, select one of the following dispense methods:
– Row-wise
– Column-wise
b In the Dispense Properties area, type the number of Replicates per source well, if applicable.
c In the destination plate graphic, select the wells into which the source contents will be dispensed. Click a well to individually select or clear the well. Alternatively, right-click a desired well and select a command from the menu that appears.
d Click Next.
4 On the dilution series page:
a In the Dilution Series area, select one of the following:
– Yes. If you select Yes, you must supply additional information about the dilution series.
 |
Dilution selection or parameter | Description |
|---|---|
Dilution in adjacent wells | Dispenses the dilution in adjacent wells before replicating the same series, as the following example shows. Notice that the dispense pattern is row-wise. 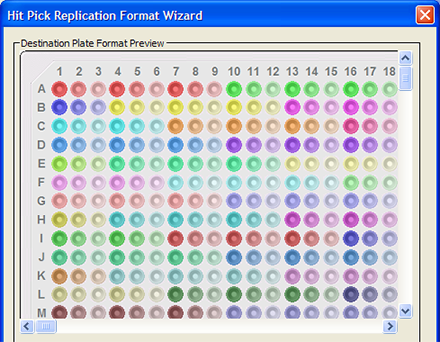 |
Replications in adjacent wells | Dispenses the replicates in adjacent wells before continuing the dilution series, as the following example shows. Notice that the dispense pattern is row-wise.  |
Number of dilutions | Specifies the number of dilutions to perform. A value of 1 means no dilution is performed. |
Dilution factor | Uses the specified dilution factor: • Constant. The same dilution factor is used throughout the process. Type the factor to use in the box. For example, a factor of 1:2 dilutes the starting concentration by one-half. If the number of dilutions is 3, then the concentrations in the series are 1, 1:2, and 1:4. • Variable (from input file). Different factors are used during the process. The factors are specified in the input file. |
Stock concentration | Specifies the concentration of the stock solution. |
Starting concentration | Specifies the concentration of the starting concentration. |
Final volume | Specifies the concentration of the final volume in each well. The software will use this value to calculate the volume for prefilling or backfilling. See Dilute to Final Volume (Agilent Bravo). |
– No. If you select No, you must select the type of volume transfer.
 |
Dilution selection or parameter | Description |
|---|---|
Constant transfer volume | Uses the same transfer volume throughout the process. |
Variable transfer volume | Uses different transfer volumes during the process. The volumes are specified in the input file. |
b Click Next.
 |
a Select whether you want to backfill or prefill the destination microplate. If you select Yes, you must supply additional information. If you select No, you can proceed to step d.
b Select the reagent microplate to use for the backfilling or prefilling process.
c Select whether the transfer will be from one of the following:
– Single location in a reservoir. Some reservoir designs might limit the pipette’s access. You can allow the software to determine how to access the reservoir, based on the labware definition. To do this, select VWorks will choose selection from reservoir. Alternatively, you can clear the check box and manually select the access point in the reservoir, using the microplate graphic displayed. The wells in the microplate represent different access points in the reservoir.
– Multiple locations in a plate. If the transfer will be from a microplate, you can select the wells from which to aspirate. In addition, you can specify a constant reagent volume, or indicate that the reagent volume information will be obtained from a database.
d Click Next.
6 On the destination plate preview page, confirm that the dispense pattern is correct.
Note: The dispense pattern shown on the screen is a preview of the first destination microplate only. To check the mapping in all of the destination microplates, compile the protocol, and then view the output files. Alternatively, you can check the Pipette Log after running the protocol in simulation mode. For more information about output files and the Pipette Log, see Verifying source-destination transfers.
 |
When you are done, click Finish.
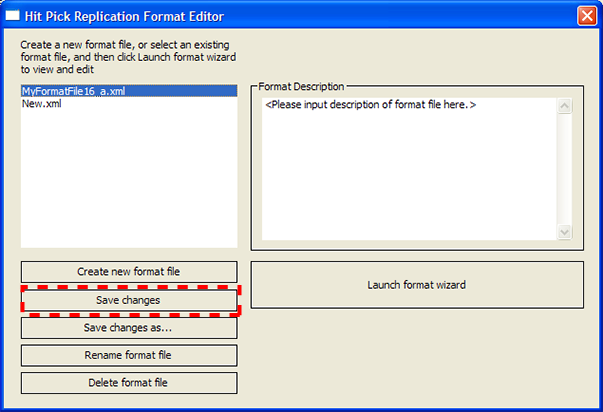
7 Back in the Hit Pick Replication Format Editor, make sure the correct format file name is selected, and then click Save changes. If you altered an existing format file, you can click Save changes as to save it as a different file.
 |
8 Click the close button (  ) at the top right corner of the dialog box to return to the Hit Pick Routine Wizard. To continue in the Hit Pick Routine Wizard, return to step 3 in Adding the Hit Pick Replication task.
) at the top right corner of the dialog box to return to the Hit Pick Routine Wizard. To continue in the Hit Pick Routine Wizard, return to step 3 in Adding the Hit Pick Replication task.Adding replication information in the format file
To add replication information in the format file:
1 In the Hit Pick Replication Format Editor, make sure the format file name is selected, and then click Launch format wizard.
 |
The Hit Pick Replication Format Wizard opens.
2 On the first page of the wizard:
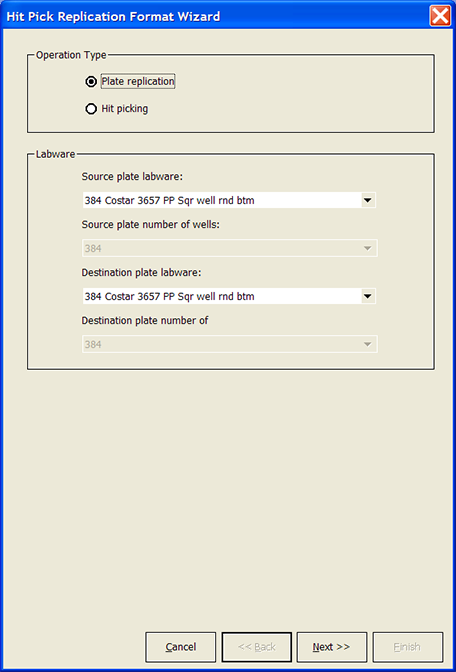 |
a In the Operation Type area, select Plate replication.
b In the Labware area, select the Source plate labware and the Destination plate labware.
c Click Next.
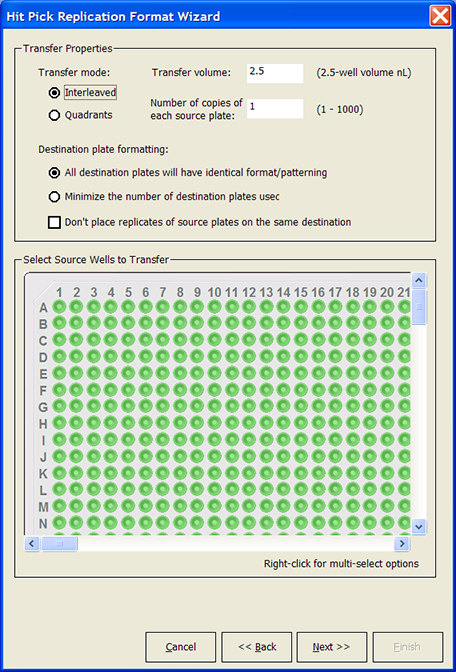
3 On the transfer page, select the Transfer mode.
 |
Transfer mode | Description |
|---|---|
Interleaved | Contents of corresponding wells from different source microplates are placed consecutively in the destination microplate. For example, if you are transferring contents from four 384-well source microplates into a 1536-well destination microplate, the Interleaved transfer would result in the following destination microplate layout: 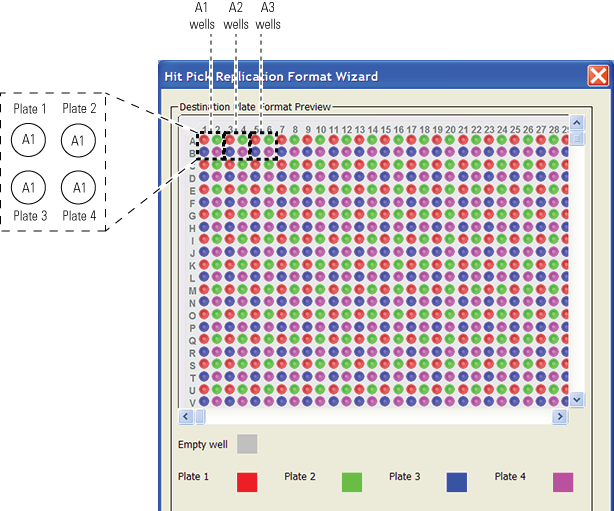 |
Quadrants | Contents from different source microplates are placed in quadrants of the destination microplate. For example, if you are transferring contents from four 384-well source microplates into a 1536-well microplate, the Quadrant transfer will result in the following destination microplate layout: 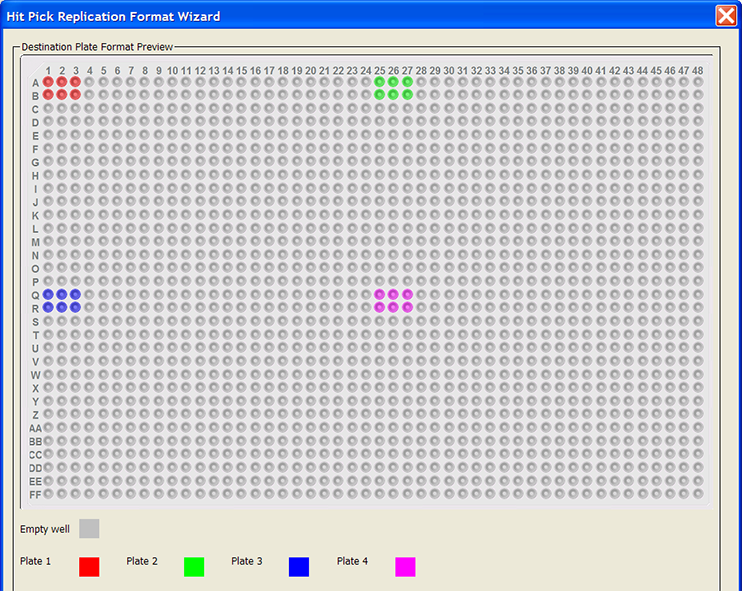 |
4 Type the volume to transfer from each source microplate well.
5 Type the number of copies you want to transfer from the source microplate.
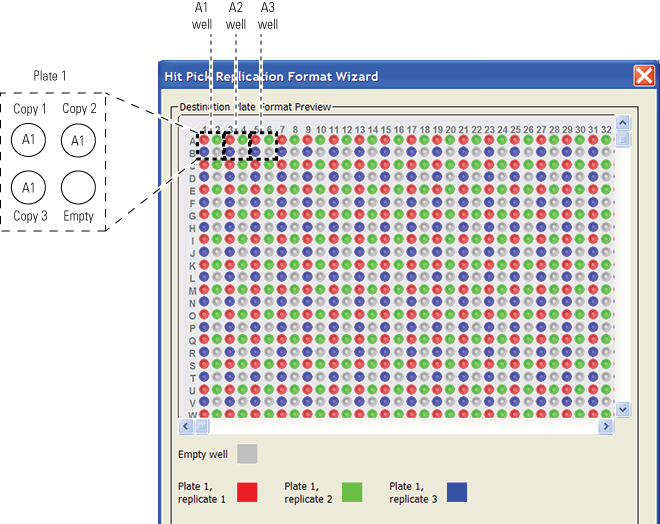
For example, if you are transferring three copies of the contents from a 384-well source microplate into a 1536-well destination microplate, the Interleaved transfer will result in the following destination microplate layout. Notice that the wells in the fourth quadrant remain empty.
 |
6 Select the destination microplate format:
Transfer mode | Description |
|---|---|
All destination plates will have identical format/patterning | All destination microplates will look identical. The layout of the destination microplate depends on the format of the source microplate, the number of copies you want to transfer, the total number of source microplates, and other selections in the wizard. For example, suppose you want to transfer contents from five 384-well source microplates into one or more 1536-well destination microplates. One 1536-well microplate can only accommodate contents from four 384-well microplates. To maintain the same layout across all of the destination microplates, five destination microplates will be used. The contents from each source microplate are transferred to one 1536-well destination microplate. Note: In the example, five destination microplates are used. 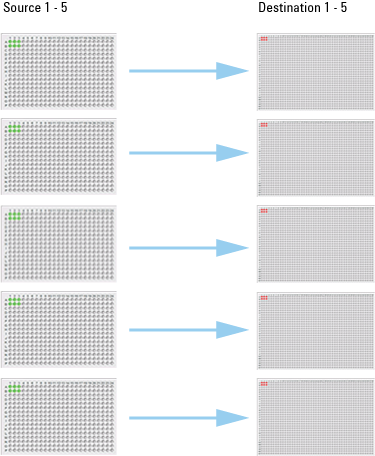 |
Minimize the number of destination plates used | The destination microplate will contain as many source contents as allowable to minimize the number of destination microplates used. For example, suppose you want to transfer contents from five 384-well source microplates into one or more 1536-well destination microplates. One 1536-well microplate can accommodate contents from four 384-well microplates. The contents from the fifth source microplate will be transferred into a second 1536-well destination microplate. Note: In this example, only two destination microplates are used. 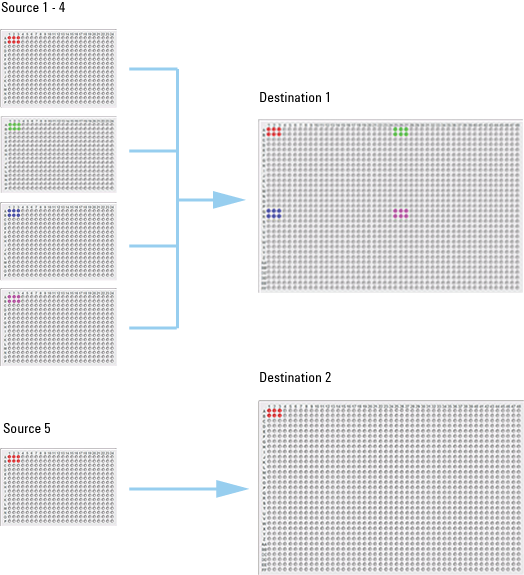 |
7 Select Don’t place replicates of the source plates on the same destination if you want to place replicates in different destination microplates. Do not select the option if you want to place replicates in the same destination microplate.
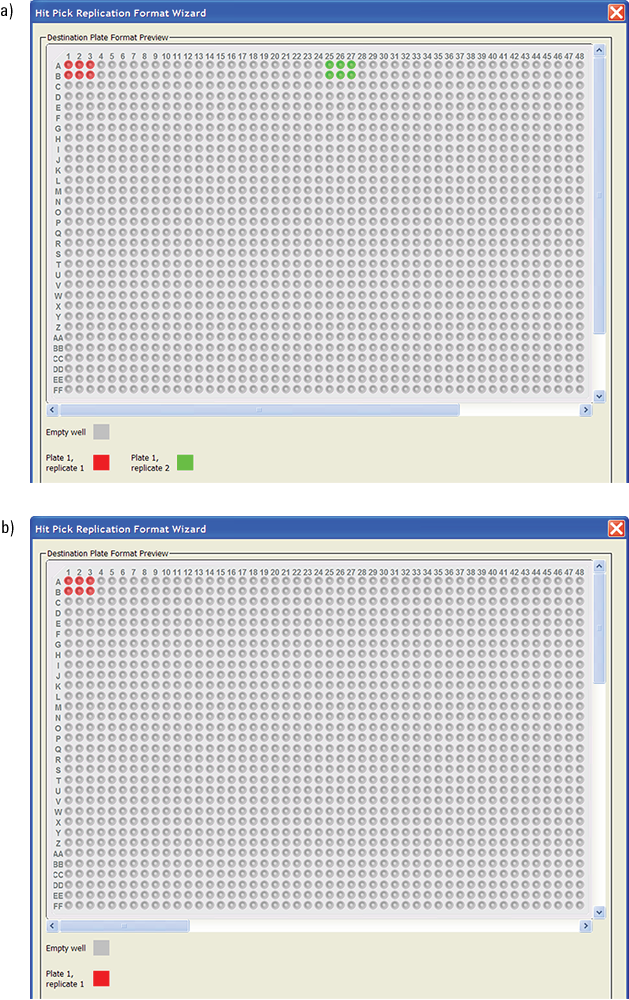
In the following example, the Quadrant transfer mode is used and the All destination plates will have identical format/patterning option is selected. Two replicates are requested from each source microplate.
In example a, the two replicates are placed in the same destination microplate. In example b, only one copy is placed in each destination microplate.
 |
8 In the Select Source Wells to Transfer area, select the source wells from which to transfer the contents.
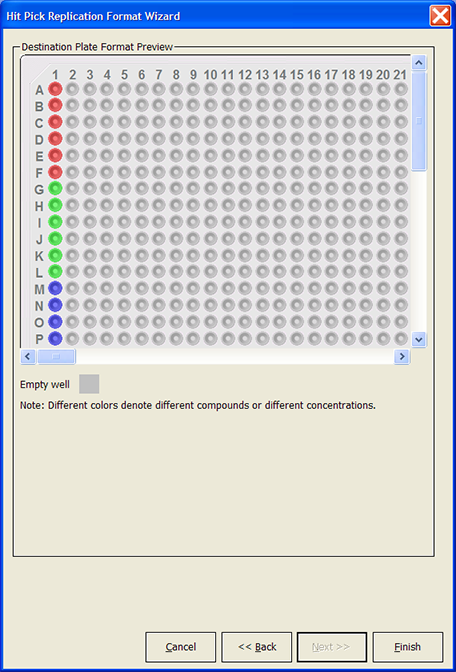
9 Click Next to preview the layout of the first destination microplate. The wells are color coded so you can see the replication pattern in the microplate.
To see the layout of all of the destination microplates, compile the protocol and check the output file. Alternatively, you can run the protocol in simulation mode and check the Pipette Log. For more information, see Verifying source-destination transfers.
Note that the layout shown in the preview might differ from the actual layout at run time if:
• The destination microplate has more wells than the source microplate.
• More than four source microplates will be processed during the run.
• You have cleared the Don't place replicates of source plates on the same destination check box in step step 7.
|
When you are done, click Finish.
10 Back in the Hit Pick Replication Format Editor, make sure the correct format file name is selected, and then click Save changes. If you altered an existing format file, you can click Save changes as to save it as a different file.
|
11 Click the close button ( ) at the top right corner of the dialog box to return to the Hit Pick Routine Wizard. To continue in the Hit Pick Routine Wizard, return to step 3 in Adding the Hit Pick Replication task.
) at the top right corner of the dialog box to return to the Hit Pick Routine Wizard. To continue in the Hit Pick Routine Wizard, return to step 3 in Adding the Hit Pick Replication task.Verifying source-destination transfers
Before you start an actual run, you can verify that the source-destination transfers are correct using either output files or the Pipette Log.
Using output files
Compile your protocol to generate output files. The files list source-destination transfers by well and show the volume transferred. One output file is generated per source-destination microplate combination. For example, if contents from Source 1 are transferred to Destinations 1 and 2, then two output files are created, one for Source 1/Destination 1, and another for Source 1/Destination 2.
The following example shows an output file displayed in Excel. The first row shows the source and microplate IDs. Subsequent rows show the source wells, the corresponding destination wells, and the volume transferred.
 |
Output files are in the CSV format. You set the directory for the hitpick output files in the Options dialog box, for example:
...\VWorks Workspace\VWorks\Hit Picking\Output Files\
For details, see Viewing and setting file directory paths.
Using the Pipette Log
Run your protocol in simulation mode and check the Pipette Log in the log area. The Pipette Log records every pipetting event that occurs, including aspirate location, dispense location, and volume information. For details, see Pipette Log contents.
Related information
For information about... | See... |
|---|---|
Adding devices | • Device user guide |
Creating a protocol | |
Adding tasks in a protocol | |
Dilute to Final Volume task | |
Aspirate task | |
Dispense task | |
Mix task | |
Pipette Log | |
Microplate-handling tasks | |
Microplate-storage tasks | |
Scheduling tasks |